Remote Shoe Adjust Factory Calibration
Proceed to the Remote Shoe Adjust Factory Calibration (OP5) or contact your dealer:
IMPORTANT:
Prior to carry out the factory procedure, make sure that Armrest Control Unit Diagnostic Address C03-132 is correctly set (see "Machine Setting Procedure" in this section).
- In case an actuator, an element (chaffer, sieve or precleaner) or a control unit has been replaced.
- In case the position of your element (chaffer, sieve or precleaner) and display do not match and the user calibration did not fix the problem.
|
|
|
|
OUZXMAG,00018BB -19-11OCT02-1/19
|
Remote Shoe Adjust Factory Calibration - Chaffer (OP5)
Turn the key switch to the run position.
Set chaffer element to 5 mm (0.2 in.) opening.
IMPORTANT:
It is essential that the chaffer is opened to a position of 5 mm (0.2 in.) starting with a smaller value. The right and left sides MUST match!
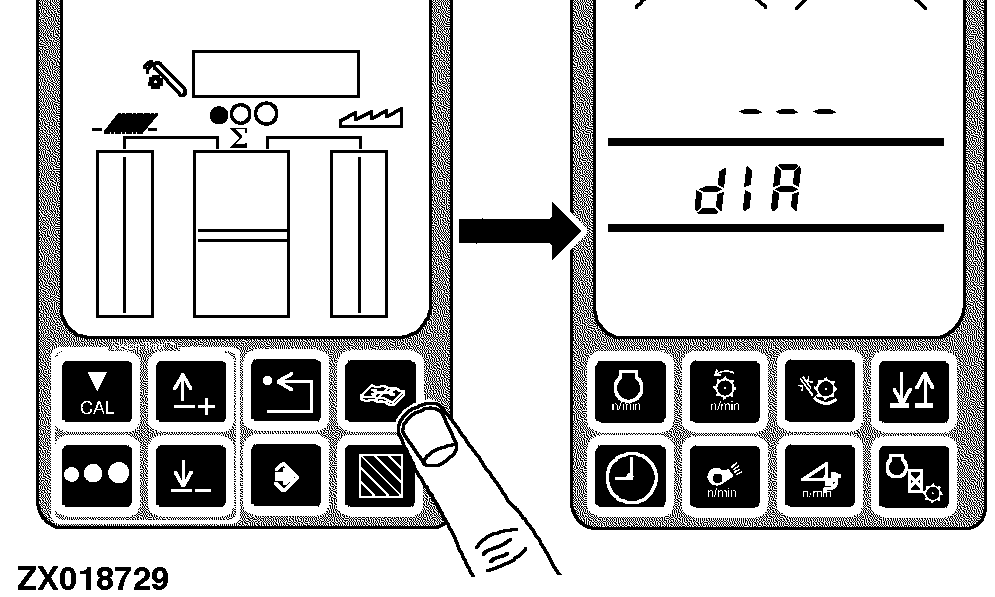
Press the diagnostic switch. dIA will appear on the triple display tachometer.
|
|
|
|
OUZXMAG,00018BB -19-11OCT02-2/19
|
|
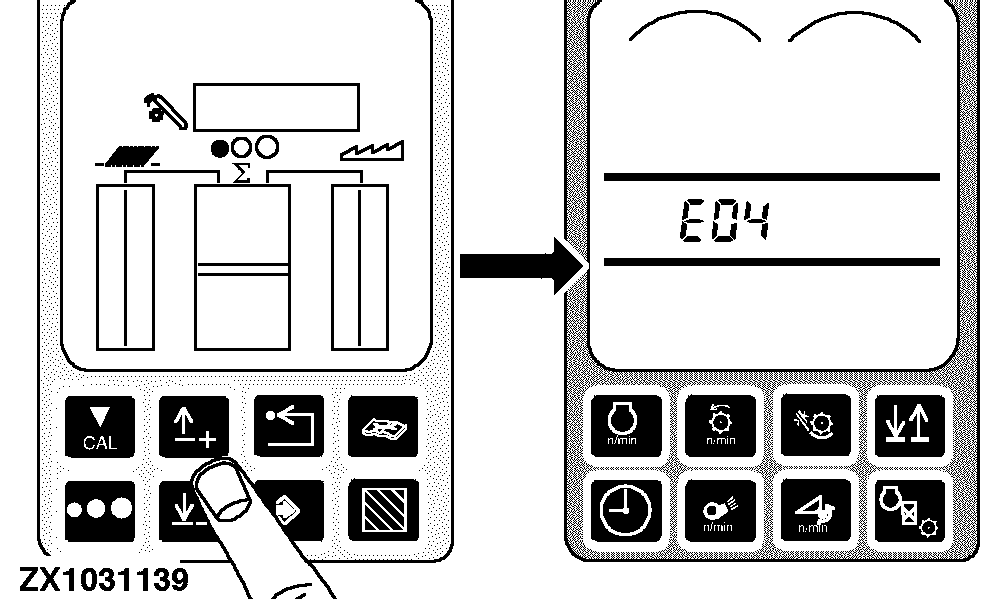
Press the up arrow switch to obtain E04.
|
|
|
|
OUZXMAG,00018BB -19-11OCT02-3/19
|
|
Press the enter switch to access the E04 diagnostic mode. Press the up arrow switch until 108 appears on the tachometer.
|
|
|
|
OUZXMAG,00018BB -19-11OCT02-4/19
|
|
Press the enter switch. 108 and OP5 should appear on the tachometer.
|
|
|
|
OUZXMAG,00018BB -19-11OCT02-5/19
|
|
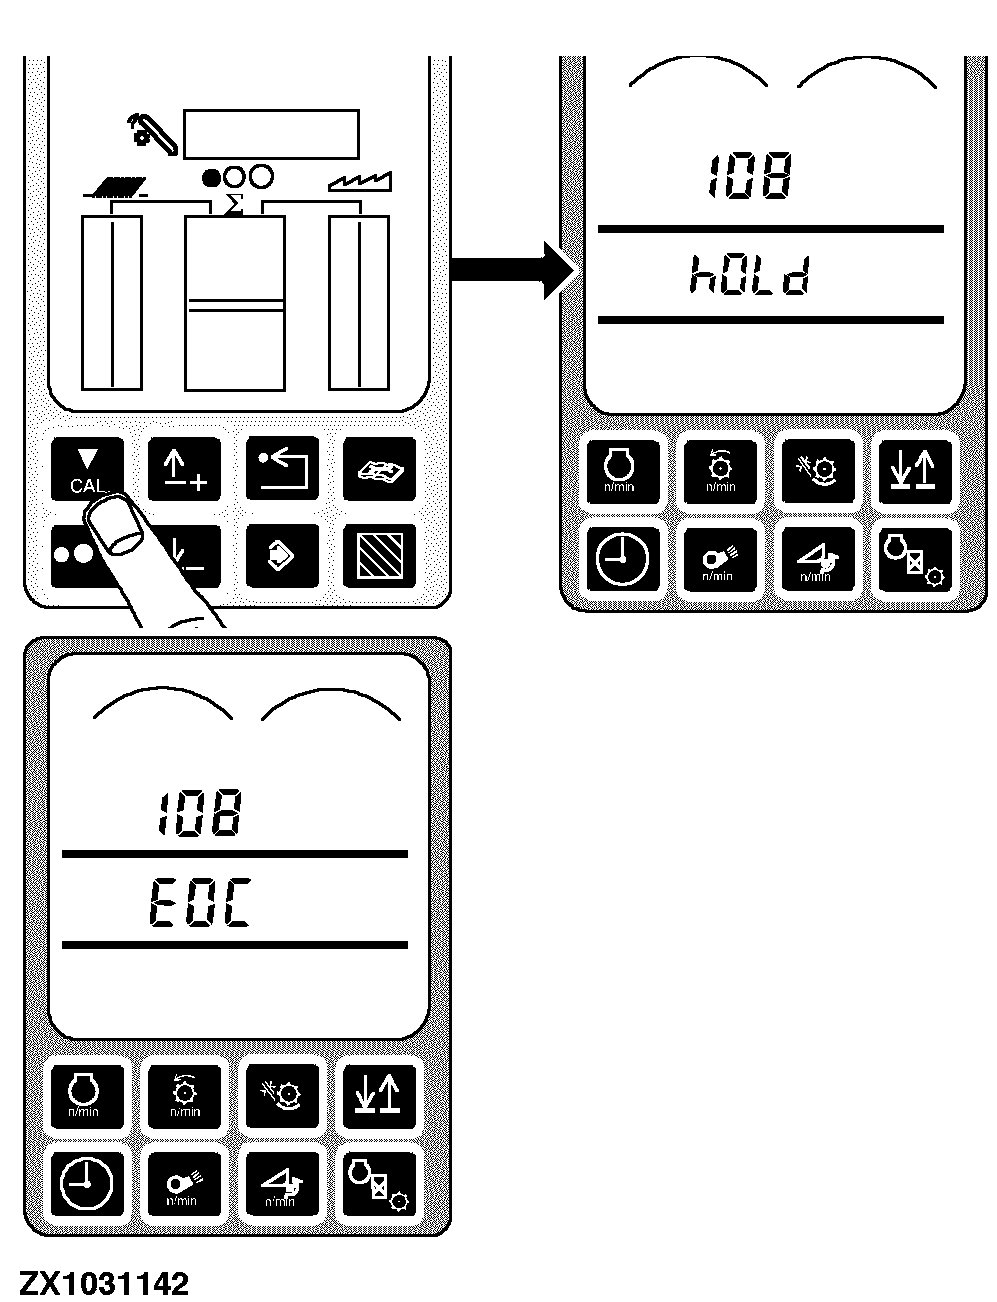
Press the calibration switch. hOLd will be displayed on the tachometer while the chaffer is opening itself up, then EOC will be displayed.
|
|
|
|
OUZXMAG,00018BB -19-11OCT02-6/19
|
|
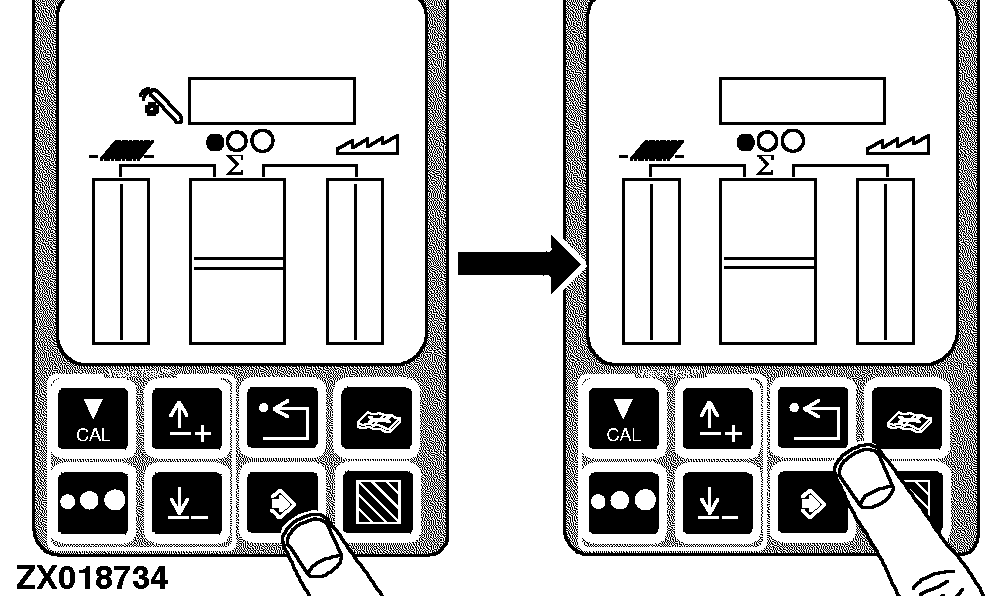
Press the enter switch to store the calibration value or press the back arrow switch to abort calibration (and not save values).
Press back arrow switch to return to normal operation.
|
|
|
|
OUZXMAG,00018BB -19-11OCT02-7/19
|
Remote Shoe Adjust Factory Calibration - Sieve (OP5)
Turn the key switch to the run position.
Set sieve element to 5 mm (0.2 in.) opening.
IMPORTANT:
It is essential that the sieve is open to a position of 5 mm (0.2 in.), and not closed down to 5 mm (0. in.). The right and left sides MUST match!
Press the diagnostic switch. dIA will appear on the triple display tachometer.
|
|
|
|
OUZXMAG,00018BB -19-11OCT02-8/19
|
|
Press the up arrow switch to obtain E04.
|
|
|
|
OUZXMAG,00018BB -19-11OCT02-9/19
|
|
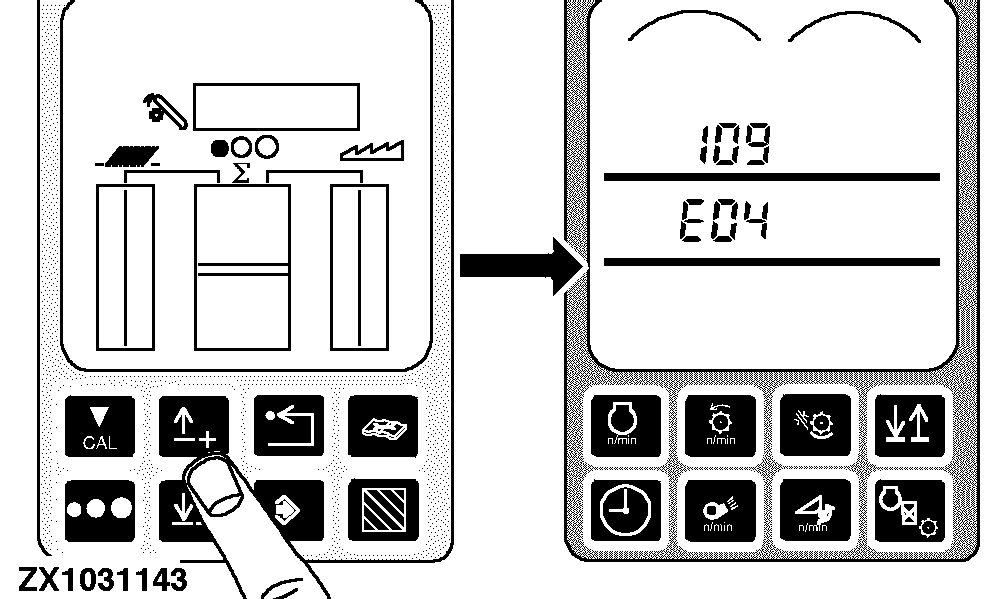
Press the enter switch to access the E04 diagnostic mode. Press the up arrow switch until 109 appears on the tachometer.
|
|
|
|
OUZXMAG,00018BB -19-11OCT02-10/19
|
|
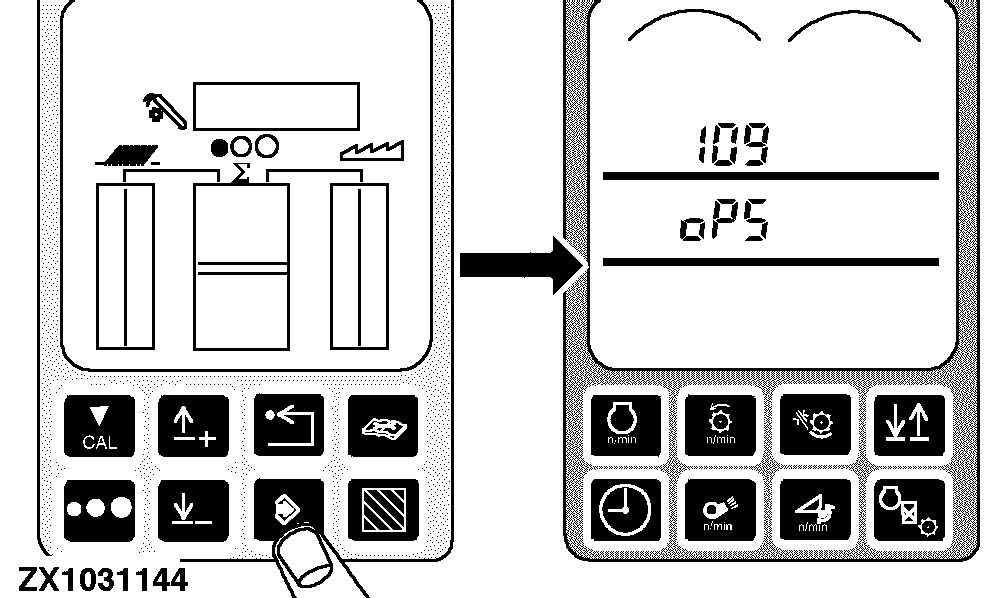
Press the enter switch. 109 and OP5 should appear on the tachometer
|
|
|
|
OUZXMAG,00018BB -19-11OCT02-11/19
|
|
Press the calibration switch. hOLd will be displayed on the tachometer while the sieve is opening itself up, then EOC will be displayed.
|
|
|
|
OUZXMAG,00018BB -19-11OCT02-12/19
|
|
Press the enter switch to store the calibration value or press the back arrow switch to abort calibration (and not save values).
Press back arrow switch to return to normal operation.
|
|
|
|
OUZXMAG,00018BB -19-11OCT02-13/19
|
Remote Shoe Adjust Factory Calibration - Precleaner (OP5)
Turn the key switch to the run position.
Set precleaner element to 5 mm (0.2 in.) opening.
IMPORTANT:
It is essential that the precleaner is open to a position of 5 mm (0.2 in.), and not closed down to 5 mm (0. in.). The right and left sides MUST match!
Press the diagnostic switch. dIA will appear on the triple display tachometer.
|
|
|
|
OUZXMAG,00018BB -19-11OCT02-14/19
|
|
Press the up arrow switch to obtain E04.
|
|
|
|
OUZXMAG,00018BB -19-11OCT02-15/19
|
|
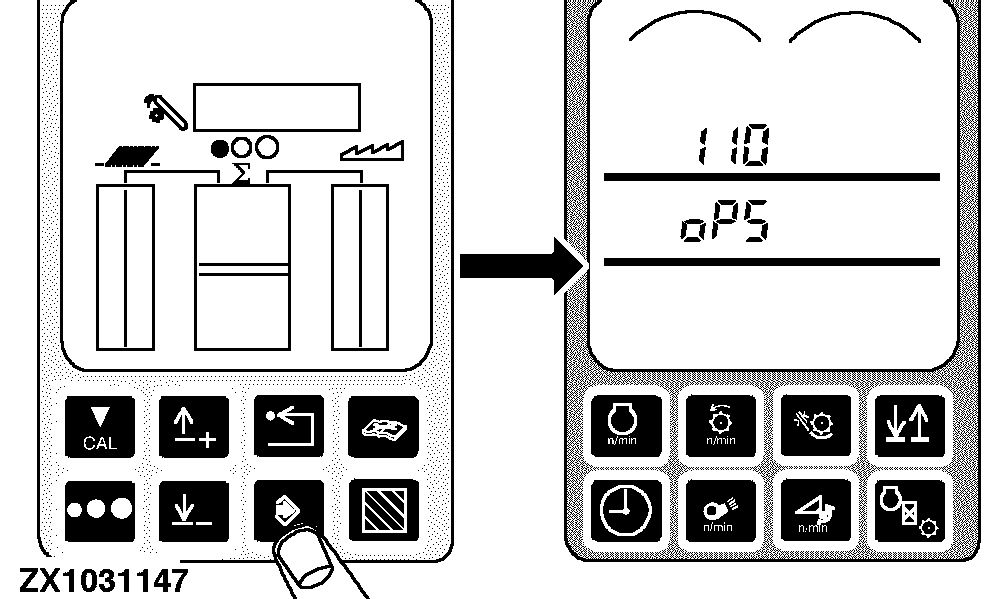
Press the enter switch to access the E04 diagnostic mode. Press the up arrow switch until 110 appears on the tachometer
|
|
|
|
OUZXMAG,00018BB -19-11OCT02-16/19
|
|
Press the enter switch. 110 and OP5 should appear on the tachometer
|
|
|
|
OUZXMAG,00018BB -19-11OCT02-17/19
|
|
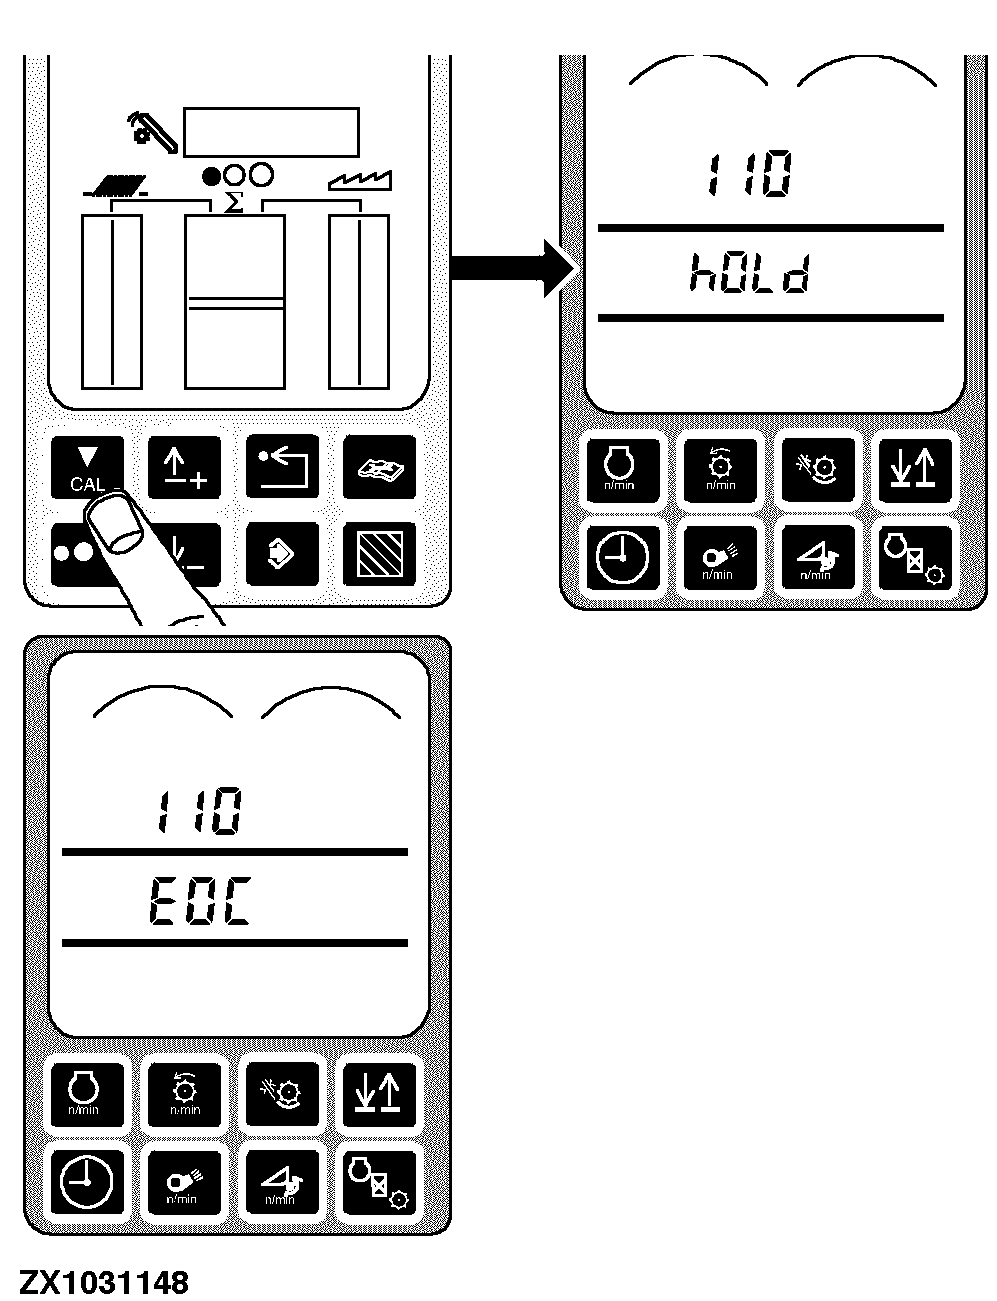
Press the calibration switch. hOLd will be displayed on the tachometer while the precleaner is opening itself up, then EOC will be displayed.
|
|
|
|
OUZXMAG,00018BB -19-11OCT02-18/19
|
|
Press the enter switch to store the calibration value or press the back arrow switch to abort calibration (and not save values).
Press back arrow switch to return to normal operation.
|
|
|
|
OUZXMAG,00018BB -19-11OCT02-19/19
|
|