![]()
21-Inch Walk-Behind Rotary Mowers
Introduction
Product Identification
Safety
Operating
Replacement Parts
Service Intervals
Service
Engine Warranty Maintenance Statement
Checking and Cleaning Air Cleaner Element
Cleaning and Gapping Spark Plug
Adjusting Traction Cable (JA62)
Lubricating Rear Axle Bushings
Cleaning Belt and Transmission Area (JA62)
Balancing and Installing Blade
Troubleshooting
Storing Machine
Assembly
Specifications
Warranty
John Deere Quality Statement
Service Record

Service
Engine Warranty Maintenance Statement
Maintenance, repair, or replacement of the emission control devices and systems on this engine, which are being done at the customers expense, may be performed by any nonroad engine repair establishment or individual. Warranty repairs must be performed by an authorized John Deere dealer.
Adjusting Carburetor
NOTE: Carburetor is calibrated by the engine manufacturer and should not require any adjustments.
If engine is operated at altitudes above 1829 m (6,000 ft), some carburetors may require a special high altitude main jet. See your John Deere dealer.
Possible engine surging will occur at high rpm when the transmission and the blades are disengaged. This is a normal condition due to the emission control system.
If engine is hard to start or runs rough, check the TROUBLESHOOTING section of this manual.
After performing the checks in the troubleshooting section and your engine is still not performing correctly, contact your John Deere dealer.
Avoid Fumes
· If it is necessary to run an engine in an enclosed area, use an exhaust pipe extension to remove the fumes. |
Engine Oil

Use oil viscosity based on the expected air temperature range during the period between oil changes.
The following John Deere oils are preferred:
The following John Deere oils are also recommended, based on their specified temperature range:
Other oils may be used if above John Deere oil is not available, provided they meet one of the following specifications:
· SAE 10W-30-API Service Classification SG or higher
· SAE 30-API Service Classification SC or higher
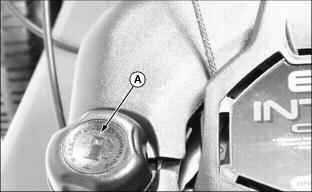
Checking Engine Oil Level
1. Stop engine. Put mower on level surface.
2. Turn oil dipstick (A) 1/4 turn counterclockwise and remove from the filler tube.
3. Wipe dipstick off with a clean cloth.
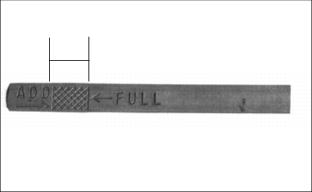
5. Remove dipstick. Check oil level. Oil should be between ADD and FULL MARKS shown on dipstick. Not above FULL MARK.
7. Install and tighten dipstick.
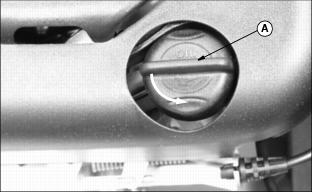
Changing Engine Oil
1. Park mower on a level surface.
2. Drain fuel from tank or run engine until fuel tank is empty or near empty.
3. Stop engine and disconnect spark plug wire.
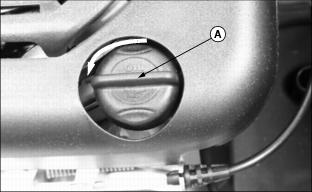
4. Turn oil dipstick (A) 1/4 turn counterclockwise and remove from the oil filler tube.
5. Insert a plastic drain tube firmly inside oil filler tube opening (B).
6. Place a drain pan on the left side of the mower.
7. Turn mower onto its left side.
8. Allow engine oil to drain from the dipstick filler tube location into the drain pan.
9. After oil has drained, return mower to an upright position.
10. Remove plastic drain tube. Clean area around filler tube.
11. Add 0.47 L (16 oz) oil through dipstick filler tube.
12. Install dipstick. Turn dipstick 1/4 turn clockwise to tighten.
13. Remove dipstick. Check oil level. Add oil to FULL mark if necessary.
14. Install and tighten dipstick.
Checking and Cleaning Air Cleaner Element
1. Park machine safely. (See Parking Safely in the Safety Section.)
3. Disconnect spark plug wire.
4. Clean dirt and debris from the air cleaner cover.
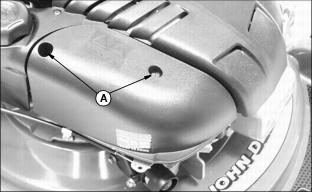
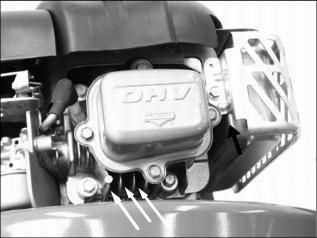
5. Loosen screws (A), and remove cover.

6. Inspect the foam precleaner (B) without removing it. If the foam precleaner is dirty:
a. Remove it from the filter carefully, leaving the paper element in the air cleaner housing.
b. Wash precleaner in a solution of warm water and liquid detergent.
c. Rinse precleaner thoroughly. Squeeze out excess water in a dry cloth until precleaner is completely dry.
7. Inspect the paper element without removing it. If the paper element is damaged or dirty, remove and replace it with a new element.
8. Clean air cleaner base carefully, preventing any dirt from falling into carburetor.
9. Install foam precleaner onto paper element and install into air cleaner base.
10. Close cover and tighten screws. Do not overtighten.
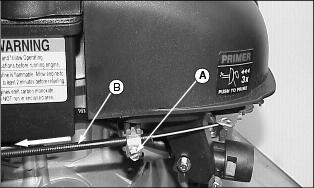
Cleaning and Gapping Spark Plug
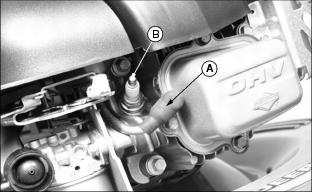
1. Disconnect spark plug wire (A). Remove spark plug (B).
2. Carefully wire brush carbon from plug. Do not clean it with abrasives in a machine.
3. Inspect plug for damage. Replace damaged plug.
4. Adjust gap: 0.51 mm (0.02 in.).
5. Install and tighten plug to 20 N·m (15 lb-ft).
Cleaning Engine Cooling Fins
1. Clean fins with brush, rag, or compressed air.
2. Blow compressed air under shroud.
Adjusting Throttle Cable
1. Move throttle lever to fasposition.
2. Loosen screw (A) until cable sheath (B) moves freely.
3. Grasp cable sheath (B) and pull toward rear of machine until cable sheath stops moving.
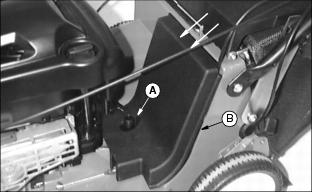
Adjusting Traction Cable (JA62)
· Keep people and pets away from mower. · Keep hands and tools away from belt area when engine is running. |
NOTE: Adjust cable if mower slows going uphill.
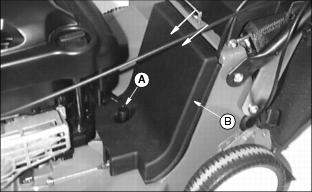
1. Unscrew and remove knob (A).
2. Apply slight pressure to the top of protective shield (B) to release tabs securing shield to the mower deck.
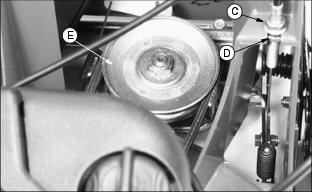
4. Loosen nut (C). Turn nut (D) down 1/8 in. (3 mm).
7. Engage traction clutch lever to check clutch action.
8. If clutch needs more tension, stop engine and repeat Steps 4 and 5.
NOTE: Pulley (E) should not turn when engine is running and clutch lever is disengaged. If pulley turns when engine is running, traction clutch cable is adjusted too tight.
Grease

Use grease based on the expected air temperature range during the service interval.
The following greases are preferred:
· John Deere MOLY HIGH TEMPERATURE EP GREASE
· John Deere HIGH TEMPERATURE EP GREASE
Other greases may be used if they meet one of the following:
· SAE Multipurpose EP Grease with a maximum of 5% molybdenum disulfide.
Lubricating Rear Axle Bushings
1. Wipe grease fittings clean.
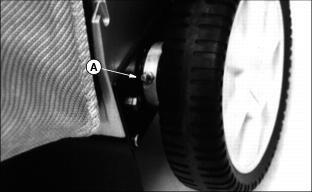
2. Lubricate bushing (A) on each side with John Deere multipurpose grease or an equivalent.
Cleaning Mower
IMPORTANT: Avoid damage! Do not use high pressure spray when cleaning under the deck. High pressure spray may cause damage to clutch and transmission parts. |
Spray under deck to remove lawn chemicals and grass buildup.
Cleaning Belt and Transmission Area (JA62)
1. Unscrew and remove knob (A).
2. Apply slight pressure to the top of protective shield (B) to release tabs securing shield to the mower deck. Remove shield.

3. Remove clippings or debris from belt area and top of the transmission using a brush or compressed air.
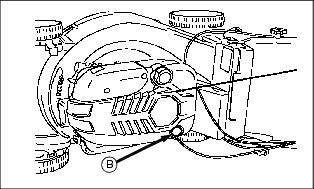
Cleaning Fuel Cap Vents

2. Check two vents (A) under metal ring and vent in top, center of cap.
3. Clean cap and vents in nonflammable solvent. Let cap dry.
Checking Blade
NOTE: Sharpened edges on blade tips must face upward when installing blade.
Checking Blade:
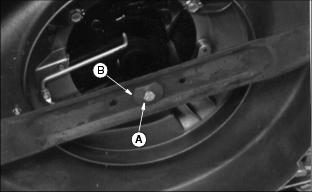
· Tighten bolt (A) to 75 N·m (55 lb-ft).
Removing Blade:
· Remove bolt (A), washer (B), and blade.
NOTE: Make sure blade tip wing points up and washer cup is against blade.
Sharpening Blade
· Sharpen blade with grinder, hand file or electric blade sharpener
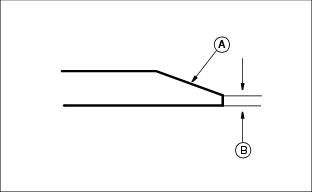
· Keep original bevel (A) when you grind.
· Blade should have 0.40 mm (1/64 in.) cutting edge (B).
IMPORTANT: Avoid damage! Balance blade after you sharpen it. An unbalanced blade may cause excessive vibration. |
Balancing and Installing Blade
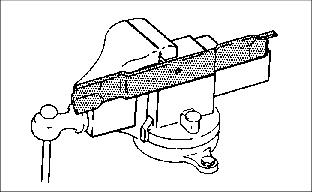
1. Clean blade. Put it on a nail in vise or on a wall. Heavy end of blade will drop. Grind bevel of heavy end. Do not change bevel.
2. Install blade, washer (cup-side against blade), and bolt.
3. Tighten bolt to 75 N·m (55 lb-ft).
IMPORTANT: Avoid damage! Avoid spilling fuel. Fuel can damage plastic and painted surfaces. Do not mix oil with gasoline. Unleaded gasoline with an octane rating of 87 or higher is recommended. |
1. Stop engine. If engine is hot let it cool several minutes before you add fuel.
2. Remove grass clippings and other trash from tank area.