![]()
21-Inch Commercial Walk-Behind Rotary Mower
Introduction
Product Identification
Safety
Operating
Avoid Damage to Plastic and Painted Surfaces
Using Discharge Chute (Optional)
Using High Lift Blade (Optional)
Replacement Parts
Service Intervals
Service
Troubleshooting
Storing Machine
Assembly
Specifications
Warranty
John Deere Quality Statement
Service Record

Operating
Daily Operating Checklist
o Remove grass and debris from machine.
o Check area below machine for leaks.
Avoid Damage to Plastic and Painted Surfaces
· Do not wipe plastic parts unless rinsed first.
· Insect repellent spray may damage plastic and painted surfaces. Do not spray insect repellent near machine.
· Be careful not to spill fuel on machine. Fuel may damage surface. Wipe up spilled fuel immediately.
Handle Controls
Engine Controls
Cutting Height Controls
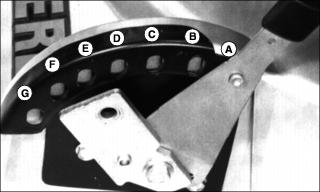
Adjusting Cutting Height
NOTE: Adjust both levers to same height except for two lowest cutting heights (A and B on following chart). At two lowest cutting heights, raise rear lever one notch higher than front lever. This adjustment allows for increased air flow when bagging and side discharging, and provides a larger exit window for clippings when mulching.
Begin at upper cutting height, then adjust downward as desired, to avoid scalping lawn with too low a setting.
Highest cutting height for rear wheel is lever in furthest front position. Highest cutting height for front wheel is lever in furthest back position.
Picture Note: Left front wheel lever shown

Picture Note: Left front wheel lever shown
To help adjust rear wheel levers:
1. Lift lower handlebar slightly with one hand to take some weight off wheel.
2. Move height adjustment lever to desired position with other hand.
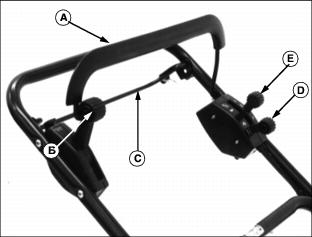
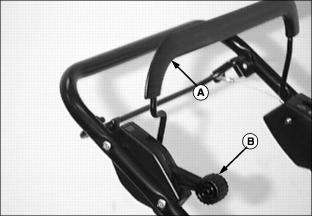
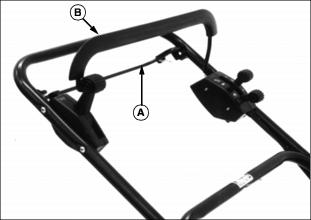
Adjusting Handle Height
1. Remove bolt (A) and lock nut from each side of handle.
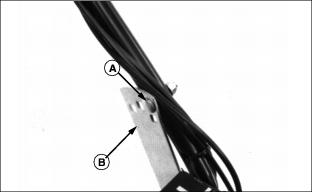
2. Install bolt in desired hole in bracket (B) and through holes in handle.
Testing Safety Systems

Use the following checkout procedure to check for normal operation of machine.
If there is a malfunction during one of these procedures, do not operate machine. See your John Deere dealer for service.
Perform these tests in a clear open area. Keep bystanders away.
Testing Blade Control Lever
3. Release blade control lever.
4. Listen for blade to stop. Do not look under mower to check blade.
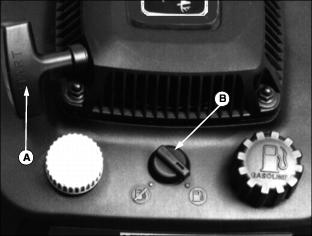
Starting Engine
IMPORTANT: Avoid damage! To help prevent damage to starter and band brake, do not start the engine: |
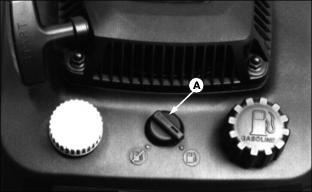
1. Turn fuel shutoff knob (A) to the open position.
COLD ENGINE: Push lever forward to choke position.
WARM ENGINE: Push lever forward to fast position.
3. Put your foot on foot pad located on top, left side of deck.
4. Pull starter handle until you feel resistance. Then pull fast and steady until engine starts.
6. Pull back throttle lever to half-throttle position.
7. Mow with throttle lever in fast position.
Blade Operation
NOTE: Do not engage blade in heavy grass or engine may stop.
To Engage Blade
2. Pull and hold blade control lever (A) against handle.
3. Push blade engagement lever (B) forward until it latches.
To Disengage Blade
Release blade control lever (A).
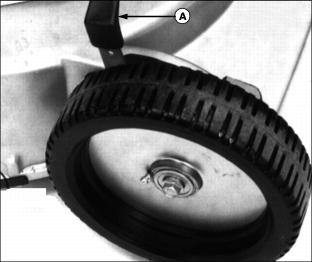
Forward Travel
To Travel Forward
Pull and hold traction clutch lever (A) against handle (B).
To Stop Forward Travel
Release lever (A). Release lever before you turn.
NOTE: Rear wheels should make a clicking noise when you push mower forward. This means drive train is operating correctly.
Travel Speeds
· 1st Gear: 1.9 km/h (1.2 mph)
· 2nd Gear: 2.9 km/h (1.8 mph)
· 3rd Gear: 3.9 km/h (2.4 mph)
· 4th Gear: 4.8 km/h (3.0 mph)
· 5th Gear: 6.6 km/h (4.1 mph)
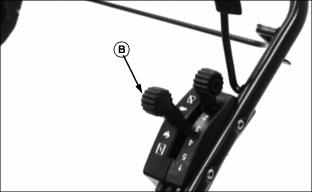
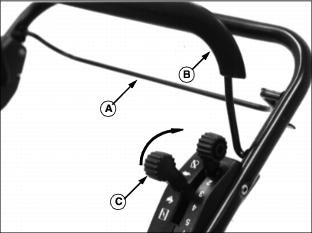
To Change Travel Speed:
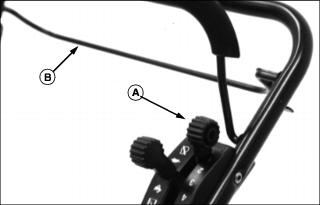
2. Move gear lever (A) to desired position.
3. Engage traction clutch lever (B).
Stopping Engine
1. Release traction clutch lever (A).
2. Release blade control lever (B).
3. Pull throttle lever (C) back to stop position.
4. Turn fuel shutoff knob to closed position when you are done mowing.
Emergency Stopping

Using Discharge Chute (Optional)
1. Stop engine. Lift and hold door.
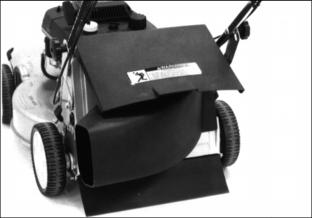
3. Install chute. Lower door to hold chute in place.
Using Grass Bag
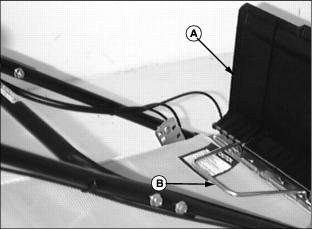
2. Grasp handle (B). Lift bag on or off mower.
NOTE: Bag may wear and deteriorate. Check condition of bag often. Use a John Deere bag or equivalent to comply with safety specifications.
Using Mulch Plug (Optional)
See your John Deere dealer for Mulch Plug.
Mulch blade is standard equipment on the mower and works equally well with mulch plug, chute, or bag. You do not need to change the blade when you change attachment.
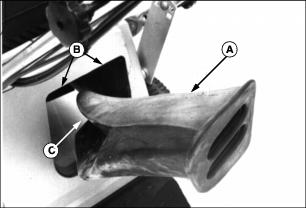
3. Install plug (A) in opening (B) with (C) facing left.
4. Push and turn plug counterclockwise until it is seated.
Using High Lift Blade (Optional)
High lift blade is recommended for the most favorable bagging performance. See your John Deere dealer for high lift blades.
1. Disconnect spark plug wire.
2. Turn fuel shutoff knob to closed position.
IMPORTANT: Avoid damage! To help prevent air cleaner damage and hard starting, turn mower on its right side. |
3. Turn mower on its right side.
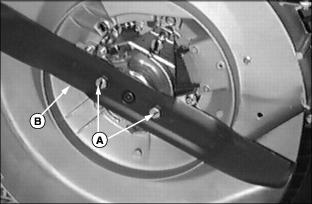
4. Remove bolts (A) and blade (B).
5. Install blade with wings pointing upward.
6. Tighten bolts to 75 N·m (55 lb-ft).
Transporting Mower
Turn the fuel shutoff knob to the closed position when transporting the mower to prevent fuel from flowing into the engine.