![]()
21-Inch Commercial Walk-Behind Rotary Mower
Introduction
Product Identification
Safety
Operating
Replacement Parts
Service Intervals
Service
Engine Warranty Maintenance Statement
Checking and Cleaning Air Cleaner Element
Cleaning and Gapping Spark Plug
Lubricating Rear Axle Bushings
Cleaning and Lubricating Rear Axle Key
Cleaning Belt and Transmission Area
Troubleshooting
Storing Machine
Assembly
Specifications
Warranty
John Deere Quality Statement
Service Record

Service
Engine Warranty Maintenance Statement
Maintenance, repair, or replacement of the emission control devices and systems on this engine, which are being done at the customer's expense, may be performed by any nonroad engine repair establishment or individual. Warranty repairs must be performed by an authorized John Deere dealer.
Adjusting Carburetor
NOTE: Carburetor is calibrated by the engine manufacturer and should not require any adjustments.
If engine is operated at altitudes above 1829 m (6,000 ft), some carburetors may require a special high altitude main jet. See your John Deere dealer.
Possible engine surging will occur at high rpm when the transmission and the blades are disengaged. This is a normal condition due to the emission control system.
If engine is hard to start or runs rough, check the TROUBLESHOOTING section of this manual.
After performing the checks in the troubleshooting section and your engine is still not performing correctly, contact your John Deere dealer.
Avoid Fumes

Engine Oil
Use oil viscosity based on the expected air temperature range during the period between oil changes.
The following John Deere oils are preferred:
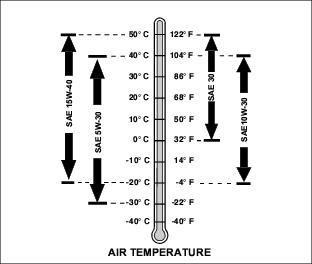
TORQ-GARD SUPREME® (SAE 5W-30)
The following John Deere oils are also recommended, based on their specified temperature range:
Other oils may be used if above John Deere oils are not available, provided they meet one of the following specifications:
· SAE 10W-40-API Service Classification SG or higher
· SAE 5W-30-API Service Classification SG or higher
· SAE 10W-30-API Service Classification SG or higher
· SAE 30-API Service Classification SC or higher
Checking Engine Oil Level
1. Park mower on level surface. Stop engine.

2. Remove dipstick. Wipe it with a clean cloth.
3. Install dipstick. Do not tighten: let threads rest on top of tube.
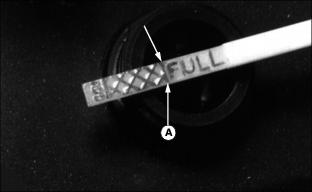
4. Remove dipstick. Check oil level. Oil should be between ADD and FULL marks shown on dipstick, not above FULL mark (A).
6. Install and tighten dipstick.
Changing Engine Oil
1. Park mower on level surface.
2. Stop engine and disconnect spark plug wire.
3. Install drain hose (included with mower) on oil drain fitting.
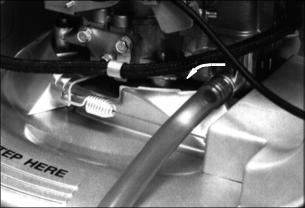
4. Turn fitting to the left to open drain. Drain oil into a container.
5. Tighten fitting. Remove hose.
6. Pour 0.6 L (20 oz) oil into dipstick tube.
7. Install dipstick. Do not tighten: let threads rest on top of tube.
8. Check oil level. If necessary, add oil to bring level to the FULL mark.
9. Install and tighten dipstick.
Changing Oil Filter
1. Park mower on level surface. Stop engine.
3. Disconnect spark plug wire.
5. Remove filter by turning it counterclockwise.
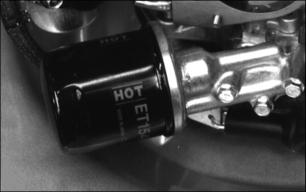
6. Apply a film of clean engine oil to new filter gasket.
· Turn filter clockwise until gasket contacts filter base.
· Tighten filter by hand 3/4 turn more.
8. Pour new oil into dipstick tube.
10. Run engine and check for leaks around filter.
11. Stop engine. Check oil level.
12. Install and tighten dipstick.
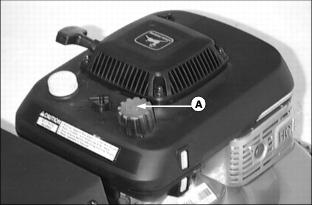
Checking and Cleaning Air Cleaner Element
1. Park mower on level surface. Stop engine.
3. Disconnect spark plug wire.
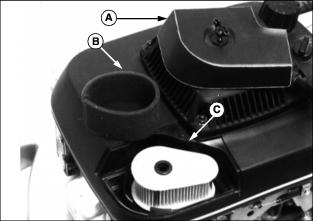
4. Clean dirt and debris from air cleaner cover and area around it. Remove cover (A).
5. Inspect the foam pre-cleaner (B) without removing it. If the foam pre-cleaner is dirty:
a. Remove it from the filter carefully, leaving the paper element in the air cleaner housing.
b. Wash foam pre-cleaner in non-flammable solvent or a solution of warm water and liquid detergent.
c. Rinse pre-cleaner thoroughly. Squeeze out excess water in a dry cloth until pre-cleaner is completely dry.
6. Put 10-15 drops of clean engine oil on element. Squeeze element to distribute oil.
7. Inspect paper element. Replace element:
· With a break, hole, or damaged seal.
· If engine performance is poor.
8. Install element, foam pre-cleaner, and cover.
Cleaning and Gapping Spark Plug
1. Disconnect spark plug wire. Remove plug.
2. Carefully wire brush carbon from plug. Do not clean it with abrasives in a machine.
3. Inspect plug for damage. Replace damaged plug.
4. Adjust gap: 0.76 mm (0.030 in.).
5. Install and tighten plug to 20 N·m (15 lb-ft).
Cleaning Engine Cooling Fins
1. Clean fins with a brush, rag, or compressed air.
2. Blow compressed air under shroud.
Adjusting Throttle Cable
2. Disconnect spark plug wire.
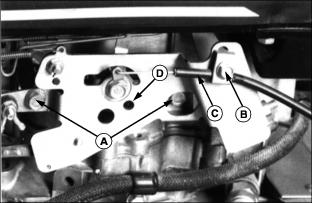
3. Push throttle lever to the fast position.
4. If hole (D) in lever is not in line with hole in bracket, loosen screw (B).
5. Move cable cover (C) to line up holes. Tighten screw.
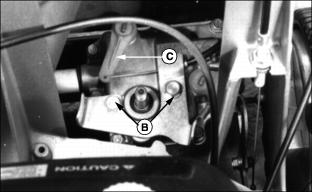
Adjusting Choke
Adjust throttle cable:
1. Turn screw (B) clockwise until lever (C) begins to move. If lever moves when you first turn screw, back off screw and start Step 2 again.
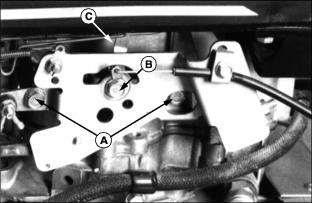
2. Push throttle lever to the choke position.
3. Move lever (C). There should be no free play.
4. If necessary, Repeat Step 2.
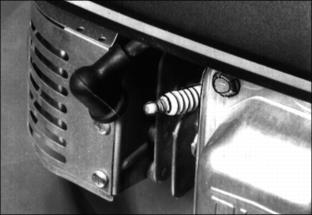
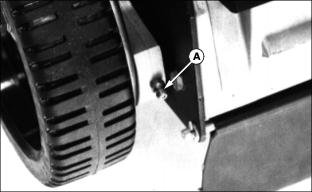
Adjusting Traction Clutch
Do not operate mower without belt shield. Before you adjust clutch: · Keep people and pets away from mower. · Keep hands and tools away from belt area when engine is running. |
NOTE: If mower slows as it goes uphill, clutch needs adjustment.
1. Park mower on level surface.
3. Disconnect spark plug wire.
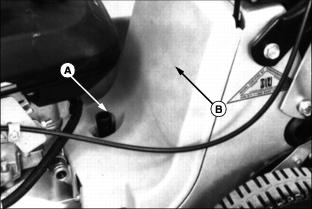
4. Remove knob (A) and shield (B).
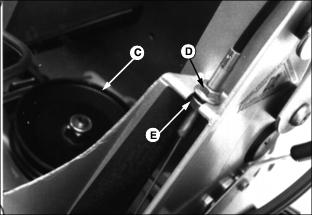
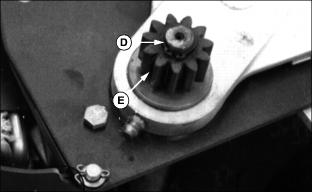
6. Turn nut (E) down 6 mm (1/4 in.).
· Put mower on a hard surface with front wheels against a wall or curb.
· Engage traction clutch lever. Rear wheels should spin. If not, repeat Steps 2-5 until wheels spin.
· If pulley (C) turns when engine is running and clutch lever is disengaged, stop engine. Turn nut (D) up. Tighten nut (E).
· Repeat this procedure until pulley does not turn.
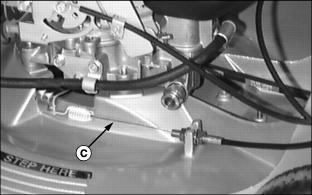
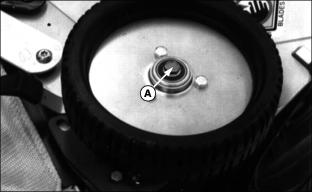
Adjusting Speed Select Cable
NOTE: Attempt to adjust traction clutch first. If problem should persist, proceed to adjust cable when gear(s) do not engage or when travel speed slows in a gear.
1. Park mower on level surface.
3. Disconnect spark plug wire.
5. Move shift lever to 5th gear.

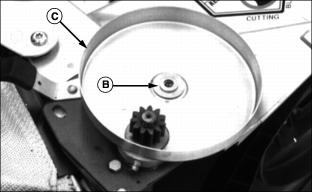
6. Remove nut (A), washer, and pulley.
7. Loosen cable clamp cap screws (B).
8. Move and hold arm (C) as far away from clamp as possible.
10. Install pulley and belt. Belt must be inside both guides.
11. Install washer and nut. Tighten nut to 30 N·m
(22 ft-lb).
Adjusting Blade Brake Clutch
NOTE: Blade should stop within 3 seconds after you release blade stop lever. If not, adjust clutch.
1. Put blade engagement lever on handlebar all the way to the rear.
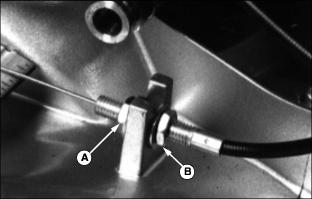
4. Pull threaded fitting to rear to remove all cable slack.
5. Turn nut (B) against deck fork.
7. Make sure there is tension on cable (C), but that it is not too loose or too tight. This will give maximum blade brake clutch engagement.
Grease
Use grease based on the expected air temperature range during the service interval.
The following greases are preferred:
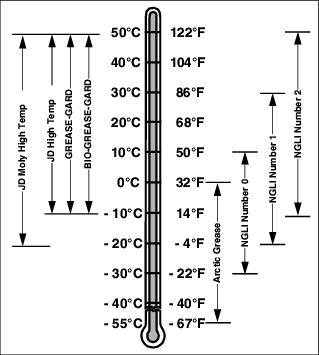
· John Deere Moly High Temperature EP Grease.
· John Deere High Temperature EP Grease.
Other greases may be used are:
· SAE Multipurpose EP Grease with 3 to 5 percent molybdenum disulfide.
· Greases meeting Military Specification MIL-G-10924C may be used as arctic grease.
Lubricating Rear Axle Bushings
NOTE: Adjust mower height indicator until zerk is easy to get grease gun on.
1. Wipe grease fittings clean.
2. Lubricate bearing (A) on each side with one shot of John Deere Multipurpose Grease or an equivalent.
Cleaning and Lubricating Rear Axle Key
NOTE: Clean key when mower will not self-propel.
1. Lift and block rear of mower.
2. Remove bolt (A) and wheel from each side.
3. Remove two washers (B) and housing (C).
4. Remove snap ring (D) from right side.
5. Turn gear (E) so it ratchets and pull it from shaft.
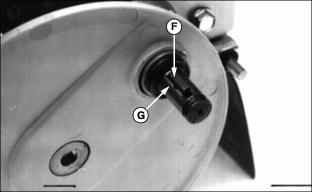
6. Remove key (F) and spring (G).
· On left side, remove snap ring and spacer.
· On right side (shown), spacer is inside of gear.
7. Clean debris from key and keyway.
8. Lubricate key, keyway, and inside of gear with John Deere multipurpose grease or an equivalent.
· Left Side: Install gear, flat side first, then install spacer and snap ring.
· Right Side: Install spacer, then install gear with flat side out. Fasten gear with snap ring.
11. Turn each gear. They must ratchet freely.
12. Install housing and washers. Install wheel and bolt on each side.
13. Remove blocks and lower mower.
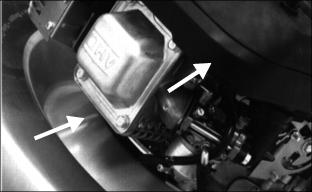
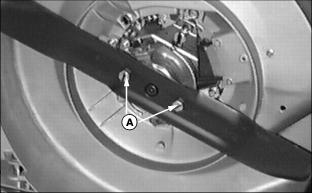
Cleaning Belt and Transmission Area
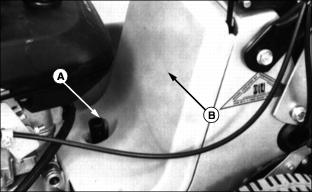
1. Remove knob (A) and shield (B).
2. Remove clippings from belt area and top of transmission
Cleaning Mower
Clean engine and top of the deck.
Check and clean cooling fins, if necessary.
If necessary, remove belt shield and clean this area. Do not spray water in the transmission area.
Remove mulch plug. Spray under the deck with garden hose to remove corrosive lawn chemicals and grass buildup. Do not spray water directly in the clutch or transmission area.
If you operate the mower in dusty conditions, clean air cleaner foam element.
Remove and shake bag to remove clippings.
If bag is caked with grass on the inside, use water under pressure to clean bag. Direct water from outside to inside of bag
Remove grass clippings between wheels and the mower deck.
Cleaning Fuel Cap Vent
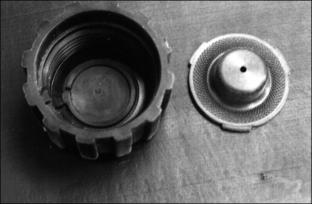
2. Remove rubber vent from cap.
3. Clean cap and vent in an nonflammable solvent.
Checking Blade
IMPORTANT: Avoid damage! To help prevent air cleaner damage and hard starting, turn mower on right side. |
NOTE: Make sure blade tip wing points up and washer cup is against blade.
Checking Blade:
· Tighten bolts (A) to 75 N·m (55 lb-ft).
Removing Blade:
NOTE: Make sure blade tip wing points up and washer cup is against blade.
Sharpening Blade
Sharpen blades with grinder, hand file, or electric blade sharpener.
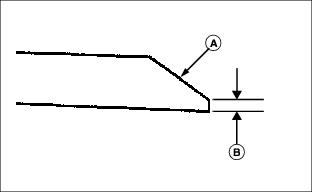
Keep original bevel (A) when grinding.
Blade should have 0.40 mm (1/64 in.) cutting edge (B) or less.
Balance blades before installing.
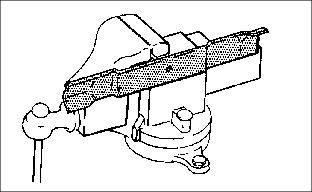
Balance and Install Blade
1. Clean blade. Put it on a nail in vise or on a wall. Heavy end of blade will drop. Grind bevel of heavy end. Do not change bevel.
2. Install blade, washers (cup-side against blade), and bolts.
3. Tighten bolts to 75 N·m (55 lb-ft).
Filling Fuel Tank
IMPORTANT: Avoid damage! Avoid spilling fuel. Fuel can damage plastic and painted surfaces. Do not mix oil with gasoline. Unleaded gasoline with an octane rating of 87 or higher is recommended. |
1. Stop engine. If engine is hot let it cool several minutes before you add fuel.
2. Remove grass clippings and other trash from tank area.