![]()
Introduction
Product Identification
Safety
Operating
Replacement Parts
Service Intervals
Service Lubrication
Service Engine
Service Transmission
Service Mower
Service Electrical
Service Miscellaneous
Cleaning and Repairing Plastic Surfaces
Cleaning and Repairing Metal Surfaces
Troubleshooting
Storage
Assembly
Specifications
Warranty
John Deere Quality Statement
Service Record

Service Miscellaneous
Filling Fuel Tank
Use regular grade 87 octane unleaded fuel.
Add John Deere fuel stabilizer to fuel before using it in your machine to prevent engine damage due to stale fuel. Follow directions on stabilizer container.
1. Park machine safely. (See Parking Safely in the SAFETY section.)
2. Allow machine to cool for several minutes.
4. Remove grass clippings and other debris from tank area.
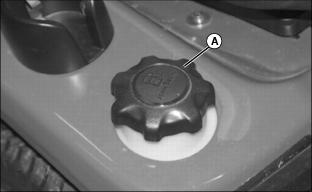
6. Fill tank with fuel only to bottom of filler neck.
Checking Wheel Bolt Torque
NOTE: Check wheel bolt torque often during the first 100 hours of operation.
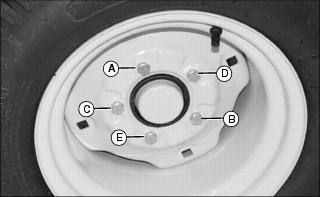
Tighten rear wheel bolts evenly in proper sequence (A), (B), (C), (D), and (E) until snug. Finish tightening to 88 N·m (65 lb-ft).
Removing and Installing Hood
Removing Hood
1. Park machine safely. (See Parking Safely in the SAFETY section.)

3. Disconnect headlight wiring harness (A).
4. Lift and pull hood away from machine.
Installing Hood

1. Align hood pivot studs (A) with pivot brackets (B) and install hood.
Adjusting Hood Latches
1. Park machine safely. (See Parking Safely in the SAFETY section.)

4. Move latch up or down as needed.
6. Adjust hood latch on other side.
Cleaning and Repairing Plastic Surfaces
Your John Deere dealer has the professional materials needed to properly remove surface scratches from plastic surfaces, do not attempt to paint over marks or scratches on plastic parts.
1. Rinse hood and entire machine with clean water to remove dirt and dust that may scratch the surface.
2. Wash surface with clean water and a mild liquid automotive washing soap.
3. Dry thoroughly to avoid water spots.
4. Wax the surface with a liquid automotive wax. Use products that specifically say "contains no abrasives."
5. Buff applied wax by hand using a clean, soft cloth.
Cleaning and Repairing Metal Surfaces
Cleaning
Follow automotive practices to care for your vehicle painted metal surfaces. Use a high-quality automotive wax regularly to maintain the factory look of your vehicle's painted surfaces.
Repairing Minor Scratches (surface scratch)
1. Clean area to be repaired thoroughly.
2. Use automotive polishing compound to remove surface scratches.
3. Apply wax to entire surface.
Repairing Deep Scratches (bare metal or primer showing)
1. Clean area to be repaired with rubbing alcohol or mineral spirits.
2. Use paint stick with factory-matched colors available from your John Deere dealer to fill scratches. Follow directions included on paint stick for use and for drying.
3. Smooth out surface using an automotive polishing compound. Do not use power buffer.