![]()
21-Inch Walk-Behind Rotary Mowers
Introduction
Product Identification
Safety
Operating
Replacement Parts
Service Intervals
Service
Engine Warranty Maintenance Statement
Cleaning and Replacing Air Cleaner Element
Cleaning and Gapping Spark Plug
Cleaning Drive Belt and Transmission Area JS61 and JS63
Checking and Replacing Drive Belt JS61 and JS63
Transmission Cable Adjustment-JS63
Lubricate Drive Shaft Hub Bushings
Troubleshooting
Storing Machine
Assembly
Specifications
Warranty
John Deere Quality Statement
Service Record

Service
Engine Warranty Maintenance Statement
Maintenance, repair, or replacement of the emission control devices and systems on this engine, which are being done at the customers expense, may be performed by any nonroad engine repair establishment or individual. Warranty repairs must be performed by an authorized John Deere dealer.
Adjusting Carburetor
NOTE: Carburetor is calibrated by the engine manufacturer and should not require any adjustments.
NOTE: If engine is operated at altitudes above 1829 m (6,000 ft.), some carburetors may require a special high altitude main jet. See your John Deere dealer.
If engine is hard to start or runs rough, check the TROUBLESHOOTING section of this manual.
After performing the checks in the troubleshooting section and your engine is still not performing correctly, contact your John Deere dealer.
Avoid Fumes
· If it is necessary to run an engine in an enclosed area, use an exhaust pipe extension to remove the fumes. |
Engine Oil
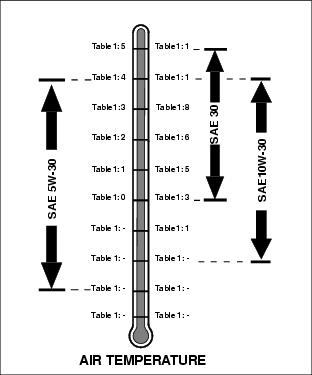
Use oil viscosity based on the expected air temperature range during the period between oil changes.
The following John Deere oils are preferred:
The following John Deere oils are also recommended, based on their specified temperature range:
Other oils may be used if above John Deere oil is not available, provided they meet one of the following specifications:
· SAE 10W-30-API Service Classification SG or higher
· SAE 30-API Service Classification SC or higher
Checking Engine Oil Level
1. Stop engine. Put mower on a level surface.
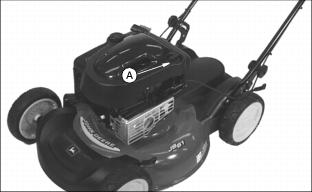
2. Turn oil dipstick (A) 1/4 turn counterclockwise. Remove dipstick and wipe it with a clean cloth.
3. Install dipstick. Turn dipstick 1/4 turn clockwise and tighten.

4. Remove dipstick. Check oil level. Oil level MUST BE between ADD and FULL marks. If not, pour oil into dipstick tube to bring level to FULL mark (B).
5. Install and tighten dipstick.
Changing Engine Oil
NOTE: Two different methods can be used for changing the engine oil. Both options are acceptable service procedures based on customer preference.
TO CHANGE ENGINE OIL FROM THE TOP:
1. Park mower on a level surface.
2. Run engine until fuel tank is empty or near empty.
3. Stop engine and disconnect spark plug wire.

4. Turn oil dipstick (A) 1/4 turn left and remove from the filler tube.
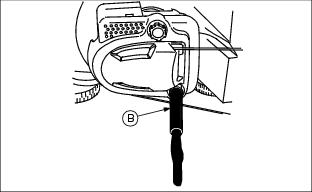
5. Insert plastic drain tube (B) firmly inside filler tube opening.
6. Place a drain pan on the left side of the mower.
7. Turn mower onto its LEFT SIDE.
8. Allow engine oil to drain from the dipstick filler tube location into the drain pan.
9. After oil has drained, return mower to an upright position.
10. Remove plastic drain tube. Clean area around filler tube.
11. Add approximately 0.47 L (16 oz) oil through dipstick filler tube.
12. Install dipstick. Turn dipstick 1/4 turn right to tighten.
13. Remove dipstick. Check oil level. Add oil to FULL mark if necessary.
14. Install and tighten dipstick.
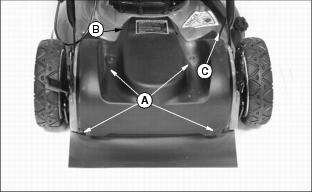
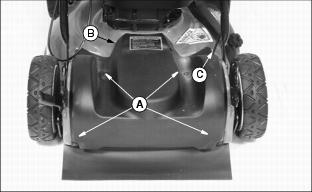
TO CHANGE ENGINE OIL FROM THE BOTTOM:
1. Stop engine and disconnect spark plug wire.
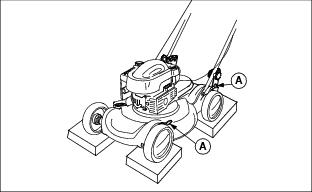
2. Raise cutting height adjustment levers (A) to the highest cutting position. (See Adjusting Cutting Height in the Operating section.) Elevate entire mower an additional 102 mm - 203mm (4-8 in.) using wooden blocks or bricks.
3. Place a drain pan under the mower.

4. Remove drain plug (B) from underside of mower using a 3/8 in. square drive.
5. After oil has drained, clean and install drain plug.
6. Turn oil dipstick 1/4 turn to the left. Remove dipstick.
7. Add approximately 0.47 L (16 oz) oil through the dipstick filler tube.
8. Install dipstick. Turn dipstick 1/4 turn right to tighten.
9. Remove dipstick. Check oil level. Add oil to FULL mark if necessary.
10. Install and tighten dipstick.
12. Return cutting height adjustment levers to a desirable cutting height.
Cleaning and Replacing Air Cleaner Element
1. Stop engine and disconnect spark plug wire.

2. Clean area around cover (A).
3. Loosen screw (B). Tilt cover (A) down.

4. Remove paper air cleaner element (C).
5. Tap element gently to remove dust.
· With a break, hole, or damaged seal.
· If engine performance is poor.
7. Install air cleaner element.
8. Rotate cover to a closed position.
9. Tighten screw. DO NOT overtighten.
Cleaning and Gapping Spark Plug
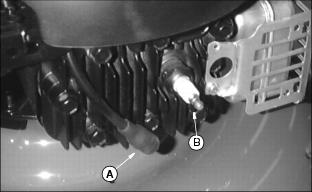
1. Disconnect spark plug wire (A). Remove plug (B).
2. Carefully wire brush carbon from plug. Do not clean it with abrasives in a machine.
3. Inspect plug for damage. Replace damaged plug.
4. Adjust gap to 0.76 mm (0.030 in.).
5. Install and tighten plug to 20 N·m (15 lb-ft).
Cleaning Engine Cooling Fins

Clean fins (A) with a brush, rag, or compressed air.
Also, blow compressed air under the shroud.
Cleaning Drive Belt and Transmission Area JS61 and JS63

1. Remove hardware (A) and belt shield (B).
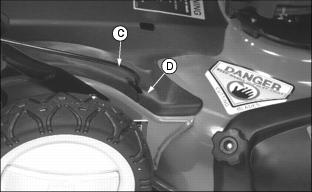
2. Remove control cables (C) from belt shield notch (D).

3. Remove clippings from belt area and top of the transmission.
4. Slide control cable into belt shield notch.
Checking and Replacing Drive Belt JS61 and JS63
1. Stop engine and disconnect spark plug wire.
2. Remove hardware (A) and belt shield (B).

3. Remove control cables (C) from belt shield notch (D).
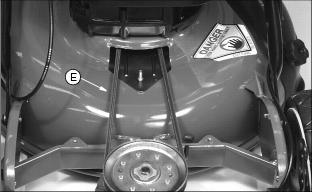
4. Inspect belt (E) for excessive wear or damage.
TO REPLACE DRIVE BELT:
NOTE: On model JS61 only, the anti-rotation bracket must be removed prior to pushing the drive sheave forward to remove the drive belt.

Picture Note: View is from underside of differential.
1. Remove cap screw (F) and anti-rotation bracket.
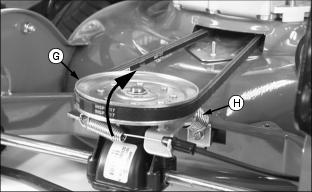
2. Push drive sheave (G) forward to relieve spring tension on belt.
NOTE: Tension spring (H) may come loose when belt is removed.
3. Remove belt from drive sheave.
4. Move belt into underside of mower deck.
5. Turn mower onto its LEFT SIDE.
6. Remove mower blade. (See Check Blade in this section.)
7. Remove drive belt from blade sheave.
8. Install new drive belt to blade sheave.
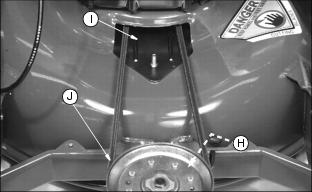
9. Insert belt through deck opening (I).
10. Install tension spring (H) if removed.
11. Check that drive belt is installed on engine sheave.
12. Push drive sheave (J) forward and install belt to sheave.
13. Install anti-rotation bracket and secure with cap screw.
· Tighten mower blade bolt to 75 N·m (55 lb-ft).
16. Slide control cables into belt shield notch.
17. Install belt shield and connect spark plug wire.
Transmission Cable Adjustment-JS63
1. Stop engine and disconnect spark plug wire.
2. Remove hardware (A) and belt shield (B).
NOTE: Transmission cable adjustment can be performed without removing belt and pulley. The belt and pulley have been removed for clarity of pictures.

3. Remove control cables (C) from belt shield notch (D)

4. Push drive sheave (E) forward to relieve spring tension on belt and remove drive belt (F).
5. Remove E-clip (G) and drive sheave.

6. Measure the clutch spring length (H) in the relaxed position. Record this value.

7. Engage the transmission bail (at handle bar) and measure the spring length in the extended position (I).
8. The spring extension length (the difference between A and B measurements) must be 10 mm (0.390 in.).

9. To adjust spring extension, use an 8 mm wrench, loosen (do not remove) the cable mount bracket capscrews (J)
NOTE: For transmission clutch to operate properly, there must be a certain amount of spring pressure engaging the cones or the transmission will slip and NOT drive the wheels.

10. Slide bracket (K) the required distance to obtain the 10 mm (0.390 in.) spring extension length (difference between the length of the relaxed spring and the length of the extended spring). Tighten capscrews.
11. Repeat steps 6 and 7 to verify the 10 mm (0.390 in.) spring extension length.
12. Install cables through notch in cover.
13. Install cover and secure with two bolts and two bolts and nuts. Make sure shield is installed with cover.
14. Start engine and verify the transmission is operating properly.
NOTE: Make sure the transmission immediately disengages when the bail is released.
15. If transmission does not disengage when bail is released, reduce spring extension length, and verify transmission is operating properly.
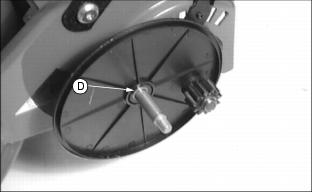
Lubricate Drive Shaft Hub Bushings
Service Interval: Lubricate drive shaft hub bushings every 25 hours or once a year.

1. Remove hardware (A) and belt shield (B).

2. JS61 & JS63: Remove control cable (C) from belt shield notch (D).
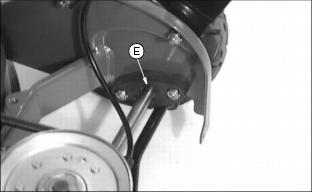
3. Tilt mower slightly to one side. Lubricate driveshaft hub bushing (E) with a few drops of light weight motor oil. Repeat procedure for other side.
4. JS61 & JS63: Slide control cables (C) into belt shield notch (D).
Lubricate Mower Axles
Service Interval: Lubricate each mower axle every 25 hours or once a year.
1. Tip mower to one side to elevate mower wheels slightly off the ground. Use a wood block to keep side of mower in a raised position.

2. Remove plastic hubcaps (A).
· Use a screwdriver in slot (B) to pry the hubcap from each wheel.
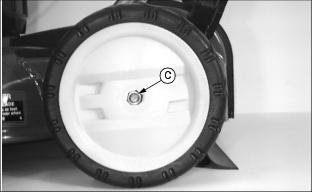
4. Remove wheel from each axle.
5. Apply a light coating of grease to each axle (D).
6. Install wheels, hardware and hubcaps.
8. Repeat procedure on other side of mower.
Check Blade
NOTE: Sharpened edges on blade tips must face upward when installing blade.
CHECK BLADE:

· Tighten Bolt (A) to 75 N·m (55 lb-ft).
· Sharpen dull blade. (See Sharpening Blade in this section.)
TO REMOVE BLADE:
· Remove bolt (A), washer (B), and blade.
Sharpening Blade
IMPORTANT: Avoid damage! Balance blade after you sharpen it. An unbalanced blade may cause excessive vibration. |
Sharpen blade with grinder, hand file or electric blade sharpener.
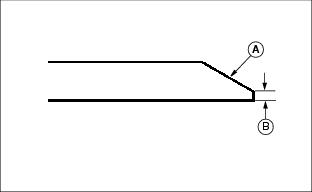
Keep original bevel (A) when you grind. Blade should have 0.40 mm (1/64 in.) cutting edge (B).
Balance and Install Blade
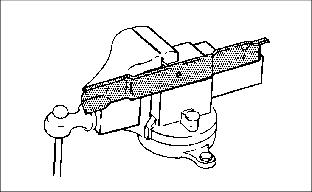
1. Clean blade. Put it on a nail in vise or on a wall. Heavy end of blade will drop. Grind bevel of heavy end. Do not change bevel.
2. Install blade, washer, and bolt.
3. Tighten bolt to 75 N·m (55 lb-ft).
1. STOP engine. If engine is hot let it cool several minutes before you add fuel.
2. Remove grass clippings and other trash from tank area.
4. Fill tank with fresh fuel only to bottom of filler neck.
Cleaning Fuel Cap Vent
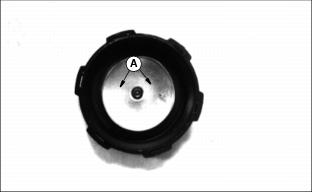
1. Check two vents (A) under metal ring of fuel cap and vent in top, center of cap.
2. Clean cap and vents in nonflammable solvent. Allow cap to dry.