![]()
21-Inch Walk-Behind Rotary Mowers
Introduction
Product Identification
Safety
Operating
Replacement Parts
Service Intervals
Service
Engine Warranty Maintenance Statement
Checking and Cleaning Air Cleaner Element
Cleaning and Gapping Spark Plug
Troubleshooting
Storing Machine
Assembly
Specifications
Warranty
John Deere Quality Statement
Service Record

Service
Engine Warranty Maintenance Statement
Maintenance, repair, or replacement of the emission control devices and systems on this engine, which are being done at the customers expense, may be performed by any nonroad engine repair establishment or individual. Warranty repairs must be performed by an authorized John Deere dealer.
Adjusting Carburetor
NOTE: Carburetor is calibrated by the engine manufacturer and should not require any adjustments.
NOTE: If engine is operated at altitudes above 1829 m (6,000 ft.), some carburetors may require a special high altitude main jet. See your John Deere dealer.
If engine is hard to start or runs rough, check the TROUBLESHOOTING section of this manual.
After performing the checks in the troubleshooting section and your engine is still not performing correctly, contact your John Deere dealer.
Avoid Fumes
· If it is necessary to run an engine in an enclosed area, use an exhaust pipe extension to remove the fumes. |
Engine Oil
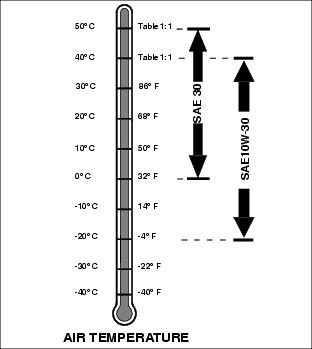
Use oil viscosity based on the expected air temperature range during the period between oil changes.
The following John Deere oils are preferred:
The following John Deere oils are also recommended, based on their specified temperature range:
Other oils may be used if above John Deere oil is not available, provided they meet one of the following specifications:
· SAE 10W-30-API Service Classification SG or higher
· SAE 30-API Service Classification SC or higher
Checking Engine Oil Level
1. Park mower on level surface and stop engine.

2. Turn oil dipstick (A) 1/4 turn counterclockwise and remove from the filler tube.
3. Wipe dipstick off with clean cloth.
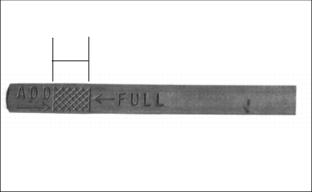
5. Remove dipstick. Check oil level. Oil should be between ADD and FULL marks shown on dipstick, not above FULL mark.
7. Install and tighten dipstick.
Changing Engine Oil
1. Park mower on level surface.
2. Drain fuel from tank or run engine until fuel tank is empty or near empty.
3. Stop engine and disconnect spark plug wire.

4. Turn oil dipstick (A) 1/4 turn counterclockwise and remove from the oil filler tube.
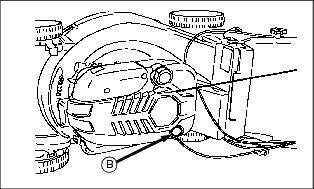
5. Insert plastic drain tube supplied with mower firmly inside oil filler tube opening (B).
6. Place a drain pan on the left side of the mower.
7. Turn mower onto its left side.
8. Allow engine oil to drain from the dipstick filler tube location into the drain pan.
9. After oil has drained, return mower to an upright position.
10. Remove plastic drain tube. Clean area around filler tube.
11. Add 0.47 L (16 oz) oil through dipstick filler tube.
12. Install dipstick. Turn dipstick 1/4 turn clockwise to tighten.
13. Remove dipstick. Check oil level. Add oil to FULL mark if necessary.
14. Install and tighten dipstick.
Checking and Cleaning Air Cleaner Element
1. Park machine safely. (See Parking Safely in the Safety Section.)
3. Disconnect spark plug wire.
4. Clean dirt and debris from air cleaner cover.
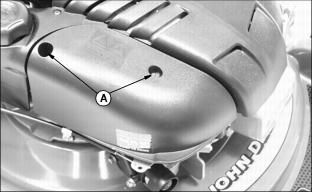
5. Loosen screws (A), and remove cover.
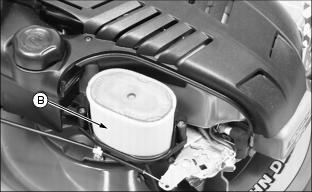
6. Inspect the foam pre-cleaner (B) without removing it. If the foam pre-cleaner is dirty:
a. Remove it from the filter carefully, leaving the paper element in the air cleaner housing.
b. Wash pre-cleaner in a solution of warm water and liquid detergent.
c. Rinse pre-cleaner thoroughly. Squeeze out excess water in a dry cloth until pre-cleaner is completely dry.
7. Inspect the paper element without removing it. If the paper element is damaged or dirty, remove and replace it with a new element.
8. Clean air cleaner base carefully, preventing any dirt from falling into carburetor.
9. Install foam pre-cleaner onto paper element and install into air cleaner base.
10. Close cover and tighten screws. Do not overtighten.
Cleaning and Gapping Spark Plug
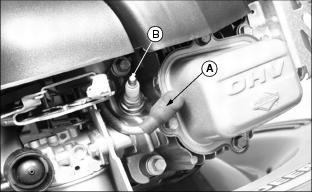
1. Disconnect spark plug wire (A). Remove spark plug (B).
2. Carefully wire brush carbon from plug. Do not clean it with abrasives in a machine.
3. Inspect plug for damage. Replace damaged plug.
4. Adjust gap: 0.51 mm (0.02 in.).
5. Install and tighten plug to 20 N·m (15 lb-ft).
Cleaning Engine Cooling Fins
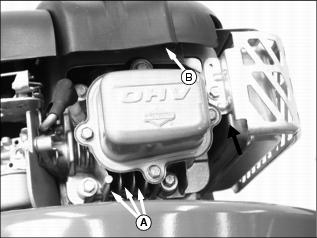
1. Park mower on level surface and stop engine.
3. Clean fins (A) and under cover (B) with brush, rag, or compressed air.
Lubricate Mower Axles
Front Axle
1. Tip mower to one side to elevate mower wheels slightly off the ground. Use a wood block to keep side of mower in a raised position.
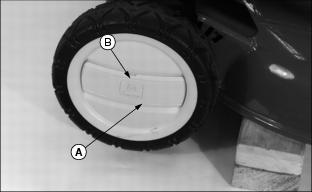
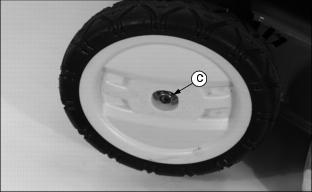
2. Remove plastic hubcaps (A).
· Use a screwdriver in slot (B) to pry the hubcap from wheel.
4. Remove wheel from each axle.
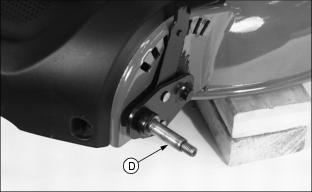
5. Apply a light coating of grease to axle (D).
6. Install wheels, hardware and hubcaps.
8. Repeat procedure on other side of mower.
Rear Axle
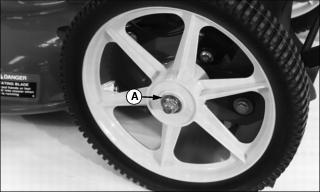
Rear wheels are equipped with sealed bearings (A). It is not necessary to put lubrication on the rear axle.
Servicing Mower Blades
NOTE: Sharpened edges on blade tips must face upward when installing blade.
Removing Mower Blades

1. Remove bolt (A), washer (B), and blade.
2. Inspect blade; sharpen, balance or replace blade as necessary.
Installing Mower Blades
1. Lubricate bolt threads lightly with a general purpose grease or oil. This lubrication is to prevent rusting and seizing.

2. Tighten bolt (A) to 75 N·m (55 lb-ft).
Sharpening Blades
Sharpen blades with grinder, hand file, or electric blade sharpener.

Keep original bevel (A) when grinding.
Blade should have 0.40 mm (1/64 in.) cutting edge (B) or less.
Balance blades before installing.
Balancing Blades
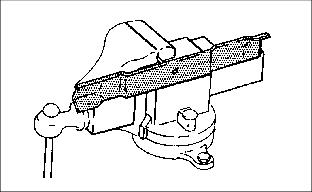
2. Put blade on nail in a vise. Turn blade to horizontal position.
3. Check balance. If blade is not balanced, heavy end of blade will drop.
4. Grind bevel of heavy end. Do not change blade bevel.
Filling Fuel Tank
Use regular grade 87 octane unleaded fuel.
Add John Deere fuel stabilizer to fuel before using it in your machine to prevent engine damage due to stale fuel. Follow directions on stabilizer container.
1. Stop engine. If engine is hot let it cool several minutes before you add fuel.
2. Remove grass clippings and other trash from tank area.
4. Fill tank with fresh fuel only to bottom of filler neck.
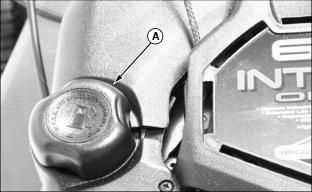
Cleaning Fuel Cap Vent
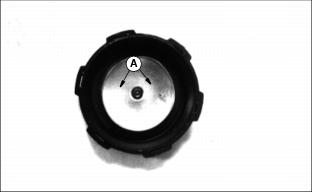
1. Check two vents (A) under metal ring of fuel cap and vent in top, center of cap.
2. Clean cap and vents in nonflammable solvent. Allow cap to dry.