![]()
21-Inch Walk Behind Rotary Motor
Introduction
Safety Signs
Controls
Operating
Lawn Care
Replacement Parts
Service Machine Safely
Service
Troubleshooting
Storing Machine
Assembly
Specifications
Warranty
John Deere Quality Statement

Storing Machine
Storing Safety
Preparing Machine for Storage
1. Clean engine and top of deck.
3. Clean belt and transmission area. DO NOT use water to clean this area. Install shield.
4. Disconnect spark plug wire. Turn mower onto its RIGHT SIDE.
5. Clean underside of deck with water pressure to remove grass buildup, lawn chemicals, and fertilizer. DO NOT spray the transmission with water.
7. Install spark plug and start mower. Engage mower blade for at least 15 seconds to eliminate water from clutch area.
8. Change engine oil and filter. Do when engine is warm.
9. Service air filter if necessary.
10. Clean debris from engine air intake screen.
11. Repair any worn or damaged parts. Replace parts if necessary. Tighten loose hardware.
12. Be sure all shields and guards are in place.
14. Paint scratched or chipped metal surfaces to prevent rust.
15. Apply light coat of engine oil to pivot and wear points to prevent rust.
NOTE: Properly preparing your engine for storage will make it easier to start the following season. Engine storage procedure should be used if vehicle is stored for longer than 60 days.
1. Stop mower in a well-ventilated area.

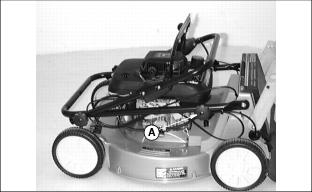
2. Turn fuel shut-off valve (A) to OFF.
IMPORTANT: Avoid damage! Be sure fuel is fresh when adding fuel |
4. Add stabilizer to fuel system.
· Mix fresh fuel and fuel stabilizer in separate container. Follow stabilizer instructions for mixing.
NOTE: Filling the fuel tank reduces the amount of air in the fuel tank and helps reduce deterioration of fuel.
· Fill fuel tank with stabilized fuel.
5. Remove spark plug. Put 30 mL (1 oz.) of clean engine oil in cylinder.
6. Install spark plug, but DO NOT connect spark plug wire.
7. Crank the engine for approximately five seconds to allow oil to be distributed.
8. Fold handlebar assembly if desirable. DO NOT crimp or pinch cables. (See Fold Handles in this section.)
9. Store the vehicle in a dry, protected place. If vehicle is stored outside, put a waterproof cover over it.
Remove Mower from Storage
1. Unfold handles. Tighten knobs. Do not crimp cables.
2. Fill fuel tank with fresh gasoline.
4. Connect wire to spark plug.
5. Inspect shields, safety devices and hardware.
6. Lubricate rear axle bushings.
7. Turn fuel shutoff knob to the OPEN position.
8. Run engine at the HALF-THROTTLE position briefly.
Fold Handles
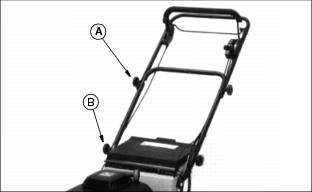
2. Loosen knob (A) 25 mm (1 in.) on each side. CAREFULLY lower upper handle (C) to the rear. Leave bolt heads against handle.
3. Remove knob and bolt (B) from each side.

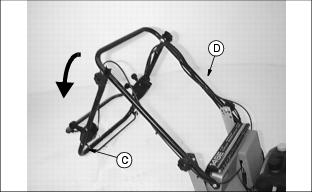
4. CAREFULLY fold lower handle (D) forward. Guide cables inside lower handle. DO NOT CRIMP CABLES.
5. Install bolts and knobs in handle.
Unfold Handles
1. Remove knob (A) and bolt from each side.
2. Install bolt in same square bracket hole and through handle on each side. The bracket should be inside handle.
4. Straighten handle. DO NOT CRIMP CABLES.