![]()
21-Inch Walk Behind Rotary Motor
Introduction
Safety Signs
Controls
Operating
Lawn Care
Replacement Parts
Service Machine Safely
Service
Engine Warranty Maintenance Statement
Changing Oil Filter (Optional)
Cleaning Air Cleaner Foam Element
Cleaning and Gapping Spark Plug
Cleaning Belt and Transmission Area
Troubleshooting
Storing Machine
Assembly
Specifications
Warranty
John Deere Quality Statement

Service
Service Intervals
· Clean air cleaner foam element. · Lubricate rear axle bearings. |
|
Service Record
Engine Warranty Maintenance Statement
Maintenance, repair, or replacement of the emission control devices and systems on this engine, which are being done at the customers expense, may be performed by any nonroad engine repair establishment or individual. Warranty repairs must be performed by an authorized John Deere dealer.
Adjusting Carburetor
NOTE: Carburetor is calibrated by the engine manufacturer and should not require any adjustments.
NOTE: If engine is operated at altitudes above 1829 m
(6,000 ft), some carburetors may require a special high altitude main jet. See your John Deere dealer.
NOTE: Possible engine surging will occur at high rpm when the transmission and the blades are disengaged. This is a normal condition due to the emission control system.
If engine is hard to start or runs rough, check the TROUBLESHOOTING section of this manual.
After performing the checks in the troubleshooting section and your engine is still not performing correctly, contact your John Deere dealer.
Avoid Fumes
· If it is necessary to run an engine in an enclosed area, use an exhaust pipe extension to remove the fumes. |
Use oil viscosity based on the expected air temperature range during the period between oil changes.
The following John Deere oils are preferred:
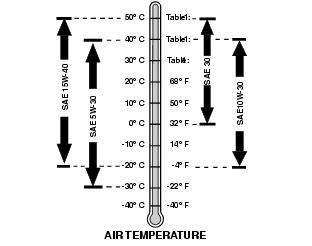
· TORQ-GARD SUPREME®
(SAE 5W-30)
The following John Deere oils are also recommended, based on their specified temperature range:
Other oils may be used if above John Deere oils are not available, provided they meet one of the following specifications:
· SAE 10W-40-API Service Classification SG or higher
· SAE 5W-30-API Service Classification SG or higher
· SAE 10W-30-API Service Classification SG or higher
· SAE 30-API Service Classification SC or higher
Checking Engine Oil Level

1. Stop engine. Put mower on a level surface.
2. Remove dipstick and wipe it with a clean cloth.
3. Install dipstick. DO NOT TIGHTEN, LET THREADS REST ON TOP OF TUBE.
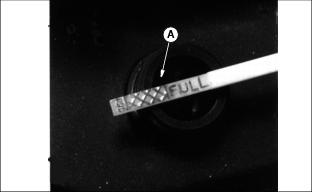
4. Remove dipstick. Check oil level. Oil level MUST BE between ADD and FULL marks. If not, pour oil into dipstick tube to bring level to FULL mark (A).
5. Install and tighten dipstick.
Changing Engine Oil
|
· Change oil after first 5 hours of operation. If you do not run mower 25 hours during mowing season, change oil before you store mower. |
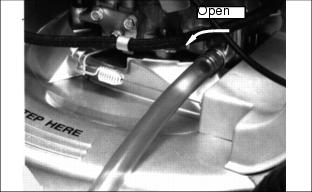
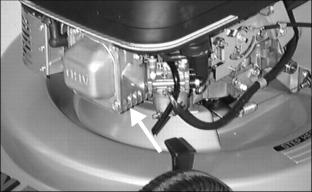
1. Install drain hose (included with mower) on oil drain fitting.
2. Turn fitting to the left to open drain. Drain oil into a container.
3. Tighten fitting. Remove hose.
4. Pour 0.6 L (20 oz) oil into dipstick tube.
5. Install dipstick. DO NOT TIGHTEN IT: LET THREADS REST ON TOP OF TUBE.
6. Check oil level. If necessary, add oil to bring level to the FULL MARK.
7. Install and tighten dipstick.
Changing Oil Filter (Optional)
IMPORTANT: Avoid damage! Change oil and filter after first 5 hours of operation. After that, change oil and filter every 50 hours or yearly, whichever comes first. |
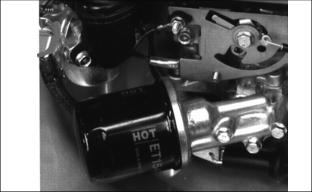
2. Remove filter by turning it to the left.
3. Apply a film of clean engine oil to new filter gasket.
4. Install filter by turning filter to the right until gasket contacts filter base. Tighten filter by hand 3/4 turn more.
5. Pour new oil into dipstick tube.
6. Run engine and check for leaks around filter.
7. STOP engine. Check oil level.
8. Install and tighten dipstick.
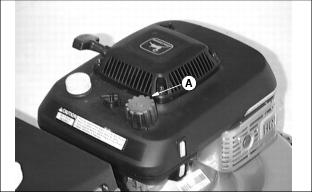
Cleaning Air Cleaner Foam Element
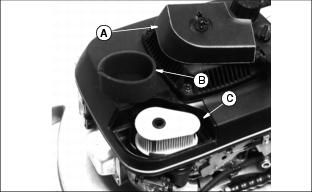
1. Clean cover and area around it. Remove cover (A).
2. Remove foam element (B) from paper element (C).
3. Wash foam element in non-flammable solvent or warm water-detergent solution.
5. Put 10-15 drops of clean engine oil on element. Squeeze element to distribute oil.
6. Inspect paper element. Install elements and cover.
Replacing Paper Element
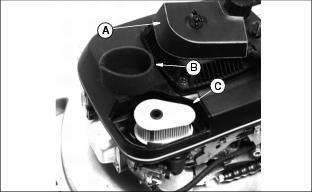
1. Clean cover and area around it. Remove cover (A).
2. Remove foam element (B) from paper element (C).
· With a break, hole, or damaged seal.
· If engine performance is poor.
Cleaning and Gapping Spark Plug

1. Disconnect spark plug wire (A). Remove plug (B).
2. Carefully wire brush carbon from plug. Do not clean it with abrasives in a machine.
3. Inspect plug for damage. Replace damaged plug.
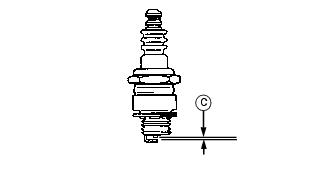
4. Adjust gap (C) to 0.76 mm
(0.030 in.).
5. Install and tighten plug to 20 N·m (15 lb-ft).
Cleaning Cooling Fins
Clean fins with a brush, rag, or compressed air.
Also, blow compressed air under the shroud.
Adjusting Traction Clutch
· Keep people and pets away from mower. · Keep hands and tools away from belt area when engine is running. |
Adjust clutch before 50 hours if mower slows as it goes uphill.
1. Remove knob (A) and shield(B).

3. Turn nut (D) down 6 mm (1/4 in.).
6. ENGAGE traction clutch lever to check clutch action.
7. If clutch needs more tension, repeat Steps 2 and 3.
8. Make sure pulley (E) does not turn when engine is running and clutch lever is DISENGAGED. If pulley turns when engine is running, traction clutch cable is adjusted too tight.
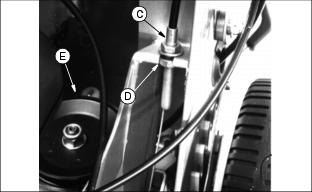
Adjusting Blade Brake Clutch
NOTE: Blade should stop within three seconds after you release blade stop lever. If not, adjust clutch.
1. Put blade engagement lever on handlebar all the way to the rear.
· Pull threaded fitting to rear to remove all cable slack.
· Turn nut (B) against deck fork.
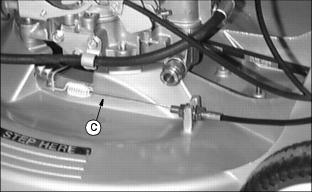
· Make sure there is tension on cable (C), but that it is not too loose or too tight. This will give maximum blade brake clutch engagement.
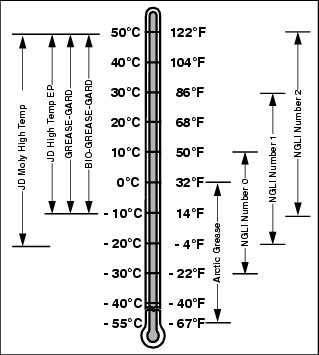
Grease
Use grease based on the expected air temperature range during the service interval.
The following greases are preferred:
· John Deere Moly High Temperature EP Grease.
· John Deere High Temperature EP Grease.
Other greases may be used are:
· SAE Multipurpose EP Grease with 3 to 5 percent molybdenum disulfide.
· Greases meeting Military Specification MIL-G-10924C may be used as arctic grease.
Lubricate Rear Axle Bearings
NOTE: Adjust mower height indicator until zerk is easy to get grease gun on.
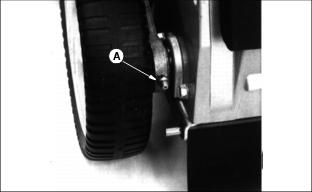
1. Wipe grease fittings clean.
2. Lubricate bearing (A) on each side with one shot of John Deere Multipurpose Grease or an equivalent.
Cleaning Mower
Clean engine and top of the deck.
Check and clean cooling fins, if necessary.
Grass clippings can build up in belt and transmission area. If necessary, remove belt shield and clean this area. DO NOT spray the transmission with water. (See Clean Belt and Transmission Area in this section.)
If you operate the mower in dusty conditions, clean air cleaner foam element.
Remove mulch plug. Spray under the deck with water under pressure to remove corrosive lawn chemicals and grass buildup. DO NOT spray the transmission with water. (See IMPORTANT information.)
Remove and shake bag to remove clippings.
If bag is caked with grass on the inside, use water under pressure to clean bag. Direct water from outside to inside of bag.
Clean grass clippings that may build up between the wheels and the mower deck.
Cleaning Fuel Cap Vent
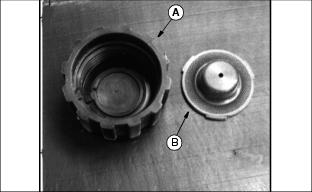
2. Remove rubber vent (B) from cap.
3. Clean cap and vent in an nonflammable solvent.
Cleaning Belt and Transmission Area
1. Remove knob (A) and shield (B).
2. Remove clippings from belt area and top of the transmission.

Servicing Mower Blade
IMPORTANT: Avoid damage! To help prevent air cleaner damage and hard starting: · Turn mower on its RIGHT SIDE when doing service under deck. |
NOTE: Wing on blade tip MUST point up.

2. Turn fuel shutoff knob (A) to CLOSED position.
3. Turn mower on its RIGHT side.
4. Hold mower blade with glove to prevent blade from spinning.

5. Remove bolts (B) and blade (C).
6. Inspect blades. Sharpen, balance, or replace as necessary.
1. Install blade, washers (cup-side against blade), and bolts.
2. Tighten bolts (B) to 75 N·m
(55 lb-ft).
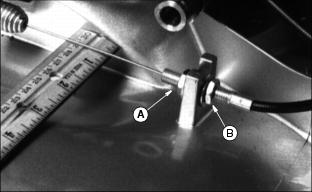
Sharpening Blade
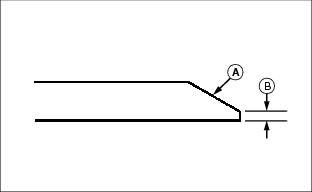
Sharpen blade with grinder, hand file, or electric blade sharpener.
Keep original bevel (A) when you sharpen. Blade should have 0.40 mm (1/64 in.) cutting edge (B).
Balance Blade

2. Put blade on a nail in vise or on a vertical wall stud. Turn blade to horizontal position.
3. If blade is not balanced, the heavy end of blade will drop.
4. Grind bevel of heavy end. Do not change bevel. (See Sharpening Blades in this section.)
Charging the Battery (JE75)
IMPORTANT: Avoid damage! Use only charger supplied with mower. Other chargers may permanently damage battery. |
NOTE: If battery is not used for an extended time, you may have to charge it.
NOTE: The battery can be charged by running the engine or by using the battery charger.

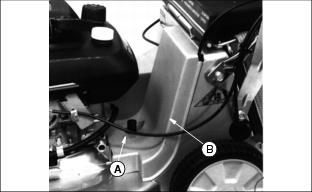
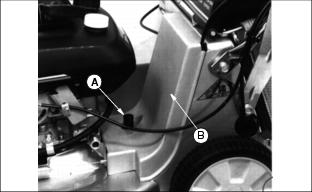
1. Disconnect battery wire connector (A) from engine wire connector (B).
2. Connect battery charger cord connector (C) to battery wire connector (A).
3. Plug charger into a 115-volt house receptacle. For a new or discharged battery: Charge battery 24-36 hours.
4. Unplug cord from house receptacle, then from battery.
5. Connect battery wire connector to engine wire connector.
Removing the Battery (JE75)
NOTE: If battery becomes permanently damaged, it can be removed and replaced.
NOTE: If the battery is not used for an extended time, you may need to charge it. (See Charging the Battery in this section).
1. Remove knob (A) and shield (B).

2. Disconnect battery wire connector from engine wire connector.

3. Using a 10 mm wrench, loosen lock nut (C) and rotate battery retainer (D) away from the battery.

Fuel
IMPORTANT: Avoid damage! Avoid spilling fuel. Fuel can damage plastic and painted surfaces. DO NOT mix oil with gasoline. Unleaded gasoline with an octane rating of 87 or higher is recommended. |
Dirt in the fuel system is a major cause of performance problems. Be sure to clean any grass or trash from the top of the tank before removing lid. Use of a PLASTIC funnel with a plastic mesh strainer when filling the tank will prevent most foreign material from entering the tank.
Regular grade 87 octane unleaded fuel is recommended for use in your mower. Higher octane fuels will seldom make your mower perform better. If your mower develops a starting or performance problem immediately after use of new fuel, change supplier or fuel brand. If the problem still exists after switching fuel, see your John Deere dealer for service.
Fuels are blended to give peak performance during cold weather and warm weather. For cold weather, gasoline is specially blended to provide better starting capabilities. However, avoid prolonged storage of cold-weather blended fuel because it will evaporate more quickly. You may experience longer cranking times in cold weather with "old" fuel. Buy smaller amounts of cold-weather blended fuel in winter.
Fuels used during the summer are not required to provide improved starting properties so they are blended differently. As a result, you may experience hard starting or other performance problems during cold weather if you use fuel remaining from summer uses.
Oxygenated or Reformulated Fuels
Many areas are now required to add "oxygenates" (either alcohol or ether) which blend oxygen into the fuel to help reduce exhaust emissions. If you use oxygenated fuel be sure it is unleaded and meets the minimum octane rating requirement. DO NOT use fuel that contains methanol to avoid producing excess emissions.
Although fuels blended with alcohol or ether allow your engine to run cleaner, they may contribute to fuel system damage and performance problems by causing gum and varnish deposits, especially if fuel is stored for several weeks or more.
Using clean, fresh fuel will help to prevent damage to the fuel system and will help maintain peak engine performance. If engine performance problems occur, use fuel from another supplier before suspecting machine problems. Suppliers blend fuels differently and changing suppliers will generally solve any performance problems.
Using Fresh Fuel and Stabilizers
The best thing you can do to ensure peak performance of your engine is to use "fresh" fuel. Your mower's engine will perform well with most good-quality fresh fuels regardless of additives. Any fuel will begin to deteriorate and evaporate over time and begin to form gum and varnish deposits in the fuel system. Help to avoid this by buying only enough fuel to last approximately 30 days or add fuel stabilizer immediately.
Adding a fuel stabilizer to the fuel system is recommended any time the mower will not be operated for more than 60 days. Varnish deposits may build up in the carburetor in as little as a few weeks by using stale, oxygenated fuel.
No stabilizer will work with "stale" fuel, any fuel that is more than 30 days old. (See Preparing Your Engine For Storage in this section for information on adding stabilizer to the fuel.)
FILLING FUEL TANK
Fuel tank capacity is 1.4 L (1.5 qt).
1. STOP engine. If engine is hot let it cool several minutes before you add fuel.
2. Remove grass clippings and other trash from tank area.