PIN (122001-) (133001-) (144001-)
IntroductionProduct Identification
Safety
Operating
Replacement Parts
Service Intervals
Service Lubrication
Service Engine
Service Transmission
Transmission and Hydraulic Oil
Checking Front Axle Oil Level (MFWD Only)
Changing Front Axle Oil (MFWD Only)
Checking Transmission Oil Level
Changing Transmission Oil, Oil Filter and Suction Screen
Checking and Cleaning the Rockshaft Control Valve Filter
Service Electrical
Service Miscellaneous
Troubleshooting
Storage
Assembly
Specifications
Warranty
John Deere Quality Statement
Service Record

Service Transmission
Transmission and Hydraulic Oil
IMPORTANT: Avoid damage! Use recommended oil only. Do not use engine oil or "Type F" automatic transmission fluid. |
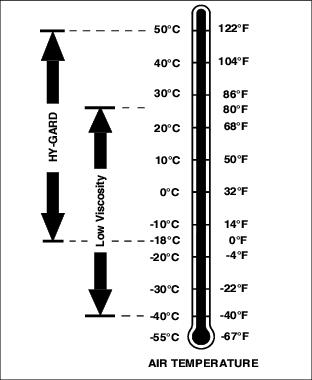
Use oil viscosity based on the expected air temperature range during the period between oil changes.
John Deere Low Viscosity HY-GARDŽ Transmission/Hydraulic Oil is recommended. Standard John Deere HY-GARDŽ Transmission/Hydraulic Oil may also be used.
Other oils may be used if they meet John Deere standard JDM J20D or J20C.
Checking Front Axle Oil Level (MFWD Only)
IMPORTANT: Avoid damage! Allow oil one hour to settle before checking level to ensure accurate dipstick reading. Repeat oil level check after several hours of operation. |
1. Park machine safely. (See Parking Safely in the SAFETY section.) Allow machine to cool down for at least one hour.
IMPORTANT: Avoid damage! Dirt and debris in oil may cause damage to the transaxle. Clean area around opening before removing dipstick. |
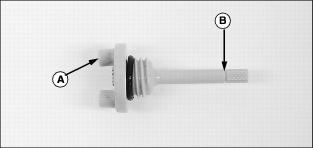
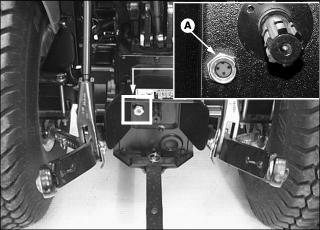
2. Loosen and remove dipstick (A) located on right side of front axle.
3. Wipe dipstick clean with a rag. Install and tighten dipstick.
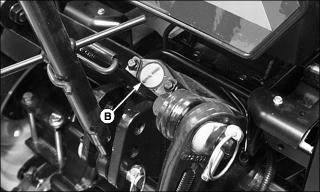
4. Remove dipstick. Oil level should be at fill mark (B). If oil level is low:
a. Add John Deere HY-GARDŽ J20D or J20C oil or equivalent through dipstick fill opening until oil level is correct.
b. Install and tighten dipstick.
5. Check front axle oil level again after the first several hours of operation.
Changing Front Axle Oil (MFWD Only)
1. Operate machine to warm front axle oil.
2. Park machine safely. (See Parking Safely in the SAFETY section.)
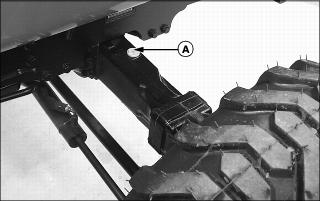
3. Position drain pan under differential drain plug (A).
NOTE: For draining purposes, front axle contains approximately 4.5 L (4.7 qt) of oil.
4. Remove differential drain plug and allow oil to drain.
5. Position drain pan under axle drain plug (B) on both sides of front axle.
6. Remove axle drain plugs and allow oil drain.
7. Install and tighten drain plugs (A) and (B) after all oil has drained.
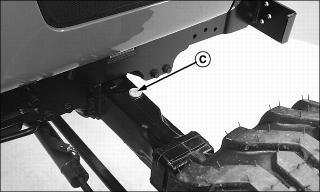
8. Remove dipstick (C) located on right side of front axle.
9. Add approximately 4.5 L (4.7 qt) of John Deere Low Viscosity HY-GARDŽ (J20D) or HY-GARDŽ (J20C) or equivalent into dipstick filler opening.
10. Install and tighten dipstick.
IMPORTANT: Avoid damage! Allow oil one hour to settle before checking level to ensure accurate dipstick reading. Repeat oil level check after several hours of operation. |
11. Check front axle oil level.
Checking Transmission Oil Level
IMPORTANT: Avoid damage! Allow oil one hour to settle before checking level to ensure accurate dipstick reading. Check oil level after several hours of operation. |
1. Park machine safely. (See Parking Safely in the SAFETY section.) Allow machine to cool down for at least one hour.
2. Locate sight glass (A) on rear of transmission next to the rear PTO stub shaft. Oil should be maintained to a mid-level range on the sight glass.
ˇ Remove oil fill cap (B). Add John Deere Low Viscosity HY-GARDŽ (JDM J20D) or equivalent oil at fill cap location until oil level reaches mid-level range on the sight glass.
4. Install and tighten fill cap.
Changing Transmission Oil, Oil Filter and Suction Screen
1. Run engine a few minutes to warm the transmission oil.
2. Park machine safely. (See Parking Safely in the SAFETY section.)
NOTE: For draining purposes, the gear transmission contains approximately 24 L (6.3 gal) of oil and the hydrostatic transmission contains approximately 26 L (6.8 gal) of oil.
3. Position drain pan under transmission drain plug (A). Remove plug and allow oil to drain.
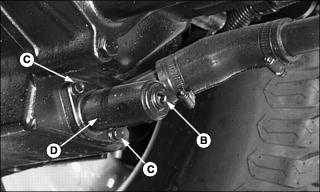
4. Position drain pan under suction screen cover drain plug (B). Remove plug and allow oil to drain.
5. After oil is drained, remove two cap screws (C) and suction screen cover (D).
6. Remove gasket (E) and suction screen (F) from transmission housing.
ˇ It may be necessary to clean old gasket material from the suction screen cover and transmission housing mounting surfaces.
7. Clean suction screen (F) and suction screen cover (D) with a mild solvent. Allow to dry.
8. Install suction screen into transmission housing.
9. Install suction screen cover (D) and new gasket (E) onto transmission housing with cap screws (C).
10. Install drain plugs (A) and (B).
11. Locate hydraulic oil filter (G) under center of tractor.
12. Position a drain pan under the hydraulic oil filter. Remove and discard filter. Allow residual oil to drain completely.
13. Put a film of clean transmission oil on seal of new filter.
14. Fill the filter 1/3 to 1/2 full with specified hydraulic oil.
15. Install filter. Turn filter clockwise until gasket makes contact with the mounting surface. Tighten 1/2-3/4 turn after gasket contact.
17. Add preferred transmission oil or equivalent into fill opening until oil level reaches mid-level range on the sight glass (I).
ˇ Gear Models: Approximately 24 L (6.3 gal).
ˇ Hydrostatic Models: Approximately 26 L (6.8 gal).
19. Start engine. Check for oil leaks around filter base and drain plugs.
21. Check transmission oil level.
Checking and Cleaning the Rockshaft Control Valve Filter
NOTE: If changes in the operation of the 3-point hitch lift capacity are detected or the rockshaft control valve should begin to react slowly, erratic or fail to cycle properly, performance of this service procedure may be required.
1. Park machine safely. (See Parking Safely in the SAFETY section.)
2. Lower rockshaft completely to relieve hydraulic pressure from the system.
4. Disconnect seat safety switch connector (A).
5. Remove cap screws (B) and flanged hex nuts (C) to remove seat and seat platform assembly.
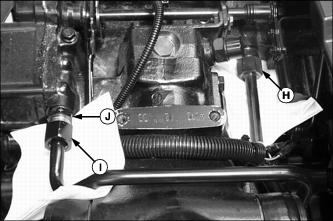
6. Remove cap screws (D) and screws (E). Raise right and left console panels (F) to access hydraulic tube and filter fitting location (G).
NOTE: Loosening the hydraulic fittings will cause hydraulic oil to leak. Place a rag or paper towel under each fitting to absorb any dripping oil.
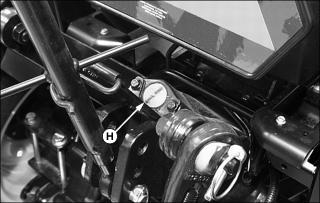
7. Loosen hydraulic tube nut (H) slightly.
8. Loosen hydraulic tube nut (I) completely. Carefully rotate hydraulic tube away from filter fitting (J).
NOTE: If fitting screen is found to be dislodged, the rockshaft control valve must be removed and inspected for debris. See your John Deere dealer if this service procedure is required.
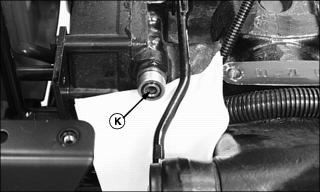
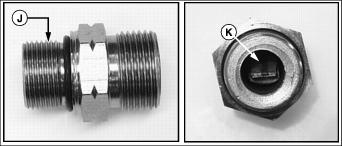
9. Visually check fitting screen (K) for any deposits or contaminants.
10. If necessary, remove fitting (J) and thoroughly flush screen (K) with a mild solvent. Allow to dry.
NOTE: Make sure the external O-ring and recessed
O-ring remain installed on filter fitting.
11. Install filter fitting and tighten to 100 Nˇm (74 lb-ft).
12. Reconnect hydraulic tube to control valve fitting.
ˇ Tighten both tube nuts to 60 Nˇm (44 lb-ft).
13. Install both console panels.
14. Install seat and seat platform assembly.
15. Connect seat safety switch connector.
17. Cycle rockshaft control lever forward and rearward several times and check for leaks.

