![]()
42-Inch for LX & GT Series Lawn & Garden Tractors
Introduction
Safety Signs
Preparing Vehicle
Install Pivot Bolts on Draft Arms (On ALL Models Except LX172, LX173, LX176, LX178, LX186, and LX188)
Install Pivot Bolts (On LX172, LX173, LX176, LX178, LX186, and LX188 Only)
Install J-Bracket on Lift Lever
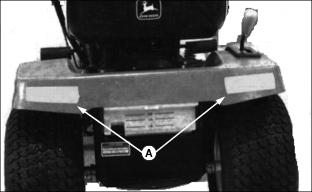
Install Reflective Tape (LX Series Tractors Only)
Installing
Removing and Storing
Operating
Replacement Parts
Service Machine Safely
Service
Troubleshooting
Assembly
Specifications
John Deere Service Literature
Quality Doesn't End When You Invest in a Deere
Copyright© Deere & Company

Preparing Vehicle
Install Tractor Requirements
NOTE: Before you attach snowthrower, REMOVE MOWER DECK from tractor. (See Removing and Storing Mower section in your Tractor Operator's Manual.)
· A FRONT IMPLEMENT LIFT KIT, BM18977, and ATTACHING PARTS KIT, BM19215, are REQUIRED to mount this snowthrower to your tractor. (See your John Deere dealer to order these attachments.)
· On GT SERIES TRACTORS, ONE of the following is REQUIRED for stability:
-ONE 19 kg (42 lb.) Rear Suitcase Weight, R66949, (OR),
-Tractor Trunk, BM19210, with 42 lbs. ballast, (OR),
RECOMMENDED on GT Series Tractors:
-FOUR Rear Suitcase Weights, R66949, (OR),
-Tractor Trunk, BM19210, with 150 lbs. ballast, (OR),
· On LX SERIES TRACTORS, one of the following is REQUIRED for stability:
- Install Rear Weight Bracket, BM17296, and TWO 19 kg (42 lb.) Rear Suitcase Weights, R66949, (OR),
- Tractor Trunk, BM19210, with 100 lbs. ballast.
On LX277-AWS: Mounting Kit, BM19797 is Required to install Rear Weight Bracket, BM17296, and Mounting Kit, BM19211, to install Tractor Trunk.
· REAR TIRE CHAINS can be added to help improve traction even more. See your John Deere dealer.
Check Tire Pressure
NOTE: See your Tractor Operator's Manual for correct tire pressure.
Check tire pressure with an accurate gauge.
Add or remove air, if necessary.
Install Pivot Bolts on Draft Arms (On ALL Models Except LX172, LX173, LX176, LX178, LX186, and LX188)
Change hardware on both draft arms:
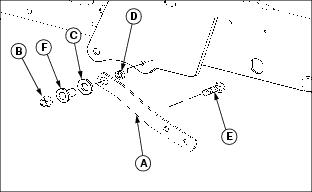
· Reuse original hardware from each draft arm (A): Flange nut (B), thick washer (C), and spacer (D).
· Discard original bolt from each draft arm and replace with M12 x 65 bolt (E) and flanged spacer (F) from bag of parts.
NOTE: If necessary, two extra washers from Bag of Parts can be used, one on each side, to reduce side play due to welding tolerances.
Install Pivot Bolts (On LX172, LX173, LX176, LX178, LX186, and LX188 Only)
IMPORTANT: Avoid damage! Follow steps below to install pins, then check for side play. If you do not install pivot pins correctly, snowthrower may slip off pins and cause damage. |
NOTE: If spacer falls out of draft arm when you remove pivot bolt, put spacer back in draft arm. Spacer MUST stay with draft arm.
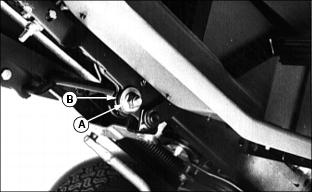
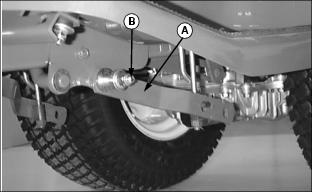
1. Remove nut, washer (A), and pivot bolt (B) from each side.
NOTE: Use nuts, washers and spacers removed in Step 1. DO NOT install more than two 13 x 37 x 3-mm washers behind pivot pin shoulder, or there won't be enough threads showing on pivot pin for lock nut.
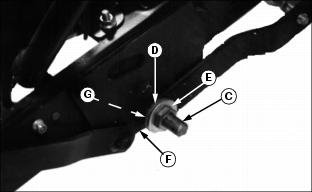
2. Install pivot pin (C), original washer (D) (on tractor), additional 37 mm washer (E) (provided), and spacer on bracket (F).
3. Install nut (G). Check: Draft arm must pivot freely.
NOTE: Some tractors may not have enough room for both washers.
4. Repeat Steps 2 and 3 on other side of tractor.
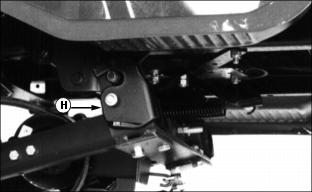
IMPORTANT: Avoid damage! to snowthrower and tractor: After you install snowthrower, pull snowthrower frame from side to side. Cam (H) must not slip off pivot pin. |
5. If necessary, two extra washers from Bag of Parts can be used, one on each side, to reduce side play due to welding tolerances.
Install Sway Bar Bracket
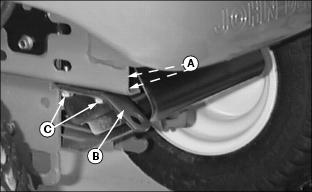
· Slide two M8 clamp-on nuts (A) over holes on right-front side of tractor frame.
· Align holes in sway bar bracket (B) with holes in bottom of frame and fasten with two M8 x 25 bolts (C). Tighten bolts.
· Follow next procedure if there is only ONE hole in the tractor frame.
If one hole in tractor frame, drill second hole (D) using sway bar bracket (B) as a template.
1. Install M8 clamp-on nut and M8 x 25 bolt (C) in first hole.
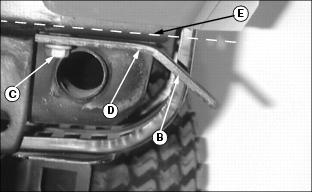
2. Move sway bar bracket so that it is flush with edge (E) of tractor frame. Tighten bolt (C).
3. Drill hole (D) into tractor frame using second hole of bracket as template.
4. Loosen bolt (C) and install M8 clamp-on nut and M8 x 25 bolt into drilled hole and bracket. Tighten both bolts.
Install J-Bracket on Lift Lever
1. Install J-bracket (A) 250 mm (10 in.) from top of lever (B) with long end to the outside as shown.
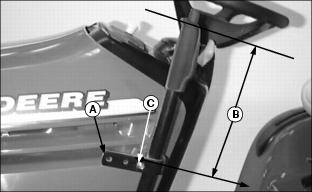
NOTE: On Model LX277-AWS: Dimension (B) should be 342.9 mm (13.5 in.).
2. Fasten bracket with M8 carriage bolt (C) and lock nut. Tighten nut.