![]()
Introduction
Safety Signs
Controls
Operating
Rotating Tines are Dangerous - Protect Children and Prevent Accidents
Using Wheel Drive Speed Selector
Replacement Parts
Service Machine Safely
Service
Troubleshooting
Storing Machine
Assembly
Specifications
Warranty
John Deere Quality Statement
Copyright© Deere & Company

Operating
Operate Safely

· Inspect machine before you operate. Be sure hardware is tight. Repair or replace damaged, badly worn, or missing parts. Be sure all safety protective devices are in good condition and fastened in place. Make any necessary adjustments before you operate.
· Clear work area of objects that might be thrown. Keep people and pets out of the work area. Stop machine if anyone enters the area.
· If you hit an object, stop the machine and inspect it. Make repairs before you operate. Keep machine properly maintained and in good working order.
· DO NOT leave machine unattended when it is running.
· Only operate during daylight or with good artificial light.
· Be sure of footing. Be especially careful when you pull machine backwards with the engine running.
· Stay behind the barrier on the handlebar when operating on the side of the machine.
· DO NOT attempt to force the tines down by hanging on the handlebar.
· Till across a hill - not up and down. Be careful when you change direction on a slope. DO NOT till excessively steep slopes.
· Keep a firm hold on the machine handle.
· Do not wear radio or music headphones while operating the machine. Safe operation requires your full attention.
Rotating Tines are Dangerous - Protect Children and Prevent Accidents
· Never assume that children will remain where you last saw them. Stay alert to the presence of children.
· Keep children in the house when you are operating the machine.
· Turn machine off if a child enters the area.
· Use extra care when you come to blind corners, or other objects that may block your vision.
· DO NOT let children or an untrained person operate the machine.
HELP PREVENT SERIOUS OR FATAL ACCIDENTS:
· Be alert at all times, people especially children can move quickly into the area before you know it.
· Stop the tines when crossing gravel drives, walks, or roads.
· Shut off tiller when you are not tilling.
· Keep hands, feet, and clothing away from rotating tines.
Wear Appropriate Clothing
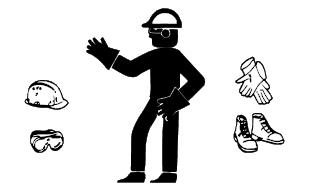
· Wear close fitting clothing and safety equipment appropriate for the job.
· Loud noise can cause impairment or loss of hearing, wear a suitable protective device such as earplugs.
· DO NOT operate the equipment when barefoot or wearing open sandals. Always wear substantial footwear.
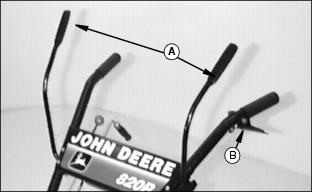
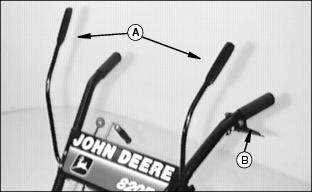
Adjust Handlebar Height
Adjust handlebar height by using three holes at bottom of handlebar legs.
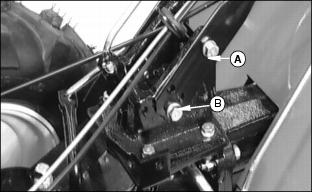
2. Remove cap screws, and lock washers (B).
3. Position handlebars at a safe comfortable tilling height.
4. Align holes and secure with cap screws and lock washers (B).
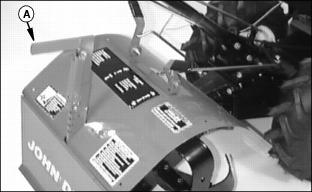
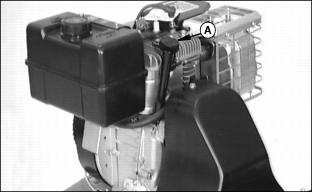
Adjust Handlebar Swivel
Handlebars may be positioned center, right or left.
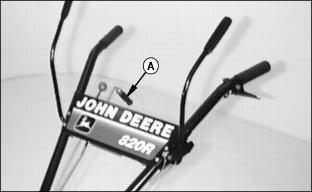
1. To move handlebars, pull back on handlebar swivel (A) until lock releases.
2. Swing handlebars left or right.
3. Release handlebar swivel and latch will lock in position by spring tension.
If the latch will not lock in position, it may be necessary to lubricate the handlebar swivel lock. See Lubricating Handlebar Swivel in the Service section.
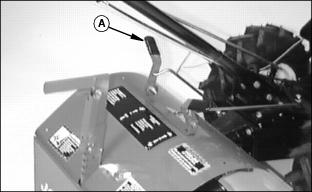
Adjust Depth Control
This tiller is equipped with a eight position depth control handle (A).
· Grasp tiller depth control handle and squeeze trigger.
· Increase tilling depth: Raise depth control handle.
· Decrease tilling depth: Lower depth control handle.
· Release trigger to engage appropriate notch in bar.
For transporting: Push depth control handle down to the lowest position and engage bottom notch.
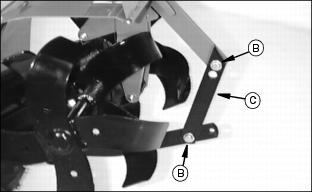
If you need to till at a deeper or shallower depth, remove hardware (B) and reposition bracket (C) in different mounting holes. Install and tighten hardware.
Using Wheel Drive Speed Selector
This tiller is equipped with a 2-speed transmission, slow and fast. Both wheels of tiller turn at same rate of speed because solid-axle provides them equal power. When the engine is running and the "t" or "r" speed is selected, wheels will turn after main clutch is engaged.
IMPORTANT: Avoid damage! DO NOT force Wheel Drive Lever when shifting. For easier shifting, roll tiller back and forth while moving the Wheel Drive lever. |

Slow Position: Move Wheel Drive lever (A) forward to the "t" position. This will be your SLOW speed.
· Use this "N" position when starting the engine.
· In this position, gears in the transmission are disengaged and the tiller may be moved by hand without engine power.
Fast Position: Move Wheel Drive lever (A) rearward to the "r" position. This will be your FAST speed.
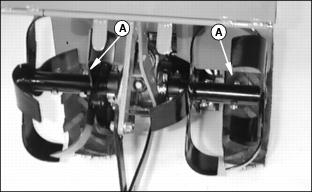
Engage Tine Clutch
Engage Tines: Move Tine clutch lever (A) forward (over center) to the "IN" position.
· In this position, when the engine is running, this will allow the tiller tines to spin.
· Clutch is spring loaded and will engage as main clutch is engaged.
Disengage Tines: Move Tine clutch lever (A) rearward (over center) to the "OUT" position.
· In this position, when the engine is running, the tiller tines will STOP spinning.
· Use this "OUT" position when starting the engine or when transporting tiller.
If the tine clutch lever does not shift smoothly or stay in the "IN" engaged position, it may be necessary to adjust the tine clutch linkage. See Adjusting Tine Clutch in the Service section.
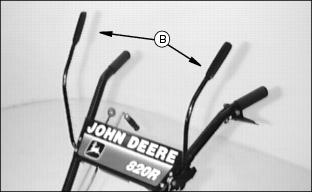
Using Main Clutch
The main clutch system consists of one set of "F" (forward) Top Levers (A) and one "R" (reverse) Bottom Lever (B).
· Pull "F" Top Levers (A) down to the handlebars. In this position, when the engine is running, the tiller tines will start spinning and the drive wheels will turn.
· The "F" Top Levers are one piece and can be operated with one hand. It is advised to operate this unit with both hands whenever possible.
· If forward drive is sluggish or will not fully engage. See Adjusting "Forward" Drive Belts Tension in the Service section.
· Both "F" Top Levers (A) and "R" Bottom Lever (B) are spring loaded to the "N" neutral position. The tiller will STOP.
· Use this "N" position when starting the engine.
· Release "F" Top Lever (A) before engaging "R" Bottom
Lever (B).
· Pull "R" Bottom Lever (B) up to the handlebars. In this position, when the engine is running, the tiller tines and the drive wheels will start spinning in reverse.
· If reverse drive is sluggish or will not fully engage. See Adjusting "Reverse" Drive Belt Tension in the Service section.
Pre-Starting Engine
1. Check that engine crankcase oil is full using dipstick (A). If necessary, see Checking Engine Oil in the Service section)
2. Check air filter and pre-cleaner for dirt. Clean as required. If necessary, see Checking Air Filter in the Service section)
3. Check fuel supply. If necessary, see Filling Fuel Tank in the Service section)
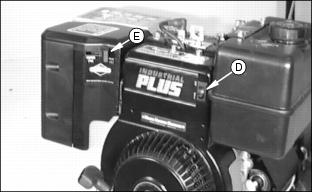
4. Make sure Main Clutch (B) is in the "N" neutral position.
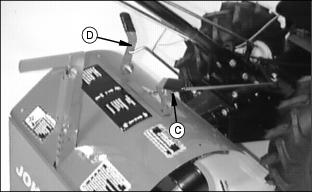
5. Put the Wheel Drive Speed Selector Lever (C) in the "N" neutral position.
6. Put the Tine Clutch (D) in the "OUT" (disengaged) position.
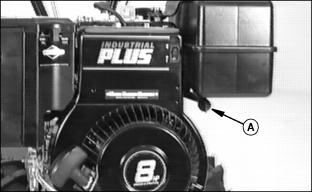
Using Fuel Shut-Off Valve
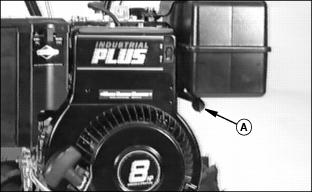
This unit is equipped with a 2-position fuel shut-off valve (A). Turn "Red" knob clockwise or counterclockwise to open or close the fuel shut-off valve.
· When performing any type of engine service.
· Fuel shut-off valve must be in the full OPEN (ON) position for proper fuel delivery to the engine.
Starting Engine
1. Make sure Main Clutch is in the "N" neutral position.

2. Put the Wheel Drive Speed Selector Lever (A) in the "N" neutral position.
3. Put the Tine Clutch (B) in the "OUT" (disengaged) position.
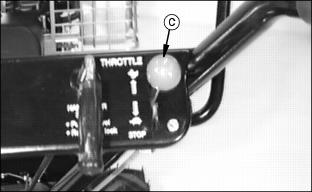
4. Set throttle lever (C) at "FAST" (r) position.
5. Check fuel shut-off valve. Valve must be in full open (ON) position.
6. Move ON/OFF switch (D) to the "ON" position.
· This engine is equipped with a 5-position choke lever.
· Cold engine: move lever to full CHOKE "k" position.
· Warm/hot engine: move lever somewhere between CHOKE "k" and RUN position.
Manual Start - Standard Equipment
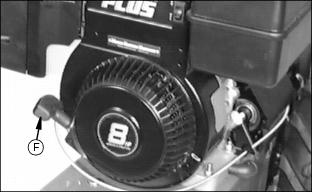
· Grasp starter handle (F) and pull rope out slowly until it pulls harder. This is the compression stroke.
· Pull rope with a rapid continuous full arm stroke. Let rope rewind slowly.
Electric Start - Optional Equipment
IMPORTANT: Avoid damage! The house circuit you use should be protected by a 20 amp fuse. · A smaller fuse may burn out when you use the electric starter. |
NOTE: The electric starter motor will shut off automatically if it overheats from cranking the engine. After the motor cools, it will operate again.
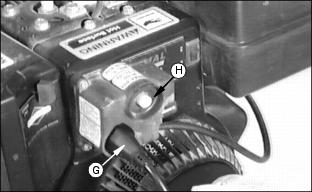
· Connect power cord to engine switch box (G).
· Plug other end of cord into three-hole, grounded 120-volt AC. receptacle.
· Push starter button (H) to start engine.
· Disconnect cord from house circuit FIRST. Then disconnect cord from switch box.
· Move choke lever (E) to 1/2 choke until engine runs smoothly.
· Move choke lever to "RUN" position.
10. Move throttle lever (C) to the desired engine speed.
Stopping Engine
1. Release Main Clutch (A) or (B). Clutch is spring loaded and will return to "N" neutral position.
· Forward or reverse motion will STOP.
· Tiller tine motion will STOP.
· Engine will continue to run.
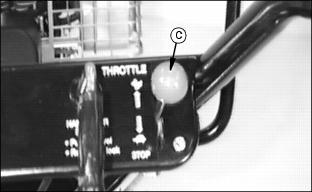
2. Move throttle lever (C) toward the "SLOW" (t) position.
· Allow engine to run for a minute or so that it can cool down.
· Move throttle lever to the "STOP" position, engine will stop.
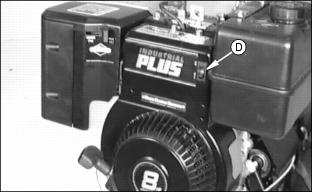
3. Move ON/OFF switch (D) to the "OFF" position.
Emergency Stopping
To stop tiller in an emergency:

· RELEASE ALL LEVERS (A or B), this will stop tiller forward or reverse motion and the tine motion.
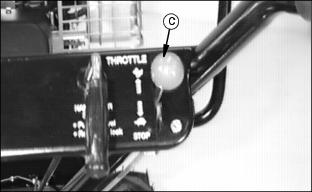
· Move throttle lever (C) to the "STOP" position, engine will stop.
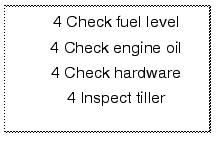
DAILY OPERATING CHECKLIST
Operate Tiller
Follow tiller operating sequence as follows:
1. Release main clutch levers.
2. Select desired "IN" or "OUT" tine engagement position.
3. Select fast (r) or slow (t) wheel drive speed.
Adjust Tilling Width
1. Stop engine prior to adjusting tine width.
2. Outer tines can be removed by removing nuts and bolts (A).
3. When installing outer tines, make sure all dirt is removed from inside tube.
4. Install and tighten hardware.
Transporting Tiller
TRANSPORTING A SHORT DISTANCE:
· When transporting unit to and from area to be tilled.
· Lower depth control to lowest notch to raise tines off ground.
· Put wheel drive lever in the "r" fast position.
· Lift up on handlebars enough to raise tines slightly off surface.
· Engage main clutch "F" top levers to propel unit.
· DO NOT engage tine clutch while transporting.
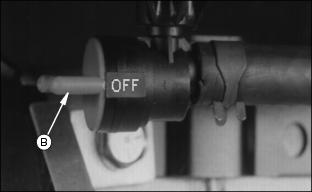
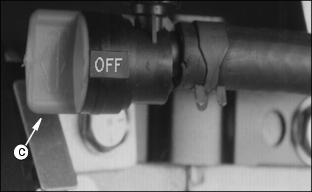
· When transporting this tiller on a trailer or in a truck, make sure unit is secured to prevent it from sliding or tipping over.
· Move fuel shut off valve (A) to the CLOSED (OFF) position (B). (See Using Fuel Shut Off Valve in this section).
Tilling Tips
Practice operating controls and running tiller (with tines out of the ground) before starting to till.
When tilling for the first time, set depth control in second notch to a tilling depth of 12 - 25 mm (1/2 - 1 in.), just enough to break hard soil crust or sod.
NOTE: Tilling depth will vary with ground conditions. Using the depth control will help maintain a constant tilling depth.
Prior to engaging the Main Clutch, hold handlebars up to keep tines out of the soil. Slowly lower tines into soil and begin tilling operations.
You don't need to exert pressure or weight on handlebars while you are tilling. Heavy pressure on handlebars will cause tines to try to propel tiller instead of digging. Keep both hands on handle grips when tilling to maintain balance and direction of tiller.
When reaching the end of a row, lift handlebars to raise tines out of the ground. Push handlebars to right or left so tiller turns in desired direction.
If loss of control occurs because of the tines impacting hard ground or hidden objects DO NOT attempt to force the tines down by hanging on the handlebar. Let go of the handlebars and do not restrain machine. Stand clear of the rotating tines until tines stop. Re-establish control by lifting upward on the handles to remove tines from the soil.
Don't let crop residue, rye grass, stringy stalks, vines, etc., build up to a point where it chokes off action of tines. Reverse the tiller to unwind and reduce amount of tangle.
NOTE: DO NOT till wet soil, it produces hard lumps.
Tilling soil that is too dry results in powdered soil.
To avoid walking in freshly tilled soil, use the handlebar swivel. The handlebars can be swivelled to the left or right.
When engaging the Main Clutch - "R" Bottom Lever (Reverse), be careful because the tiller tines and drive wheels will start spinning in reverse.