![]()
Introduction
Product Identification
Safety
Operating
Replacement Parts
Service Intervals
Service Lubrication
Service Engine
Service Transmission
Checking Transmission Oil Level
Adjusting Cruise Control Lever Tension
Service Electrical
Service Miscellaneous
Troubleshooting
Storage
Assembly
Specifications
Warranty
John Deere Quality Statement
Service Record

Service Transmission
Anti-Chatter Transmission Oil
NOTE: All GT Tractors are filled with John Deere Low Viscosity HY-GARDTM (J20D) transmission oil at the factory. DO NOT mix oils.
These tractors are equipped with a hydraulic wet disc brake transmission. To avoid chatter, use only Low Viscosity HY-GARDTM (J20B or J20D) transmission oil. DO NOT USE type "F" automatic transmission fluid.
John Deere Low Viscosity HY-GARDTM (J20D) transmission oil is specially formulated to minimize brake chatter, and to provide maximum protection against mechanical wear, corrosion, and foaming.
Checking Transmission Oil Level
|
· Due to oil expanding with heat, always CHECK COLD. · To help prevent dirt from entering reservoir and causing transmission damage, clean around reservoir filler cap before removing. |
Service Interval: Check transmission oil level every 50 hours of operation.
1. Park tractor on a level surface. STOP engine.
2. Check transmission oil level before operating tractor when transmission oil is COLD.
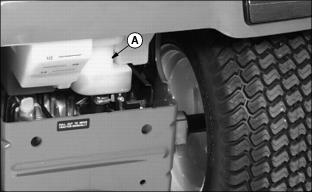
3. Locate the translucent oil reservoir (A) next to the fuel tank. Oil tank is embossed with a FULL line and an ADD line.

4. If oil is low, remove oil fill cap (B) and add John Deere Low Viscosity HY-GARD J20D transmission oil to bring oil level to the FULL line.
5. Install and tighten oil fill cap.
7. Operate tractor forward and in reverse several times.
8. Park tractor on level surface. STOP engine and check oil again.
Changing Transmission Oil
Service Interval: For initial break-in, change transmission oil at 50 hours of operation. After that change transmission oil every 250 hours of operation.
1. Park tractor on a level area, STOP engine, and engage park brake.
NOTE: Transmission has two oil cavities, one on the hydrostatic transmission side and one on the differential gear side. Both sides are internally connected. Both drain plugs are M10 cap screws (14 mm socket).

2. Place drain pan so it is under drain plugs (A and B).
· Front drain plug (A) will drain the hydrostatic transmission side.
· Rear drain plug (B) will drain the differential gear side.
IMPORTANT: Avoid damage! To help prevent dirt from entering reservoir and causing transmission damage, clean around reservoir filler caps before removing. |

3. Remove filler caps (C and D), this will allow transmission oil to drain better.

4. Allow transmission oil to completely drain.
5. Install and tighten both drain plugs (A and B) to 15 N·m (133 lb-in.).
NOTE: Transmission has two oil cavities, one on the hydrostatic transmission side and one on the differential gear side. Both sides are internally connected. Both have separate fill caps.
6. Add a total of 4.4 L (4.6 qts.) John Deere Low Viscosity HY-GARD or an equivalent (J20D) transmission oil. (See Transmission Oil in this section.):

· Fill plug (D) will fill the differential gear side, add approximately 2 L (2 qts.). When oil is at the bottom of the threads, install and tighten filler cap.
· Fill plug (C) will fill the hydrostatic transmission side, add approximately 2.4 L (2.6 qts.).
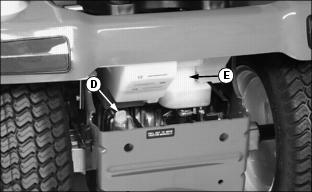
7. Locate the translucent oil reservoir (E) next to the fuel tank. Oil tank is embossed with a FULL line and a ADD line.
8. Add transmission oil to bring oil level to the FULL line.
9. Install and tighten oil fill cap.
10. Start engine and check for oil leaks around drain plugs.
11. Unlock park brake and drive tractor forward and backward a few times.
12. Park tractor on level surface. STOP engine and check oil again. Add oil if necessary to bring oil up to the FULL line.
Adjusting Cruise Control Lever Tension
The friction mechanism that holds the cruise control lever in position was pre-set at the factory. This mechanism may require adjustment due to wear or operator preference.
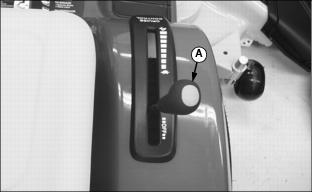
1. While operating tractor, move cruise control lever (A). Decide if lever tension should be increased or decreased.
NOTE: Right wheel removed for clarity of photo.
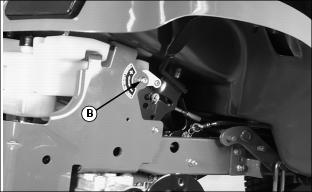
2. Locate M8 adjusting nut (B) (13 mm wrench) in right wheel well. Adjustment can be easily made without removing right wheel.
A backing wrench on the opposite (inside) end of bolt is not required.
3. Turn only nut (B) to adjust cruise control lever tension:
Adjust tension, so that lever can be easily stroked in both forward and rearward direction. Lever should hold transmission linkage in any position desired.