![]()
924DE, 1128DE, 1128DDE and 1332DDE
Introduction
Product Identification
Safety
Operating
Avoid Damage to Plastic and Painted Surfaces
Using Discharge Chute Controls
Using Differential Lock - Models 1128DDE and 1332DDE
Using Differential Lock - Models 924DE and 1128DE
Starting Engine (Manual Start)
Starting Engine (Electric Start)
Using Heated Grips (Models 1128DDE and 1332DDE)
Replacement Parts
Service Intervals
Service
Troubleshooting
Storage
Assembly
Specifications
Warranty
John Deere Quality Statement
Service Record
Copyright© Deere & Company

Operating
Daily Operating Checklist
Avoid Damage to Plastic and Painted Surfaces
· Do not wipe plastic parts unless rinsed first.
· Be careful not to spill fuel on machine. Fuel may damage surface. Wipe up spilled fuel immediately.
Engine Controls
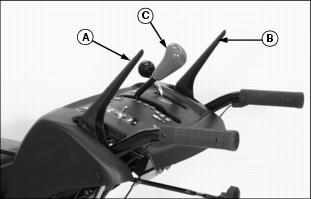
Handle Controls
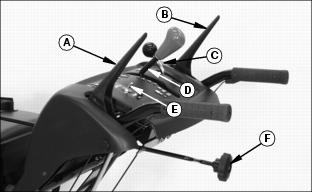
C - Chute Deflector Lever - Models 1128DE, 1128DDE and 1332DDE
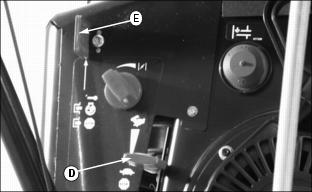
E - On/Off Switch for Heated Grips - Models 1128DDE and 1332DDE
Miscellaneous Controls
A - Differential Lock - Models 1128DDE and 1332DDE
A - Differential Lock - Models 924DE and 1128DE
Adjusting Scraper Blade
1. Park snowblower on a hard, smooth surface.
2. Stop engine, remove key, wait for all moving parts to stop.
3. Remove wire from spark plug to prevent accidental starting.
4. Tip unit back onto handle bars and support housing.
5. Adjust skid shoes to their FULL UP position.
· If scraper blade has excessive wear, replace it.
· If scraper blade can be adjusted; loosen nuts and reposition scraper blade, flush with skid shoes.
8. Adjust skid shoes to the proper height.
Adjusting Skid Shoes
Adjust skid shoe height for proper working conditions:
1. Park snowblower on a hard, smooth surface.
2. Stop engine, remove key, wait for all moving parts to stop.
3. Remove wire from spark plug to prevent accidental starting.
· Air pressure in both tires should be equal, although some machine leveling can be made by using different pressures.
· Each tire must be resting on hard surface, not a cross-link of tire chain.
5. Put a block under auger housing.
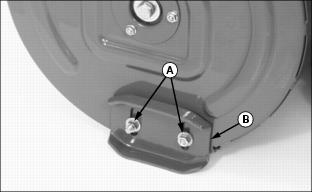
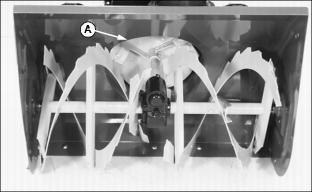
Picture Note: Model 1332DDE is shown.
6. Inspect skid shoes for wear:
· If skid shoes have excessive wear, replace them.
7. Adjust skid shoes by loosening two nuts (A) and moving skid shoe (B) to desired position.
9. Adjust other skid shoe to the same height.
Using Drive Control Levers
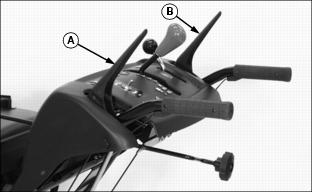
1. Pull traction drive lever (A) to handle grip to begin forward or reverse movement.
2. Pull auger drive lever (B) to handle grip to begin auger motion.
3. Release traction drive lever (A) to stop forward or reverse movement.
4. Release auger drive lever (B) to stop auger motion.
If both levers are engaged, the auger drive lever (B) can be released and auger drive will stay in the engaged position. This allows the operator to change chute direction while the machine is operating. Release traction drive lever and both traction drive and auger drive will disengage.
Using Speed Selector
IMPORTANT: Avoid damage! Do not overload machine capacity by attempting to clear snow at too fast a rate. |
1. Move the speed selector (A) forward to start or increase forward travel speed.
· Use 1st and 2nd gears for deep, hard or wet snow o slippery or sloping surfaces.
· Use 3rd and 4th gears for light-to-heavy snow on level surfaces.
· Use 5th gear for light snow.
· Use 6th gear for moving the machine without the auger moving.
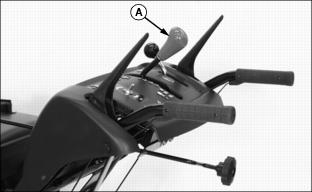
Using Discharge Chute Controls
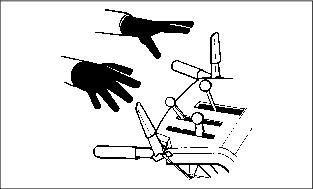
· Do not put hands or feet near or under rotating parts. |
Using the Discharge Chute Control:
1. Turn the discharge chute control (A) to position the discharge chute (B) for snow discharge.
· The discharge chute will rotate full right, straight ahead, or full left.
Using the Chute Deflector Lever:
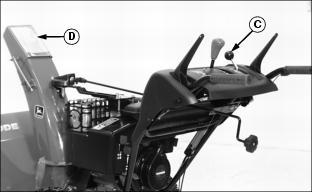
· On Models 1128DE, 1128DDE and 1332DDE, move the chute deflector lever (C) forward or backward to move the chute deflector (D).
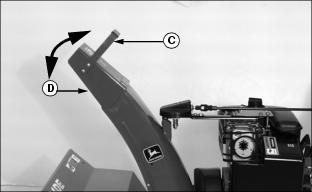
· On Model 924DE, use the deflector handle to position the chute deflector (D).
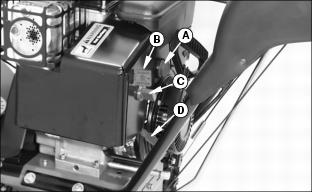
Using Fuel Shut Off Valve
Closed (OFF) position (A):
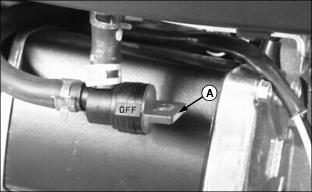
· When performing any type of engine service.
OPEN position (B):

· Fuel shut off valve must be in the full OPEN position for proper fuel delivery to the engine.
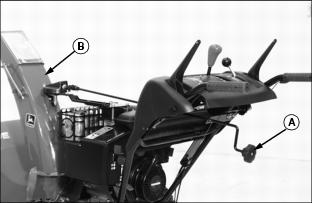
Using Differential Lock - Models 1128DDE and 1332DDE
To ENGAGE differential lock:
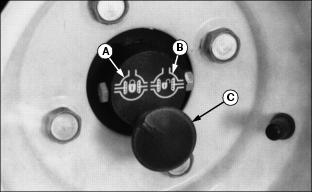
· Pull knob (C) and turn to "LOCKED" position (A). Knob will snap in when positioned correctly.
· Both drive wheels are now locked together for improved traction -turning will now be more difficult.
To DISENGAGE differential lock:
· Pull knob (C) and turn to the "UNLOCKED" position (B).
· This is the normal position to leave your unit in. Engine power will be going to both wheels through the differential - turning corners will now be easier.
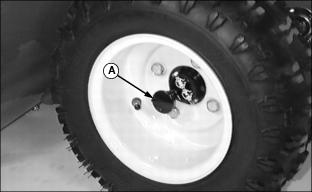
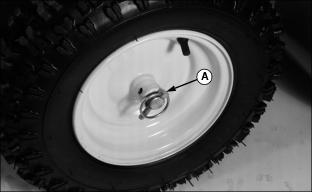
Using Differential Lock - Models 924DE and 1128DE
NOTE: Engage and disengage the differential lock on the right wheel only.
To ENGAGE differential lock:
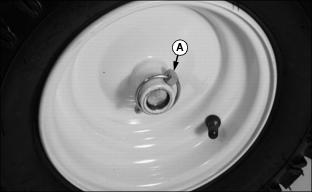
· Align hole in wheel with hole in axle. Install and lock pin (A).
· Both drive wheels are now locked together for improved traction-turning will now be more difficult.
To DISENGAGE differential lock:
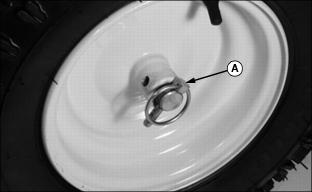
· Install and lock pin (A) on axle only. Wheel is now free to spin on axle.
· This is the normal position to leave your unit in. Engine power will be going to the left wheel only - turning corners will now be easier
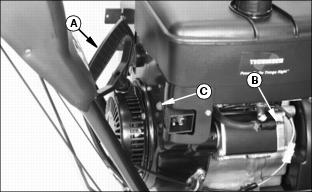
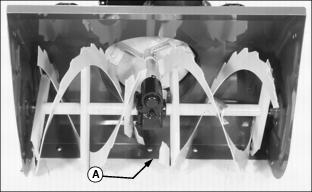
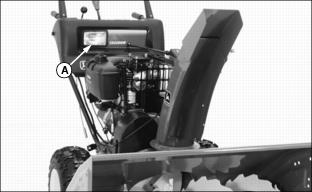
Pre-Starting Engine
IMPORTANT: Avoid damage! In very cold weather, check impeller to be sure it is not frozen. Starting with a frozen impeller could damage the unit. |
1. Disconnect spark plug wire from spark plug.
3. Pull engine rewind starter.
· If impeller (A) is frozen: Rewind starter can not be pulled. Move unit to a heated area so ice around impeller can thaw.
· If Impeller is not frozen: Rewind starter can be pulled - it will be more difficult than normal.
Starting Engine (Manual Start)
1. Turn the fuel shut off valve to the OPEN position.
2. Put the traction drive lever and auger drive lever in the DISENGAGED position.
3. Put the speed selector lever in the "N" NEUTRAL position.
IMPORTANT: Avoid damage! The engine ignition key is a two-position PUSH/PULL design. DO NOT twist key after it is installed. |

4. Install engine ignition key (A) and PUSH it into the "START" position.
· "START" position. To enable the ignition system, PUSH key all the way in until you feel it "Click" into place.
· "STOP" position. To disable the ignition system, PULL key all the way out.
5. Turn choke control knob (B) to choke engine:
6. Push primer bulb (C) to force fuel into the carburetor, be sure to cover VENT HOLE in primer bulb:
7. Move throttle lever (D) to set engine speed:
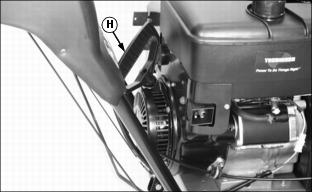
8. Pull starter handle (H) until you feel resistance within the engine.
9. Then pull handle fast and steady. Do not let handle snap back.
10. If engine does not start, push primer bulb and pull starter handle again until engine starts.
11. If starter handle is frozen and will not crank engine:
· Pull as much rope out of starter as possible.
· Release starter handle and let it snap back against starter, repeat as required.
Starting Engine (Electric Start)
1. Turn the fuel shut off valve to the OPEN position.
2. Put the traction drive lever and auger drive lever in the DISENGAGED position.
3. Put the speed selector lever in the "N" NEUTRAL position.
IMPORTANT: Avoid damage! The engine ignition key is a two-position PUSH/PULL design. DO NOT twist key after it is installed. |
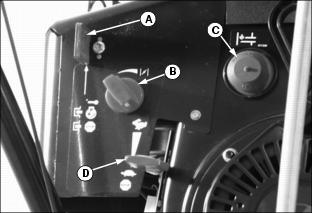
4. Install engine ignition key (A) and PUSH it into the "START" position.
· "START" position. To enable the ignition system, PUSH key all the way in until you feel it "Click" into place.
· "STOP" position. To disable the ignition system, PULL key all the way out.
5. Turn choke control knob (B) to choke engine. This engine is equipped with a four position choke:
· Cold engine: Turn choke knob clockwise to the full position.
· Warm / Hot engine: Turn choke knob to the off position or middle position, depending on engine temperature.
6. Push primer bulb (C) to force fuel into the carburetor. Be sure to cover VENT HOLE in primer bulb:
· Warm / Hot engine: Push primer bulb once or not at all depending on engine temperature.
7. Move throttle lever (D) to set engine speed:
IMPORTANT: Avoid damage! The house circuit you use to start the machine should be protected by a 20 amp fuse. · A smaller fuse may burn out when you use the electric starter. |
NOTE: The electric starter motor will shut off automatically if it overheats from cranking the engine. After the motor cools, it will operate again.
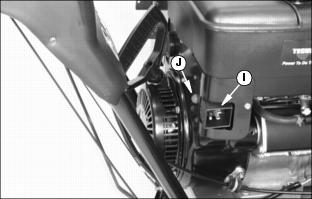
8. Connect power cord to engine switch box (I).
9. Plug other end of cord into three-hole, grounded 120-volt AC receptacle.
10. Push starter button (J) to start engine.
11. Disconnect cord from house circuit FIRST. Then disconnect cord from switch box.
12. Slowly move choke knob to the "OFF" position.
13. Slowly move throttle lever to desired engine speed.
Stopping Engine
NOTE: Follow steps below before you park, inspect, adjust, or unplug snowblower.
1. Release traction drive lever (A) and auger drive lever (B). Snowblower will STOP and auger/blower will STOP.
2. Put speed selector lever (C) in the "N" NEUTRAL position.
3. Slowly move throttle lever (D) to the "STOP" position. Engine will stop.
IMPORTANT: Avoid damage! The engine ignition key is a two position PUSH/PULL design. DO NOT twist key after it is installed. |
4. Pull engine ignition key (E) out.
· "START" position. To enable the ignition system, PUSH key all the way in until you feel it "Click" into place.
· "STOP" position. To disable the ignition system, PULL key all the way out.
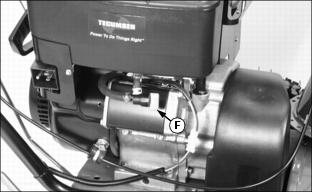
5. Move fuel shut off valve (F) to the CLOSED (OFF) position.
Emergency Stopping
To STOP snowblower in an emergency, RELEASE LEVERS.
This will:
Using Heated Grips (Models 1128DDE and 1332DDE)
1. Start engine and move throttle lever to fast position.
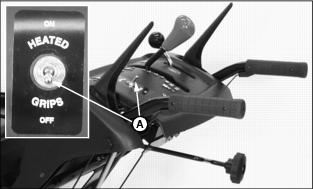
2. Move HEATED GRIPS switch (A) to the ON position.
3. Before stopping engine, move switch to the OFF position.
Using Headlight
Headlight (A) will remain "ON" as long as the engine is running.
Transporting
TRANSPORTING A SHORT DISTANCE:
· When transporting unit to and from area to be cleared, press down on handlebars enough to raise front of snowblower slightly off surface.
· Engage traction drive lever to propel unit. Do not engage auger drive while transporting.
TRANSPORTING A LONG DISTANCE:
· When transporting this snowblower on a trailer or in a truck, make sure unit is secured to prevent it from sliding or tipping over.
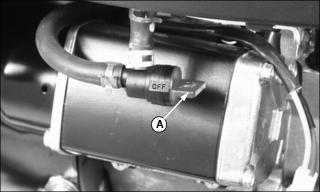
· Move fuel shut off valve to the CLOSED (OFF) position (A).
Snowblowing Tips
· For best snowblower performance, run engine with throttle lever in the FAST position.
· Do not operate unit at high transport speeds on slippery surfaces and use care when backing.
· Do not overload machine capacity by attempting to clear snow at too fast a rate.
· Match ground speed to amount of snow to be moved. Example: Low speed (1) is recommended for removing deep or hard packed snow.
· Clear snow immediately after it falls, if possible.
· Blow snow downwind, if possible.
· Overlap each swath slightly for complete snow removal.
· Run snowblower a few minutes after blowing snow to prevent freeze up of auger/impeller.
· Pull the starter handle several times to help prevent moisture in the starter from freezing.