![]()
Introduction
Product Identification
Safety
Preparing Vehicle
Using Your Tractor Trunk for Rear Ballast
Installing Mounting Bolts (LT Lawn Tractors)
Installing Anchor to Tractor Frame (STX's, LX277-AWS, 325, 345, and GT Series Tractors Only)
Installing
Removing
Operating
Troubleshooting
Assembly
Specifications
John Deere Quality Statement
Copyright© Deere & Company

Preparing Vehicle
Ballasting Requirements
For front end ballast on SST Tractors
· mid-mount mower and one suitcase weight must be installed when using the tractor trunk.
For front end ballast on all other tractors
· two front suitcase weights or two front wheel weights must be installed when using the tractor trunk.
Using Your Tractor Trunk for Rear Ballast
Use the following recommendations to determine proper ballast for your machine:
Installing Mounting Bolts (LT Lawn Tractors)
NOTE: Bolt assembly can be found in bag of parts. Wheels can be removed for easier installation.

1. Locate the upper hole (A) on both sides at rear of tractor frame.
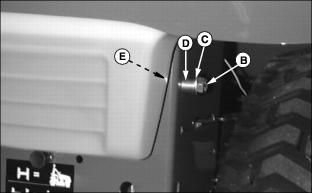
2. Install M10x40 bolt (B), flat washer (C) and spacer (D) from the outside and secure with M10 nut (E) on inside of tractor frame. Install on both sides of frame.
Installing Anchor to Tractor Frame (STX's, LX277-AWS, 325, 345, and GT Series Tractors Only)
Parts In Tractor Trunk Mounting Kit (BM19211) Include:
On STX Models:

1. Lift seat and unfasten the battery rubber strap.
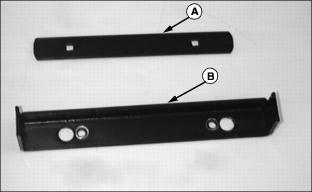
2. Install the flat anchor stabilizer (A) from the rear of the tractor up through the seat battery hole and place the support behind the tractor frame.
3. Align the small holes and fasten the welded anchor (B) to the flat support (A) using two 5/16x1.00 in. bolts (C) and two 5/16 in. flange nuts (D). Do not tighten at this time.
· Nuts are tightened after installing the support frame.
4. Fasten battery rubber strap and lower seat.
On LX277-AWS Model:
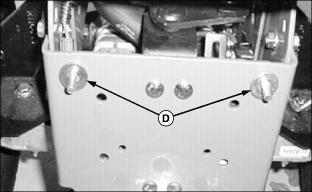
1. Install two 5/16x1.00 in. bolts from inside tractor frame and install two flat washers (D).
2. Install welded anchor (E) and two 5/16 in. flange nuts (F). Do not tighten at this time. Tighten nuts installing the support frame.
On 325, 345, and GT Models
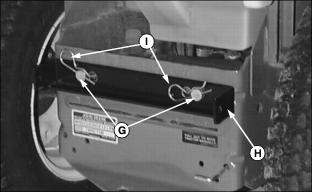
1. Install two 3/4x3/4 in. drilled pins (G) from inside tractor frame into large holes.
2. Attach welded anchor (H) with two spring locking pins (I).