![]()
Introduction
Product Identification
Safety
Preparing Vehicle
Installing
Installing to SST Lawn Tractors
Installing to STX Lawn Tractors
Installing to LT Lawn Tractors
Installing to LX Lawn Tractors With Bagger Attachment
Installing to LX Lawn Tractors Without Bagger Attachment and 325, 345, and GT Series Lawn and Garden Tractors
Removing
Operating
Troubleshooting
Assembly
Specifications
John Deere Quality Statement
Copyright© Deere & Company

Installing
Installing to SST Lawn Tractors
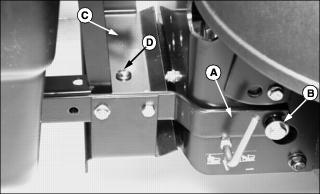
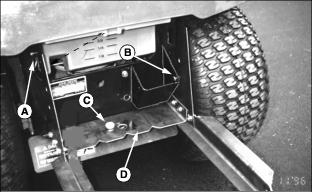
1. Slide support rail (A) of trunk frame onto side mounting bolt (B) and place drawbar support (C) on top of tractor hitch plate.
2. Insert 3/8x1 in. carriage bolt (D) down through drawbar support and hitch plate and fasten with one 3/8 in. flat washer and plastic locking knob.
3. Level each side of support frame. Adjust support rails to same height.
Installing to STX Lawn Tractors
Installing Support Frame to Tractor
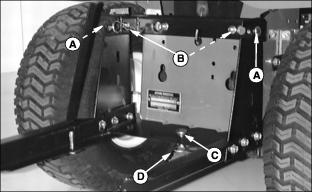
1. Install support frame to tractor frame with two 3/8x3/4 in. drilled pins (A) and two large spring locking pins (B).
2. Install 3/4x29/32 in. drilled pin and spring locking pin (C) in center drawbar support (D).
3. Level each side of support frame. Adjust support rails to same height.
Installing Trunk on Support Frame
1. Place trunk assembly onto support frame.
2. Install two 3/8x3/4 in. drilled pins, flat washers, and small spring locking pins (A), one on each side.
Installing to LT Lawn Tractors
Installing Support Frame to Tractor
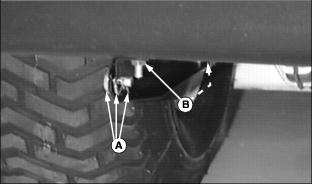
1. Install support frame (A) to mounting bolts (B).
2. Install 3/4x29/32-in. drilled pin and spring locking pin (C) in center drawbar support (D).
3. Level each side of support frame. Adjust support rails to same height.
Installing Trunk on Support Frame
1. Place trunk assembly onto support frame.

2. Install two 3/8x3/4-in. drilled pins, flat washers, and small spring locking pins (A), one on each side.
Installing to LX Lawn Tractors With Bagger Attachment
Installing Support Frame to Tractor
NOTE: Support frame must be assembled correctly for attachment to tractor. See ASSEMBLY section for information.
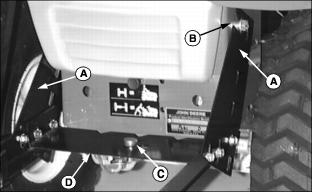
1. Install support frame to tractor frame on left side with one 3/8x3/4 in. drilled pin (A) and one large spring locking pin.
2. On right side, install one 3/8x3/4 in. drilled pin through the bagger bracket (B) and support frame and secure with spring locking pin as shown.
3. Install 3/4x29/32 in. drilled pin and spring locking pin (C) in center drawbar support (D).
4. Level each side of support frame. Adjust support rails to same height.
Installing Trunk on Support Frame
1. Place trunk assembly onto the support frame.

2. Install two 3/8x3/4 in. drilled pins, flat washers, and small spring locking pins (A), one on each side.
Installing to LX Lawn Tractors Without Bagger Attachment and 325, 345, and GT Series Lawn and Garden Tractors
Installing Support Frame to Tractor
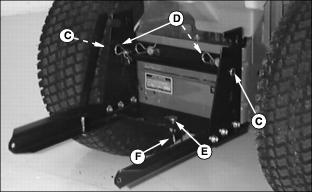
Picture Note: Model 325 shown.
1. Install support frame to tractor with two 3/8x3/4 in. drilled pins (C) and two large spring locking pins (D), and one 3/4x29/32 in. drilled pin and spring locking pin (E) in center drawbar support (F).
2. Level each side of support frame. Adjust support rails to same height.
Installing Trunk on Support Frame
1. Place trunk assembly onto support frame.

2. Install two 3/8x3/4 in. drilled pins, flat washers, and small spring locking pins (A), one on each side.