![]()
38-Inch for F510 and F525 Front Mowers
Introduction
Safety Signs
Preparing Vehicle
Installing
Removing
Operating
Service Machine Safely
Service
Troubleshooting
Storing Machine
Assembly
Specifications
John Deere Service Literature
John Deere Quality Statement
Copyright© Deere & Company

Installing
Park Vehicle Safely
· Stop vehicle on a level surface, not on a slope.
· STOP the engine and remove the key.
· Before you leave the operator's seat, wait for engine and all moving parts to STOP.
Installing Snowthrower
IMPORTANT: Avoid damage! For proper tire chain clearance, drive wheels must be in the WIDE position. |
1. Check drive wheels for WIDE position:
· Remove plastic cap from axle.
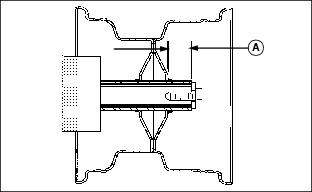
· Measure hub. Wheel in WIDE position will measure (A) approximately 25 mm (1 in.).
· If necessary, remove drive wheel, turn it around and install in the WIDE position.
2. Lock rockshaft to snowthrower:

· Remove drilled pin and spring locking pin (B).
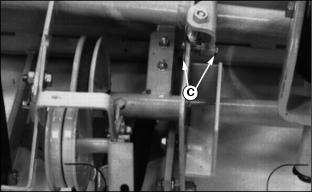
· Lock rockshaft to shell with drilled pin and spring locking pin (C). (Use lift lever to align holes. This puts snowthrower in correct position.)
3. Connect snowthrower to push arms:
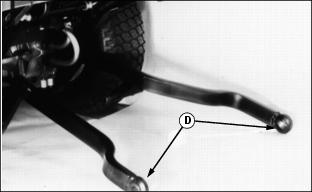
· Push snowthrower back toward Front Mower.
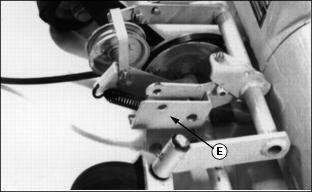
· Put arms (D) in lift brackets (E).
· Turn wheels in position for forward travel.
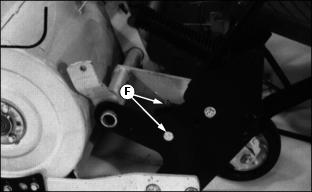
4. Install two drilled pins and spring locking pins (F) through bracket and push arms.

5. Install two drilled pins and spring locking pins (G).
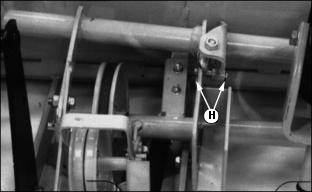
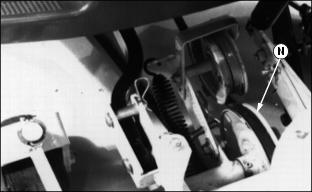
· Remove spring locking pin and drilled pin (H).
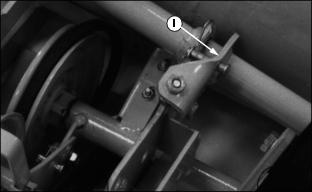
· Store spring locking pin on bracket (I).
7. Install weight transfer spring:
· Lower snowthrower to lowest position with lift handle.
NOTE: Raise rear tires off ground 51-102 mm (2-4 in.).

· Install S-hook (J) through hole in frame of Front Mower.
· Bend S-hook closed to prevent loss during operation.
NOTE: S-hook remains on frame after removal of snowthrower.
· Install spring (K) through S-hook.
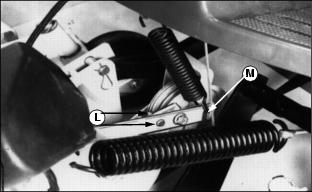
8. Remove and save spring locking pin and drilled pin (L).
9. Install spring to bracket slot (M):
· Pull spring bracket up to align holes in bracket arm.

· Install drilled pin and spring locking pin (L).
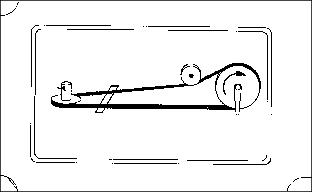
· CHECK belt routing decal at right. Snowthrower must be on ground (NOT RAISED) with idler pinned in UP position.
· Lower snowthrower to ground.
· Roll belt from top of drive sheave (N).
NOTE: Photo taken with Front Mower on hoist for clarity of bracket and drive sheave.
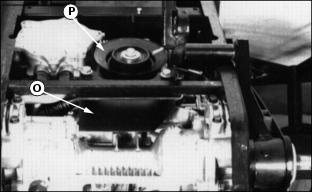
· Slide belt on top of belt guard plate (O) on Front Mower, if your model Front Mower has this plate.
If your model Front Mower does not have this plate, go to the next bullet.
· Attach belt to drive sheave (P).
· Attach other end of belt to drive sheave on snowthrower.
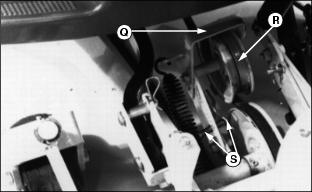
· Grasp arm (Q) on idler sheave (R) and pull forward.
· Remove spring locking pin and drilled pin (S).
11. Install weight transfer cable:
· Raise snowthrower with lift handle.
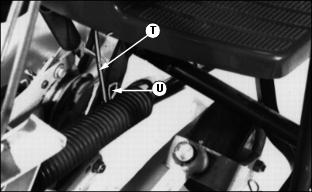
· Attach cable (T) to lift bracket.