![]()
38-Inch for F510 and F525 Front Mowers
Introduction
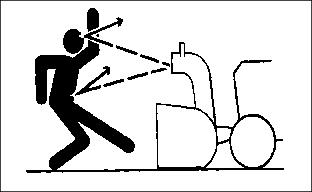
Safety Signs
Preparing Vehicle
Installing
Removing
Operating
Avoid Injury from Moving Parts
Avoid Injury from Hitting Obstructions
Raising and Lowering Snowthrower
Inspecting, Unplugging or Parking Snowthrower
Recommended Front Mower Attachments
Service Machine Safely
Service
Troubleshooting
Storing Machine
Assembly
Specifications
John Deere Service Literature
John Deere Quality Statement
Copyright© Deere & Company

Operating
Operate Safely
· Check vehicle brake action before you operate. Adjust or service brakes as necessary.
· Inspect machine before you operate. Be sure hardware is tight. Repair or replace damaged, badly worn, or missing parts. Be sure guards and shields are in good condition and fastened in place. Make any necessary adjustments before you operate.
· Clear work area of objects that might be thrown. Keep people and pets out of the work area. Stop machine if anyone enters the area.
· If you hit an object, stop the machine and inspect it. Make repairs before you operate. Keep machine properly maintained and in good working order.
· DO NOT throw snow towards people, buildings or cars.
· DO NOT leave machine unattended when it is running.
· Only operate during daylight or with good artificial light.
· DO NOT let anyone, especially children, ride on machine or vehicle.
· DO NOT let children or an untrained person operate machine.
· Do not wear radio or music headphones while operating the machine. Safe operation requires your full attention.
Wear Appropriate Clothing
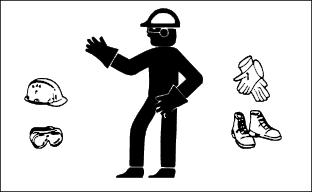
· Wear close fitting clothing, eye protection, and safety equipment appropriate for the job.
· Loud noise can cause impairment or loss of hearing, wear a suitable protective device such as earplugs.
Avoid Injury from Moving Parts
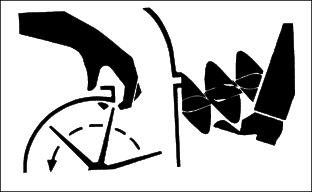
· Keep hands, feet and clothing away from snowthrower and discharge chute when auger is turning.
· Stop auger when you are not throwing snow.
· Put PTO in the OFF position and stop vehicle engine before you unplug, repair, or adjust snowthrower.
Avoid Injury from Hitting Obstructions
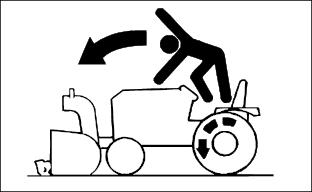
· Raise snowthrower when you drive between jobs.
· Slow down when you remove snow.
· Be extremely careful if you must clear snow from a gravel surface. Keep the auger well above gravel.
Snowthrowing Tips
Put chains and drive wheel weights on Front Mower.
Adjust runners before you clear snow.
Operate snowthrower at full throttle.
Operate snowthrower at safe travel speed.
· When you throw snow close to buildings or trees.
Raise snowthrower when you drive between jobs.
Use optional drift blade to help cut through drifted snow.
Throw snow downwind, if possible.
· STOP snowthrower immediately.
· Fix damage before you use snowthrower again.
Before you clean or unplug snowthrower:
· Put PTO switch in OFF position.
· Wait for ALL moving parts to STOP.
Clean snowthrower after you use it.
Raising and Lowering Snowthrower

· Pull lever until latch clicks.
· Pull lever rearward slightly.
· Lower level. Release button.
Adjusting Lift Height
1. Raise snowthrower until it LOCKS in transport position.
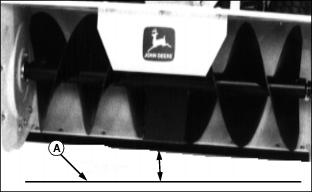
2. CHECK: Snowthrower must be 102 6 mm (4 1/4-in.) above ground-Dimension A.
3. To adjust snowthrower lift height:
· Lower snowthrower to ground:
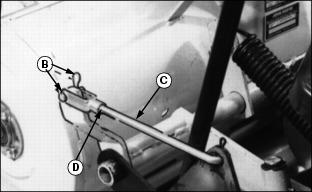
· Remove spring locking pin and drilled pin (B) to disconnect lift rod (C).
IMPORTANT: Avoid damage! Lift height dimension is critical to insure proper function of snowthrower casters. |
· Turn clevis counterclockwise out of lift rod to decrease lift height.
· Turn clevis rod clockwise into lift rod to increase lift height. Dimension (D), length of exposed thread, should be 28 mm (1-1/8-in.).
· Install lift rod (C) and fasten with drilled pin and spring locking pin (B).
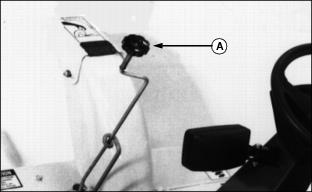
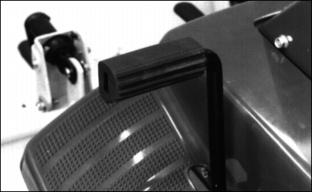
Adjusting Upstop
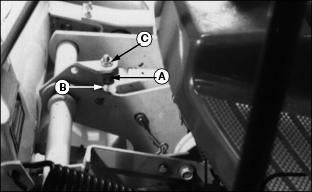
To prevent snowthrower from latching itself in RAISED position:
· Put snowthrower in RAISED position.
· Adjust bolt head (A) within 2-5 mm (0.079-0.197 -in.) of rockshaft arm (B).
· Raise and lower snowthrower for proper operation of lift handle. If handle is too hard to latch, adjust bolt for more clearance to rockshaft arm.
Adjusting Spout
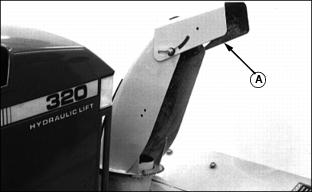
Grasp spout (A) and move to desired position. You should feel resistance.
NOTE: Spout MUST BE tight enough to stay in position when snow from auger hits it, but also loose enough to move by hand.
Adjusting Chute
Turn handle (A) to put chute at desired position.
Adjusting Runners
Before using snowthrower on gravel or uneven surfaces, lower runners fully.
Raise runners before you throw snow from smooth surface. Scraper blade must not contact ground.
1. Raise snowthrower. Put block under auger housing.
2. Loosen three cap screws (A). Move runner to desired position.
· Adjust to 6.5 mm (1/4-in.) when you blow snow from blacktop.
· Adjust to 19 mm (3/4-in.) when you blow snow from gravel.
Operating Snowthrower
· Clear area of objects that can be thrown causing personal injury. |
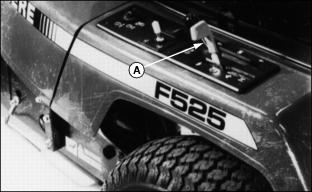
2. Move throttle lever (A) to ONE-FOURTH position.
IMPORTANT: Avoid damage! To help prevent clutch damage, do not engage PTO with throttle in FAST position. |
3. Lower snowthrower to ground.

4. Move PTO switch (B) to ON position.
5. Move throttle lever to the FAST (r) position.
7. Engage transmission to move forward.
8. Throw snow at a safe travel speed.
Using Traction Assist Pedal
· Push pedal down to help improve traction.
· Push pedal down further for better traction.
· Use pedal ONLY when you need more traction.
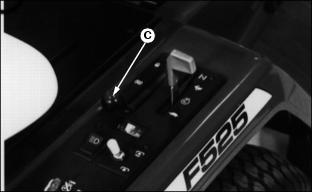
Inspecting, Unplugging or Parking Snowthrower
If engine and snowthrower are running, engine and snowthrower MUST STOP when you get off seat. |
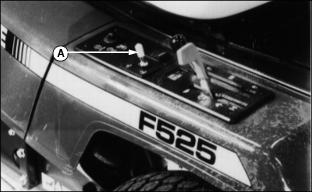
2. Put PTO switch (A) in OFF position.
3. Lower snowthrower to ground.
Optional Equipment
DRIFT KNIFE: Slices through snow that is higher than auger housing. Snow feeds through auger rather than falling on machine.
ELECTRIC ROTATION SPOUT KIT: Requires electrical wiring harness.
REMOTE SPOUT CAP KIT: Operator can change angle of discharge spout cap "On-The-Go" without leaving the seat.
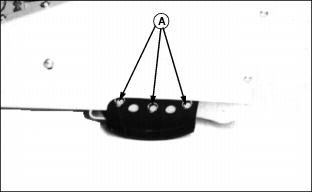
Recommended Front Mower Attachments
When operating Front Mower with tire chains and wheel weights the drive wheels must be placed in the WIDE position.

Check drive wheels for WIDE position:
· Remove plastic cap from axle.
· Measure hub. Wheel in WIDE position will measure (A) approximately 25 mm (1 in.).
· If necessary, remove drive wheel, turn it around and install in the WIDE position.
TIRE CHAINS - For proper tire chain clearance, drive wheels must be in the WIDE position.
DRIVE WHEEL WEIGHTS and mounting hardware kit - Put drive wheels in WIDE position.