![]()
Introduction
Safety Signs
Controls
Operating
Lawn Care
Replacement Parts
Service Machine Safely
Service Intervals
Service Engine
Service Transmission
Service Steering & Brakes
Service Electrical
Service Miscellaneous
Tighten Wheel Bolts And Other Hardware
Troubleshooting
Storing Vehicle
Assembly
Specifications
Warranty
John Deere Quality Statement
Copyright© Deere & Company

Service Miscellaneous
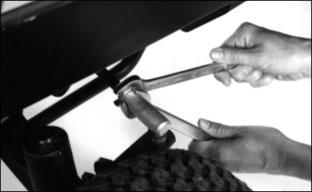
Checking Tire Pressure

2. Check tire pressure with an accurate gauge.
· Tire pressure should be 140 kpa (20 psi).
Fuel
· Use Grade No. 2-D fuel at temperatures above 4°C (40°F).
· Use Grade No. 1-D fuel at temperatures below 4°C (40°F).
· Use Grade No. 1-D fuel for all air temperatures at altitudes above 1500 m (5000 ft.).
· For maximum filter life, sediment and water should not be more than 0.10 per cent.
· The cetane number should be 45 minimum. If you operate your machine where air temperatures are normally low or in high altitudes, you may need fuel with a higher cetane number.
· Cloud Point - For cold weather operation, cloud point should be 6°C (10°F) below lowest normal air temperature.
· In winter use special winter fuel or add an anti-gelling compound to fuel to maintain its proper viscosity.
DO NOT use a galvanized container to store diesel fuel.
· Specially coated steel containers made for diesel fuel.
DO NOT use brass-coated containers, brass is an alloy of copper and zinc.
Fill fuel tanks at the end of each day's operation to prevent condensation and freezing during cold weather.
Capacity for each fuel tank is 5 L (5.5 gal).
1. STOP engine. If engine is hot let it cool several minutes before you add fuel.
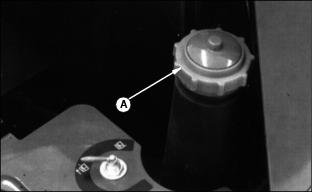
2. Remove fuel tank cap (A) slowly to allow any pressure built up in tank to escape.
3. Fill the tank on each side at the end of each day's operation. Each tank holds 5 L (5.5 gal) fuel.
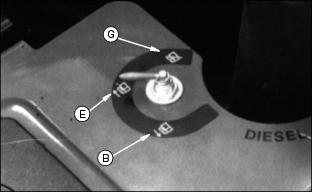
4. Turn pointer to position (B) to use fuel from the left tank.
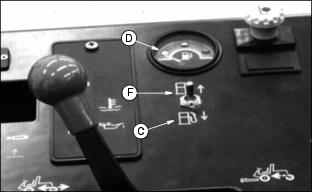
5. Pull lever to (C) to show the fuel level in the left tank on gauge (D).
6. Do not run the left tank empty. If you do, bleed fuel system. (See Bleeding Fuel System in Service Engine section.)
7. When the left tank shows LOW on the gauge, pivot pointer to position (E) to use the fuel from the right tank.
8. Push lever to (F) to show the fuel level in the right tank.
9. Pivot pointer to (G) for storage.
10. Install fuel tank cap (A).
Tighten Wheel Bolts And Other Hardware
Look for loose hardware before each use and check wheel bolts often during operation.
· Front Wheels: 136-163 N·m (100-120 lb-ft).
· Rear Wheels: 85-100 N·m (60-70 lb-ft).
Drive Front Mower 30 m (100 ft). Change directions several times as you drive.
Tighten bolts again and after 3-10 hours use.
Adjusting Toe-In
1. Park Front Mower on level surface.
2. Turn steering wheel so rear wheels are in STRAIGHT-AHEAD position.
3. Lower attachment to ground.
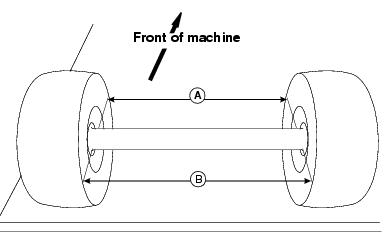
6. Measure distance between tire beads (A) at front of tire, hub height.
7. Measure distance between tire beads at rear of tire, hub height.
8. Front distance should be 5 mm (3/16 in.) less than rear distance (B). If not, adjust tie rod length.
10. Turn tie rod until toe-in is to correct specification.