![]()
For 4100 Compact Utility Tractor's
Introduction
Safety Signs
Installing
Removing
Operating
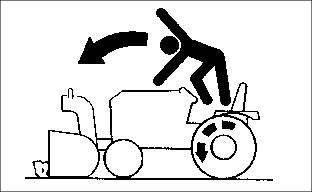
Avoid Injury from Moving Parts
Avoid Injury from Hitting Obstructions
Stay Clear Of Rotating Drivelines
Transporting Tractor and Snowblower
Raising and Lowering Snowblower
Operate Rotary Broom Safely On Slopes
Engaging And Disengaging Broom
Using PTO Controls For The Hydro Tractor
Adjusting Blade For Clearing Or Leveling
Removing Objects Between Blade And Mounting Bracket
Stopping Hydrostatic Tractor And Blade
Stopping Gear Tractor and Blade.
Replacement Parts
Service Machine Safely
Service
Troubleshooting
Assembly
Storing Machine
Specifications
John Deere Service Literature
John Deere Quality
Copyright© Deere & Co

OPERATING
Operate Attachments Safely
· Check vehicle brake action before you operate. Adjust or service brakes as necessary.

· Inspect machine before you operate. Be sure hardware is tight. Repair or replace damaged, badly worn, or missing parts. Be sure guards and shields are in good condition and fastened in place. Make any necessary adjustments before you operate.
· Clear work area of objects that might be thrown Keep people and pets out of the work area. Stop machine if anyone enters the area.
· Be alert for traffic when crossing or working near roadways.
· If you hit an object, stop the machine and inspect it. Make repairs before you operate.Keep machine properly maintained and in good working order. Keep all shields and guards in place.
· DO NOT leave machine unattended when it is running.
· Do not operate equipment when you are tired or ill.
· Only operate during daylight or with good artificial light.
· Look carefully behind tractor before you back up.
· DO NOT let anyone, ESPECIALLY CHILDREN, ride on machine or vehicle.
· DO NOT let children or an untrained person operate machine.
· Do not wear radio or music headphones while operating the machine. Safe operation requires your full attention.
· Be alert for holes, rocks, drop-offs, and hidden hazards. Travel slowly on rough ground.
· Slow down before turning. Avoid sudden turns.
· Keep first-aid kit and fire extinguisher handy. Keep a list of emergency numbers near telephone.
· Don't operate near drop-offs, ditches or embankments.
· DO NOT operate the machine while you are under the influence of alcohol or drugs.
Operate Snowblower Safely
· DO NOT blow snow toward people, pets, vehicles or buildings
Operate Blade Safely
· Do not keep blade in the TRIPPED position.
· Do not put hands between blade and mounting bracket when removing objects that are stuck.
· Keep hands, feet, and clothing away from blade when blade is in the TRIPPED position or is being pivoted.
Avoid Injury from Moving Parts
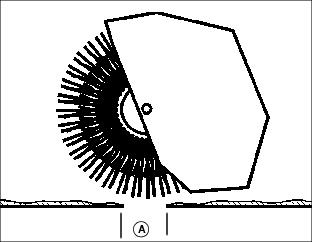
· Keep hands, feet and clothing away from snowthrower and discharge chute when auger is turning.
· Stop auger when you are not throwing snow.
· Stop vehicle engine before you unplug, repair, or adjust snowthrower.
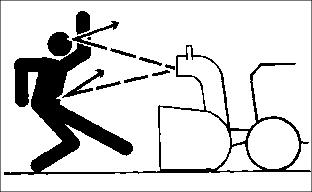
Avoid Injury from Hitting Obstructions
· Raise snowthrower when you drive between jobs.
· Slow down when you remove snow.
Wear Appropriate Clothing
· Wear close fitting clothing and safety equipment appropriate for the job.
· Loud noise can cause impairment or loss of hearing, wear a suitable protective device such as earplugs.
Stay Clear Of Rotating Drivelines

· Entanglement in rotating driveline can cause serious injury or death:
· Wear close fitting clothing.
· STOP the engine and be sure PTO driveline is stopped before getting near it
Transporting Tractor and Snowblower
1. DO NOT tow tractor and snowblower. (See your tractor operator's manual for information on pushing tractor.
2. Use a heavy-duty trailer to transport tractor/snowblower.
3. MAKE SURE PTO is DISENGAGED.
4. Lower snowblower to trailer deck. LOCK park brake.
5. Trailer should have all lights and signs required by law.
6. Fasten tractor and snowblower to trailer with straps, chains, or cables.
Snowblowing Tips
Adjust runners before you clear snow.
Use snowblower only at full throttle.
Use snowblower only at a safe travel speed.
· When you throw snow close to buildings or trees.
Raise snowblower when you drive between jobs.
Use drift blade to help cut through drifted snow.
Throw snow downwind, if possible.
· STOP snowblower immediately.
· Check for damage. If damaged, repair damage before you use snowblower again
Before you clean or unplug snowblower:
· Wait for ALL moving parts to STOP.
Clean snowblower after you use it.
Raising and Lowering Snowblower
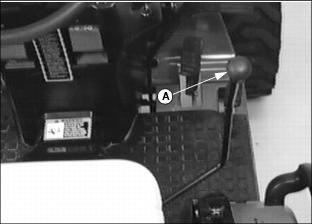
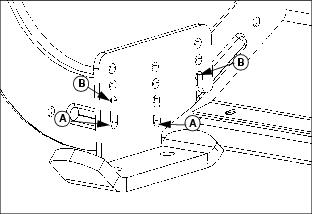
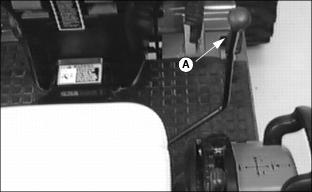
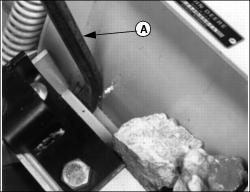
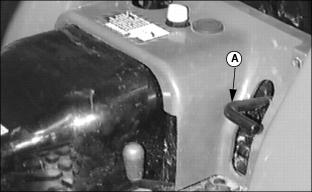
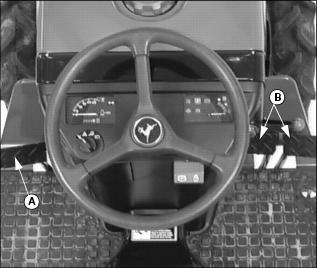
To LOWER snowblower: Push lever (A) FORWARD
To RAISE snowblower: Pull lever (A) REARWARD.
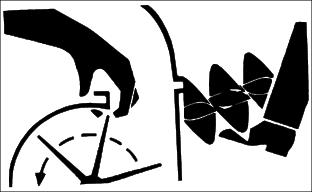
Turning Discharge Chute
· To turn discharge chute to the RIGHT: Push lever (A) to the right.
· To turn discharge chute to the LEFT: Push lever (A) to the left.
Adjusting Spout

Move spout to desired position.
Adjusting Runners
NOTE: ·Before using snowblower on gravel or uneven surfaces, lower runners fully.
·Both runners must be in same position.
Lower snowblower to the ground.
To clear snow from a SMOOTH SURFACE:
· Loosen hardware on each runner.
· Adjust runner to desired POSITION (A or B).
Operating Snowblower
NOTE: See your tractor operator's manual for detailed information on controls.

2. Push lever (A) forward to lower snowblower to the ground.
3. Once snowblower is on the ground push lever (A) forward with a slight jerk:
· This will lock the lever in the FLOAT position.
· This FLOAT position allows the snowblower to follow the contours of the surface.


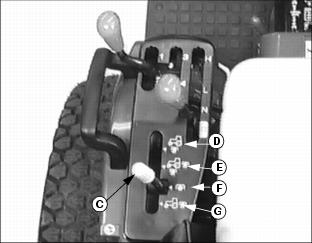
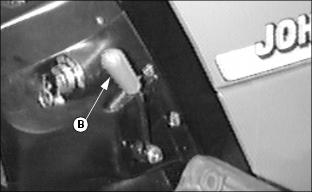
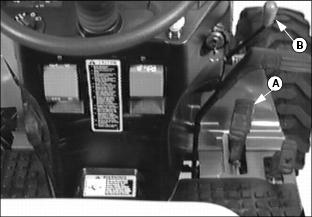
4. Push brake pedal (B) (Gear tractor) (C) (Hydro) down.
5. Push handle (D) (Gear) (E) (Hydro) DOWN to UNLOCK park brake
7. Engage PTO (See Engaging PTO in Tractor Operator's manual).
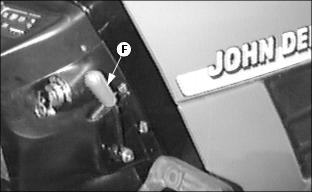
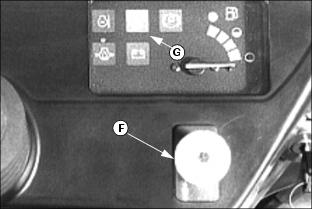
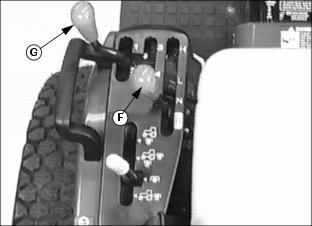
8. Move throttle lever (F) to FULL (r) throttle when blowing snow. This will give you the best performance.

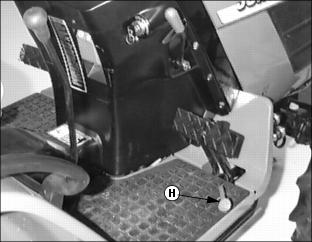
9. Forward travel (Hydro Tractor): Slowly push down forward pedal (G). Tractor will travel faster the farther down you push the pedal. Release pedal, transmission will return to neutral and tractor will stop.On Hydro model tractors push pedal (G) to begin FORWARD travel.
Reverse travel (Hydro Tractor): Slowly push down reverse pedal (H). Tractor will travel faster the farther down you push the pedal. Release pedal, transmission will return to neutral and tractor will stop.
· Operate snowblower at a safe travel speed.
NOTE: Both the Forward and Reverse pedals are spring loaded. When you release either pedal, the transmission will automatically return to neutral and the tractor will stop.
10. Forward Travel (Gear Tractor): Release the parking brake. See Using Brakes in Tractor Operator Manual.

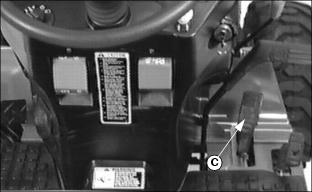
11. Depress clutch pedal (I) and start engine.
Move hand throttle lever (F) to set engine speed at 1025 rpm (slow idle speed).
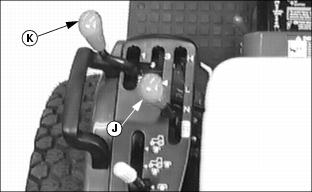
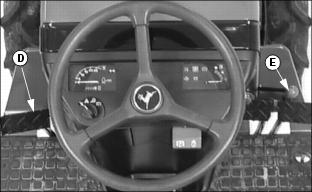
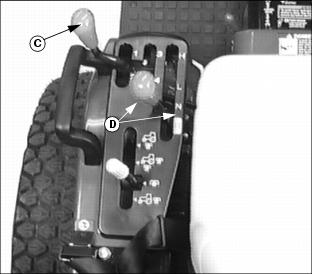
12. Move the 2-speed Range and direction Lever (J) to the "H" (high or "L" (low) position.
Move Gear Shift Lever (K) to position:

· Slowly release clutch pedal and increase fuel by pressing down on the foot throttle (L).
Reverse Travel (Gear Tractor):
· Move the 2-Speed Range and Direction Lever (J) to the "R" (reverse) position.
· Move Gear Shift Lever (K) to position:
NOTE: See Tractor Manual for detail operation.
· Slowly release clutch and increase fuel by pressing down on the foot throttle (L).
Operate Rotary Broom Safely On Slopes
· DO NOT operate on a steep slope where you can't maintain control of the machine. Slopes are strongly related to loss-of-control and tip-over accidents, which can result in severe injury or death. All slopes require extra caution.
· Don't drive where the machine could slip or tip.
· To help prevent loss of steering, braking and stability follow ballast requirements in this manual.
· Keep all movement on a slope slow and gradual. DO NOT make sudden changes in speed or direction.
· Avoid starting or stopping on a slope. If tires lose traction, shut off PTO switch and proceed slowly straight down slope.
· If engine stops as you drive uphill, shut off PTO switch and back down slowly.
Sweeping Hard Surface
For deep, heavy material, use a blade first.
Adjust brush so ends just touch surface (a 3-5 inch brush pattern). Tips of brush do the sweeping, not the sides.
Use LOW BRUSH SPEED and MODERATE TRAVEL SPEED to sweep almost any hard surface.
To sweep gravel, use just enough brush speed to roll gravel, NOT THROW IT.
· Sweep on overcast or humid days, or right after a rain.
· Sweep with wind at your back, or in the direction broom is angled.
· Don't try to move piles like a blade.
Sweeping Thatch
Use LOW BRUSH SPEED and SLOW TRAVEL SPEED. Thatch should roll into a windrow.
Adjust brush so ends barely touch tips of grass blades, or brush may pull itself into grass.
NOTE: Check adjustment if grass is very tall, you may want to adjust a little father into grass than just touching.
Set up sweeping pattern so wind does not blow thatch back into area already swept.
Sweeping Snow
For light snow, try 2/3 throttle.
For moderately heavy snow, try 3/4 throttle to FULL throttle.
For wet, heavy snow, use full throttle.
For deep snow, make more than one pass.
Sweep with wind at your back, or in the direction broom is angled.
Sweeping Leaves
Use SLOW BRUSH SPEED AND TRAVEL SPEED.
Adjust brush so ends barely touch tips of grass blades. Leaves should roll into a windrow.
· Moisture content of leaves will affect brush and travel speed.
· Where you want final pile of leaves.
Storage Stands
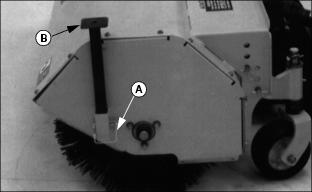
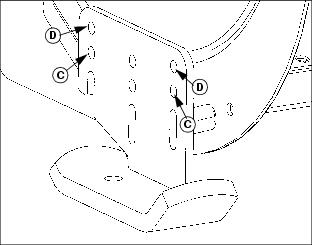
1. Remove spring clevis pin (A) and stand (B) from each side of broom.
2. Invert stands and install spring clevis pins prior to operating broom.
Controlling Brush Speed
Control brush speed with throttle lever (A)
1. Push lever forward to increase brush speed.
2. Use lowest possible brush speed.
3. If brush stalls frequently, increase engine speed slightly. Find the right brush and travel speeds so you don't have to suddenly increase brush speed to overcome a stall.
Engaging And Disengaging Broom
NOTE: If the operator leaves the seat after the PTO is engaged the Safety Interlock System will shut down the engine and everything will stop.
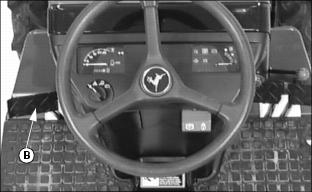
Depress clutch pedal (B) before engaging or disengaging the Power Take Off (PTO) Lever.
Use Power Take Off (PTO) Lever (C) to select which PTO you want to use:
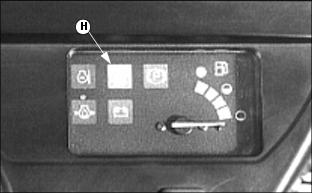
· PTO OFF Position ((F). The Power Take Off (PTO) Lever must be in this position when starting the engine.
The PTO Engaged Light (H) will turn on and the selected PTO will be spinning.
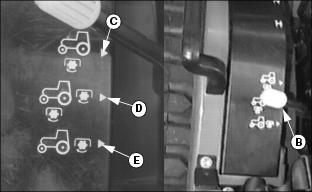
Use Power Take Off (PTO) Lever (B) to select which PTO you want to use:
NOTE: If operator leaves the seat after the PTO is engaged the Safety Interlock System will shut down the engine and everything will STOP.
· Pull PTO "p "switch (F) up to the "I"(on) position.
· The PTO Engaged Light (G) will turn on and the selected PTO will be spinning.
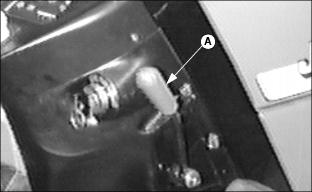
Raising And Lowering Broom
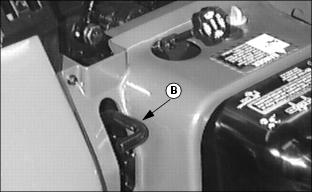
· Push hydraulic lever (A) all the way forward to FLOAT position to lower broom.
· Pull hydraulic lever (A) rearward.
Angling Broom
NOTE: When attaching the broom to the front hitch, an Angling Cylinder Kit MUST BE installed on the hitch. (See Assembly section for more information)
NOTE: If the broom does not respond this way check hose connections, they may be reversed.

· To angle broom to the RIGHT: Push lever (A) to the right.
· To angle broom to the LEFT: Pull lever (A) to the left.
Adjust Broom and Brush Height
1. Start tractor and engage broom. Raise broom and drive to dirty section of hard surface.
2. Set broom on ground by putting hydraulic control lever in FLOAT position. Run broom a few seconds without moving tractor.
3. Raise broom and back away. Stop and park tractor safely.
4. Area (A) cleared by broom should be approximately 76-127 mm (3-5 in.) wide along the entire width of the broom.
5. If not, adjust caster wheels and/or brackets to get correct brush height.
NOTE: Spacers (D) move caster wheel 12.7 mm (1/2-in.) and pins (B) move wheels 25 mm (1 in.).
· To move spacers, remove pin (C) and move spacers (D) to top of spindle to lower brush, or to bottom to raise brush.
NOTE: It may be necessary to use a combination of moving spacers and changing bracket position
6. Repeat Steps 2, 3, and 4 to check brush-to-surface contact.
Operating Blade Tips
· When clearing snow or light material.
· To use less power to move material.
· To decrease rear wheel slippage.
· With hydraulic control lever not in the FLOAT position.
· With blade spring-trip LOCKED.
Do not use blade as a battering ram.
Operate engine at full throttle for best engine performance and blading results.
If blade penetrates too much, raise blade or adjust height of skid shoes.
To remove loose material (snow, slush) from a hard surface, install OPTIONAL rubber squeegee on blade.
The blade is not intended to move a large amount of material. Use common sense when you move material.
Raise blade when you are driving between jobs or when you are not moving snow or dirt.
Before Operating Blade

5. Make operating adjustments as necessary.
6. Follow PRESTARTING Checks in your tractor/front mower operator's manual.
· Loose or missing hardware or parts.
8. Learn controls. (See your tractor/front mower operator's manual.)
Adjusting Skid Shoes
Skid shoes (A) can be adjusted in increments of 6 mm (1/4-in.), and increments of 13 mm (1/2-in).
· All models have twelve positions.
1. Raise blade. Put blocks under center of blade.
NOTE: Adjust each skid shoe to same height.
5. Remove spring locking pin and drilled pin.
6. Move skid shoes up or down as desired.
7. Install drilled pin and spring locking pin.
Adjusting Blade For Digging
Turn J-pin (A) and put in hole in blade
Adjusting Blade For Clearing Or Leveling

Pull J-pin (A) out of hole in blade
Removing Objects Between Blade And Mounting Bracket
Blade is designed to trip if an obstruction or solid object is hit during blade operation. If this happens, blade should automatically return to the OPERATING position.
If an object becomes wedged between blade and mounting bracket, the blade will remain in the TRIPPED position. Use extreme caution to remove the object.
5. Always stand in front of the blade.
6. Using a breaker bar (A), put end of bar between bracket and blade.
7. Apply downward pressure on upper end of bar to lower the blade.

8. Keeping one hand on the bar, remove the object
9. Let up pressure to return the blade to the Operating position.
Operating Blade

1. Push selective control valve lever (A) all the way forward to FLOAT position to lower blade
· Use FLOAT position for most operating conditions.
· Do not use FLOAT position for slow-speed digging.
2. Pull lever rearward to lift blade.
3. Move throttle lever (B) to FAST position. Operate engine at full throttle for best engine and blade performance
NOTE: When you want blade to operate in the opposite direction of Step 4 below, switch hydraulic hose connections.
· To clear snow or light material.
· To decrease amount of power to move material.
To Angle Blade To The Right: Move hydraulic control lever (A) to the right.
To Angle Blade To The Left: Move lever (A) to the left.
NOTE: See your respective Gear or Hydrostatic tractor manual for more detail on forward and reverse travel.
5. Push forward control pedal (C) (Hydro tractor) slowly forward. Operate blade at a safe travel speed
· Depress clutch pedal (D) (gear tractor) and move hand throttle (E) to set engine speed.
· Move 2 speed range and direction lever (F) to the "H" high or "L" Low position.
· Move gear shift lever (G) to position (1st, 2nd, 3rd, 4th gear).
· Slowly release clutch pedal and increase fuel by pressing down on foot throttle (H).
6. If blade penetrates or trips too much:
· Adjust height of skid shoes.
· Put blade at a sharper angle.
· Take a narrower cut to push less material.
· Put control lever in FLOAT position.
Using Differential Lock
The differential lock is used to provide better traction when rear wheels start to slip. Engaging differential lock will cause both wheels to turn equally.
IMPORTANT: Avoid damage! To prevent damage to differential, do not engage differential lock at high speeds. |
NOTE: Turning radius is increased when differential lock is engaged. To assist turning, release differential lock and use turn brake pedals. (See Using Brakes in the tractor manual.)
· Push down on differential lock pedal (A) (Hydro tractor) (B) (Gear tractor). Lock will remain engaged as long as there is rear wheel slippage or pedal is depressed.
Disengage Differential Lock:
· Remove foot from differential lock pedal. If differential lock will not disengage, depress one turn brake pedal then the other.
Stopping Hydrostatic Tractor And Blade
1. Be sure foot is off forward control pedal (A).
2. Pull throttle (B) back to slow.
Stopping Gear Tractor and Blade.
1. Use clutch pedal (A), gear shift lever (C) and brakes (B) to stop tractor. See Operating Transmission in the Tractor manual.
2. Move 2-speed range and direction lever (D) to the "N" (neutral) position. See Operating Transmission in the tractor manual.
3. Set the parking brake. See Using Brakes in the tractor manual.