![]()
Introduction
Safety Signs
Controls
Operating
Operating Cutting Units
Replacement Parts
Service Machine Safely
Service Interval Chart
Service Lubrication
Service Engine
Service Transmission
Service Cutting Units
Service Electrical
Service Miscellaneous
Cleaning Equipment Properly After Use
Care for Plastic and Painted Surfaces
Troubleshooting
Storing Machine
Assembly
Specifications
Warranty
John Deere Service Literature
John Deere Quality Statement
Copyright© Deere & Company

Service Miscellaneous
Checking Tire Pressure

2. Check tire pressure with an accurate gauge.
3. Adjust air pressure, if necessary:
Refueling Machine
Fuel
· Use Grade No. 2-D fuel at temperatures above 4°C (40°F).
· Use Grade No. 1-D fuel at temperatures below 4°C (40°F).
· Use Grade No. 1-D fuel for all air temperatures at altitudes above 1500 m (5000 ft.).
· For maximum filter life, sediment and water should not be more than 0.10 per cent.
· The cetane number should be 45 minimum. If you operate your machine where air temperatures are normally low or in high altitudes, you may need fuel with a higher cetane number.
· Cloud Point - For cold weather operation, cloud point should be 6°C (10°F) below lowest normal air temperature.
· In winter use special winter fuel or add an anti-gelling compound to fuel to maintain its proper viscosity.
DO NOT use a galvanized container to store diesel fuel.
· Specially coated steel containers made for diesel fuel.
DO NOT use brass-coated containers, brass is an alloy of copper and zinc.
Filling Fuel Tank
Fill fuel tank at the end of each day's operation to prevent condensation and freezing during cold weather.
Fuel tank capacity is 28 L (7.4 Gal).
1. STOP engine. If engine is hot let it cool several minutes before you add fuel.
2. Remove any trash from area around fuel tank.
3. Remove fuel tank cap slowly to allow any pressure built up in tank to escape.
4. Fill tank only to "FULL" line.
Tighten Wheel Bolts
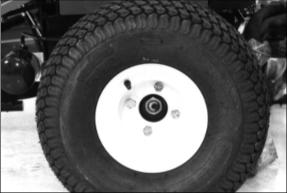
NOTE: Tighten wheel bolts after first 10 hours of operation and every 50 hours thereafter.
Tighten wheel bolts to 40734 N·m (30025 lb-ft.).
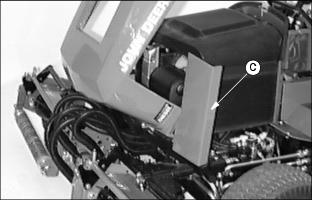
Raising Hood
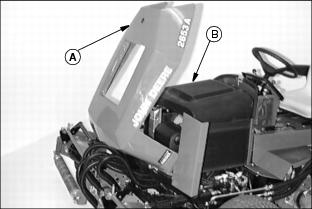
3. Turn button (A) to unlock hood and pull hood up.
NOTE: Hinged cover plates (C) on each side of hood, tilt forward independently to provide additional access and service capability.
4. Lift off air plenum (B) to expose the top of engine.
Adjusting Parking Brake
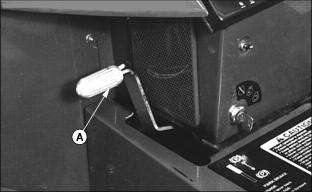
1. To adjust park brake tension, place park brake (A) in the DISENGAGED position.

2. Tighten the yoke (B) so the brake pads just begin to drag on the brake rotor. Then back off one revolution.
3. When all yoke adjustments have been used, back off the yoke so the threads on the rod (C) are flush with the yoke.
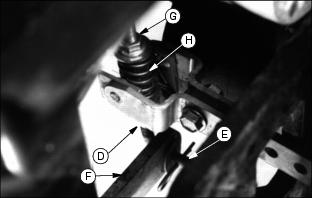
4. Loosen top nut (G) approximately 1/4 inch.
5. Remove hairpin clip from end of "J" rod (E).
6. While holding caliper arm with spring assembly, up as far as possible adjust "J" rod until end of rod aligns with hole in brake lever arm (F).
7. Reassemble "J" rod, washer, and hairpin clip (E).
8. Tighten top nut (G), while holding bottom nut (D), until it contacts spacer. Torque to 10 N·m (7 lb-ft).
9. Engage the brake and repeat on opposite side.
Cleaning Equipment Properly After Use
Following are general guidelines for the daily cleaning of John Deere Golf & Turf Equipment:
1. Lower attachments to the ground.
2. Disengage all power and stop the engine.
3. Move hydraulic lif levers back and forth to relieve pressure.
4. Lock park brake and remove the key.
6. Blow debris from radiators, air screens, under the hood and seat area using compressed air.
7. Wash exterior of machine, foot platform area and reels using high volume, low pressure water.
8. Perform grease maintenance on the reels after washing to purge any moisture from system.
Care for Plastic and Painted Surfaces
PLASTIC SURFACES
The plastic parts on your greensmower are made of a blend of polycarbonate and polyester materials. These parts are extremely strong and durable. Unlike painted metal, the plastic parts will never dent or rust. If the plastic parts get scratched, the color will remain the same since the color goes through the entire part.
NOTE: Follow cleaning procedure every time plastic surfaces are cleaned. DO NOT wipe dry plastic surface with hand or towel.
Correct Cleaning Care:
1. Before washing, rinse hood and entire machine with clean water to remove dirt and dust that may scratch the surface.
2. Wash plastic surface with clean water and a mild liquid automotive washing soap. Use a SOFT, CLEAN cloth (bath towel or automotive mitt) when washing.
3. Dry thoroughly with a SOFT, CLEAN cloth (diaper or bath towel).
4. Wax the surface with a liquid automotive wax. Use products that specifically say "contains no abrasives".
5. Remove applied wax by hand using a clean, soft cloth.
Avoid Damage:
· "Dry wiping" or wiping the plastic surface when it is dry is a major source of minor surface scratches.
· DO NOT wipe hood or other plastic parts unless wetted first.
· DO NOT apply wax unless plastic surface has been thoroughly cleaned first.
· DO NOT use abrasive materials, such as polishing compounds, to clean or to wax plastic surface.
· DO NOT wax plastic surfaces without drying first. Hard-to-remove water spots will be left.
· DO NOT use solvents or commercial cleaners.
· DO NOT use power buffers to remove wax.
· DO NOT spray insect repellent near machine. Insect repellent spray may damage plastic or painted surfaces.
· Be careful not to spill fuel on any plastic or painted surfaces. Wipe up fuel immediately.
Repair:
· Your John Deere dealer has the professional materials needed to properly remove surface scratches from any plastic surfaces.
· DO NOT attempt to paint over marks or scratches in plastic parts.
· DO NOT use polishing compounds to attempt to remove scratches.
PAINTED METAL SURFACES
Correct Cleaning Care:
Follow automotive practices to care for your greensmower painted metal surfaces. Use a high-quality automotive wax regularly to maintain the factory look of your tractor's painted surfaces.
Repair:
Minor Scratches (surface scratch):
1. Clean area thoroughly to be repaired.
2. Use automotive polishing compound to remove surface scratches.
· DO NOT use rubbing compound to avoid removing paint.
3. Apply wax to entire surface.
Deep Scratches (bare metal or primer showing):
1. Clean area to be repaired with rubbing alcohol or mineral spirits.
2. Use paint stick with factory-matched colors available from your John Deere dealer to fill scratches. Follow directions for use and for drying.
· Apply sparingly to scratch without getting on surrounding painted surface. Fill in scratch to level of surrounding painted area.
· Allow to dry 48 hours in warm weather and up to 30 days in colder temperatures.
3. Use automotive polishing compound to smooth out surface. Do not use power buffer.