![]()
Introduction
Product Identification
Safety
Operating
Replacement Parts
Service Intervals
Service Lubrication
Service Engine
Service Chain Case
Service Hydraulics
Service Steering & Brakes
Service Electrical
Service Miscellaneous
Opening and Closing Engine Cover
Raising ROPS (Roll Over Protection Structure)
Raising ROPS (Roll Over Protection Structure)
Raising and Blocking Skid Steer
Filling Windshield Washer Bottle (If Equipped)
Cleaning and Replacing Heater/Defroster Air Filter (If Equipped)
Troubleshooting
Storage
Specifications
Warranty
John Deere Quality Statement
Service Record

Service Miscellaneous
Opening Rear Service Door
1. Park machine safely. (See Parking Safely in the SAFETY section.)
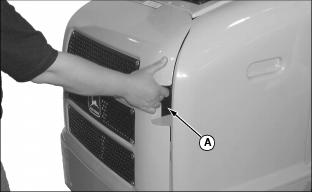
2. Pull latch (A) up to release door. Pull back on door to open it.
3. To close door, push door closed until latch closes.
NOTE: A padlock may be used to lock engine compartment.
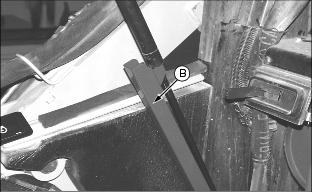
Opening and Closing Engine Cover
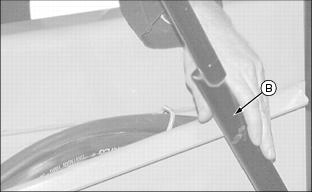
Opening engine cover:
1. Park machine safely. (See Parking Safely in the SAFETY section.)
3. Lift engine cover latch (B) up to release latch.
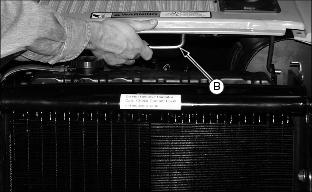
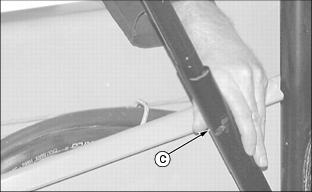
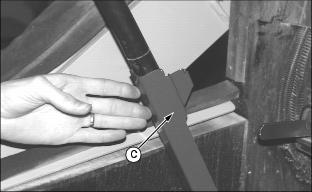
Closing engine cover:
· Lower cover letting latch slide into slots on each side.
Removing Engine Side Panels
1. Park machine safely. (See Parking Safely in the SAFETY section.)
2. Open rear service door and engine cover.
3. Lift side panel up and remove from skid steer.
Removing Left Side Panel To Service:
Removing Right Side Panel To Service:
Removing Cover Plates
1. Park machine safely. (See Parking Safely in the SAFETY section.)
3. Raise boom and set on boom locks.
4. Turn key switch to off position.
5. Raise and lock ROPS in up position.
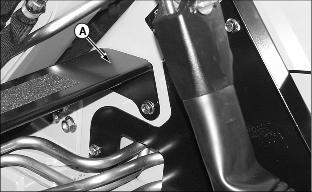
6. Remove toe guard shielding (A).
7. Remove step (B) and cover (C).
Raising ROPS (Roll Over Protection Structure)
1. Park machine safely. (See Parking Safely in the SAFETY section.)
2. Lower boom to full down position.
NOTE: ROPS can be raised with the boom resting on the boom locks.
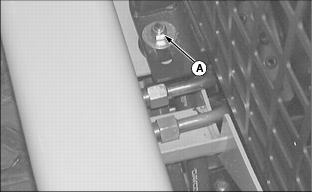
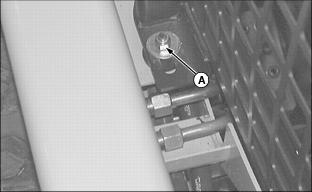
3. Remove nuts and washers (A) (one on each side).
4. Using hand holds, raise ROPS, making sure steering levers fall forward. Continue raising ROPS all the way up so that gas spring cylinder locks in place.
5. Ensure ROPS cylinder is locked by pushing down on lower cylinder tube (B).
6. To lower ROPS, push lower cylinder tube (C) up to unlock cylinder.
7. Pull ROPS down until seated on mounting studs.
· The cylinder is cracked or damaged. *See your Authorized John Deere Skid Steer Dealer, NEVER attempt to repair a damaged gas spring. |
8. Install washer and nut on ROPS mounting stud (one on each side). Tighten hardware to 140 N·m (105 lb-ft).
Raising ROPS (Roll Over Protection Structure)
1. Park machine safely. (See Parking Safely in the SAFETY section.)
2. Lower boom to full down position.
NOTE: ROPS can be raised with the boom resting on the boom locks.
3. Remove nuts (A) (one on each side).
4. Using hand holds, raise ROPS, making sure steering levers fall forward. Continue raising ROPS all the way up so that gas spring cylinder locks in place.
5. Ensure ROPS cylinder is locked by pulling forward on red cylinder lock (B).
6. To lower ROPS, push red cylinder lock (C) rearward to unlock cylinder.
7. Pull ROPS down until seated on mounting studs.
· The cylinder is cracked or damaged. *See your Authorized John Deere Skid Steer Dealer, NEVER attempt to repair a damaged gas spring. |
8. Install washer and nut on ROPS mounting stud (one each side). Tighten hardware to 140 N·m (105 lb-ft).
Refueling Machine
Fuel Specifications
· Use Grade No. 2-D fuel at temperatures above 4°C (40°F).
· For maximum filter life, sediment and water should not be more than 0.10 per cent.
· The cetane number should be 45 minimum. If you operate your machine where air temperatures are normally low or in high altitudes, you may need fuel with a higher cetane number.
· Cloud Point - For cold weather operation, cloud point should be 6°C (10°F) below lowest normal air temperature.
· In winter use special winter fuel or add an anti-gelling compound to fuel to maintain its proper viscosity.
Diesel Fuel Storage
Do not use a galvanized container to store diesel fuel.
· Specially coated steel containers made for diesel fuel.
Do not use brass-coated containers. Brass is an alloy of copper and zinc.
Filling Fuel Tank
Fill fuel tank at the end of each day's operation to prevent condensation and freezing during cold weather.
1. Park machine safely. (See Parking Safely in the SAFETY section.)
2. Stop engine. If engine is hot, let it cool several minutes before you add fuel.
NOTE: Side cover in photo removed for clarity.
4. Remove any dirt or debris from area around fuel tank cap.

6. Fill tank only to bottom of filler neck. Capacity is 56.7 L (15 gal).
Raising and Blocking Skid Steer
1. Park machine safely. (See Parking Safely in the SAFETY section.)

Picture Note: Wheels removed for photo clarity
2. Use a safe lifting device to raise skid steer. Use jacking points (A) to jack skid steer.
3. Lower skid steer onto blocks.
Removing Skid Plate
1. Park machine safely. (See Parking Safely in the SAFETY section.)
2. Locate skid plate at rear underside of frame.
3. Remove five cap screws securing skid plate to frame.
Installing Skid Plate
1. Install skid plate using five cap screws.
2. Tighten cap screws to 41 N·m (30 lb-ft).
Filling Windshield Washer Bottle (If Equipped)
1. Park machine safely. (See Parking Safely in the SAFETY section.)
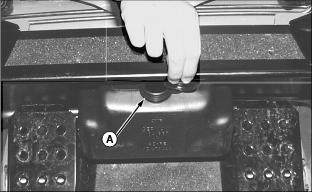
2. Open cap (A) on windshield washer bottle.
3. FIll bottle with a 50/50 mix of windshield wiper fluid and water.
4. Close cap (A) on windshield washer bottle.
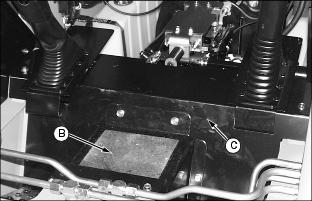
Cleaning and Replacing Heater/Defroster Air Filter (If Equipped)
1. Park machine safely. (See Parking Safely in the SAFETY section.)
NOTE: The heater contains an air filter element (B) in left side of heater assembly at (C).

2. Check air filter element (B) periodically especially if running in dirty applications.
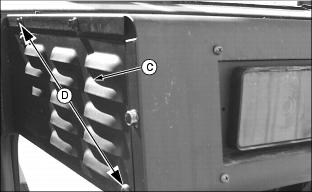
3. Remove filter element by removing two screws (D) and shield from left side of heater assembly.
4. The filter element can be blown off with a low pressure air gun and reused or replaced.
The element must be placed with the rubber seal toward the heater core.