![]()
Introduction
Safety Signs
Controls
Operating
Rotating Blades Are Dangerous - Protect Children And Prevent Accidents
Stay Clear Of Rotating Drivelines
Using Cruise Control (F935) (Optional F925)
Using Weight Transfer Valve (F935) (Optional F925)
Using Reserve Fuel System (F935)
Using Front Wheel Weights (Optional)
Using Rear Frame Weights (Optional)
Avoid Damage To Plastic And Painted Surfaces
Transporting Front Mower On A Trailer
Using Drawbar Hitch (Optional)
Lawn Care
Replacement Parts
Service Machine Safely
Service Intervals
Service Engine
Service Transmission
Service Steering & Brakes
Service Electrical
Service Miscellaneous
Troubleshooting
Storing Vehicle
Assembly
Specifications
Warranty
John Deere Quality Statement
Copyright© Deere & Company

Operating
Operate Safely
· Check brake action before you operate. Adjust or service brakes as necessary.
· Clear work area of objects that might be thrown. Keep people and pets out of the work area. Stop machine if anyone enters the area.
· If you hit an object, stop the machine and inspect it. Make repairs before you operate. Keep machine and attachments properly maintained and in good working order. Keep all shields and guards in place.
· DO NOT leave machine unattended when it is running.
· Only operate during daylight or with good artificial light.
· Be careful of traffic when operating near or crossing roadways.
· Do not wear radio or music headphones while operating the machine. Safe operation requires your full attention.
Park Safely
· Stop machine on a level surface, not on a slope.
· Lower attachments to the ground.
· Before you leave the operator's seat, wait for engine and all moving parts to STOP.
Rotating Blades Are Dangerous - Protect Children And Prevent Accidents
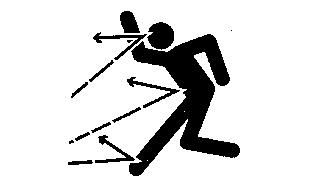
· Never assume that children will remain where you last saw them. Children are attracted to mowing activity, stay alert to the presence of children.
· Keep children in the house when you are operating the machine.
· Turn machine off if a child enters the mowing area.
· Use extra care when you come to blind corners, shrubs, trees, or other objects that may block your vision.
· DO NOT let children or untrained person operate the machine.
· DO NOT carry or let children ride on machine or any attachment. DO NOT tow children in a cart or trailer.
HELP PREVENT SERIOUS OR FATAL ACCIDENTS:
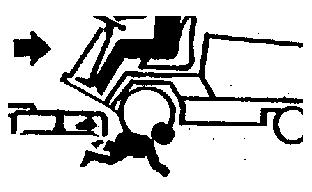
· Be alert at all times, drive forward carefully. People ESPECIALLY CHILDREN can move quickly into the mowing area before you know it.
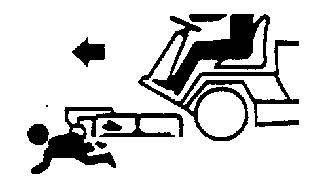
· Back carefully. Shut off PTO and look behind the machine carefully, ESPECIALLY FOR CHILDREN, before you back up.
· DO NOT mow in reverse unless it is absolutely necessary.
· Shut off PTO when you are not mowing.
· DO NOT operate machine if you are under the influence of drugs or alcohol.
Use Seat Belt Properly
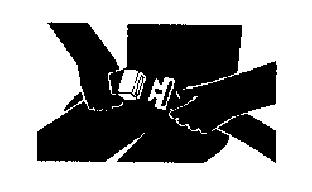
Use a seat belt when you operate with a roll-over protective structure (ROPS) or cab to minimize chance of injury from an accident such as an overturn.
Do not use a seat belt if operating without a ROPS or cab.
Avoid Tipping
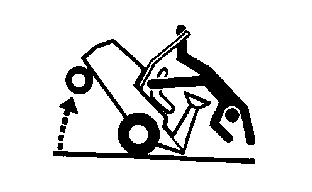
· DO NOT drive where machine could slip or tip.
· Stay alert for holes and other hidden hazards in the terrain.
· Slow down before you make a sharp turn or operate on a slope.
· When pulling loads or using heavy equipment, use only approved hitches, limit loads to those you can safely control, and use counterweights or wheel weights when required per this manual or your attachment manual.
· Drive up and down a hill - not across. Be careful when you change direction on a slope.
· DO NOT stop when going up hill or down hill. If machine stops going up hill, STOP PTO and back down slowly.
· DO NOT mow wet grass. Reduced traction could cause sliding.
· DO NOT try to stabilize the machine by putting your foot on the ground.
Operator Training Required
· Study operation section of this manual before operating the machine.
· Operate machine in an open, unobstructed area under the direction of an experienced operator.
· Learn the use of all controls.
· Operator experience is required to learn the moving, stopping, turning and other operating characteristics of the machine.
Keep Riders Off
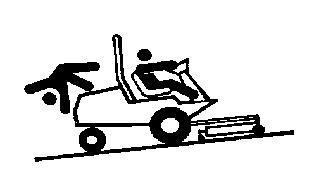
· Only allow the operator on the machine. Keep riders off.
· Riders on the machine or attachment may be struck by foreign objects or thrown off the machine causing serious injury.
· Riders obstruct the operator's view resulting in the machine being operated in an unsafe manner.
Mount And Dismount Safely
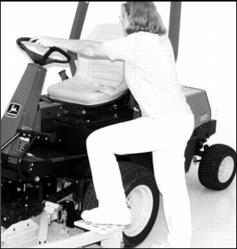
· Use mower step when you mount or dismount.
· Keep step and platform clean.
Wear Appropriate Clothing

· Wear close fitting clothing and safety equip- ment appropriate for the job.
· Loud noise can cause impairment or loss of hearing, wear a suitable protective device such as earplugs.
Stay Clear Of Rotating Drivelines
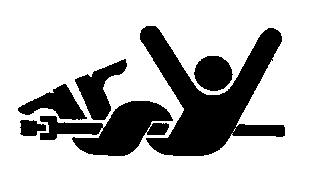
Entanglement in rotating driveline can cause serious injury or death:
· Wear close fitting clothing.
· STOP the engine and be sure PTO driveline is stopped before getting near it.
Check Wheel Bolts
· A serious accident could occur causing serious injury if wheel bolts are not tight.
· Check wheel bolt tightness often during the first 100 hours of operation.
Transport Safely

· Use safety lights and devices. Slow moving machines when driven on public roads are hard to see, especially at night. Avoid personal injury or death resulting from a collision with a vehicle.
· Whenever driving on public roads, use flashing warning lights and turn signals according to local regulations. Extra flashing warning lights may need to be installed.
Lifting Seat Platform
1. Push and hold left or right side lock lever to the rear.
2. Lift up rear of seat to pivot seat platform up to service position.
3. Latch seat platform securely in raised position before working underneath it.
Lowering Seat Platform
2. Pull and hold release lever forward to release seat platform latch.
3. Lower seat all the way down until secured with lock lever.
Adjusting Seat
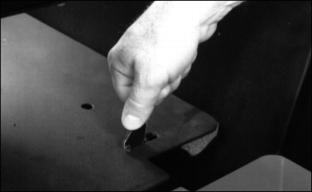
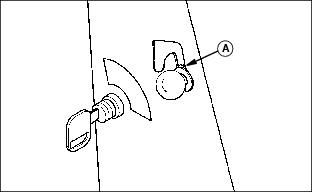
1. Move lever (A) to the left and slide seat forward or rearward to the most comfortable position.
2. Release lever to LOCK seat in position.
3. Turn knob (B), (in front of seat cushion) clockwise for heavier operators, counterclockwise for lightweight operators. If seat suspension "bottoms out" during normal operation, turn knob farther clockwise.
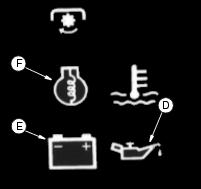
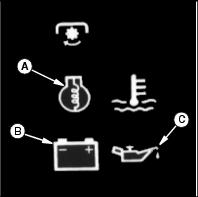
Indicator Lights And Gauges
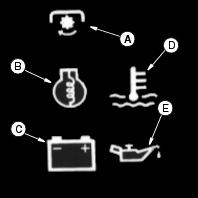
· PTO indicator (A) will come on when PTO is engaged.
· Engine Preheat indicator (B) will come on for up to 8 seconds when starting the engine. If the engine has been run and then cooled, the time maybe less. If engine has been run and is hot the light will not come on.
· Battery Discharge indicator (C) will come on when output is too low. If indicator comes on during operation, stop engine and perform appropriate service.
· Coolant Temperature indicator (D) will come on when engine is overheating.
· Oil Pressure indicator (E) will come on when engine oil pressure is too low. If indicator comes on during operation, stop engine and perform appropriate service.
Hour Meter
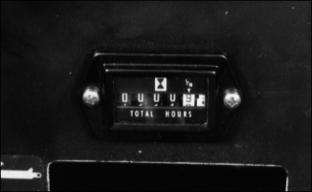
Check hour meter and Periodic Service Chart under hood daily to learn when your Front Mower needs service.
The hour meter shows number of hours engine has run. The periodic service chart gives necessary service intervals.
After you have done ALL the services in an interval section, write the hours from the hour meter and the date in spaces provided.
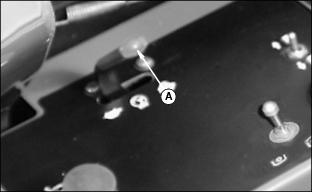
Oil Pressure Indicator
IMPORTANT: Avoid damage! Do not use oil pressure indicator as a way to tell you that the engine oil is low. |

The oil pressure indicator light (A) will come on when the engine oil pressure is too low.
1. If the oil pressure indicator comes on during operation, STOP engine.
2. Check engine oil level. (See Checking Engine Oil Level in Service Engine section.) Add oil if necessary.
3. Start engine. If indicator is still on, DO NOT operate Front Mower. STOP engine and see your John Deere dealer.
Battery Discharge Indicator
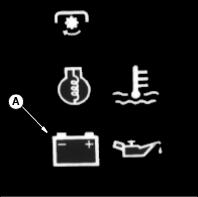
The battery discharge indicator light (A) will come on when alternator output is too low.
1. If the battery discharge indicator comes on during operation, move throttle to FAST position. STOP engine if light remains on.
2. See Electrical System in Troubleshooting section to determine the cause. If problem cannot be corrected, see your John Deere dealer.
Water Temperature Indicator
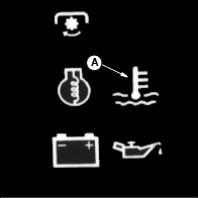
The water temperature indicator light (A) will come on when engine coolant in radiator is above 220°F (107°C).
1. If the water temperature indicator comes on during operation, STOP engine.
2. See Engine in Troubleshooting section to determine the cause. If problem cannot be corrected, see your John Deere dealer.
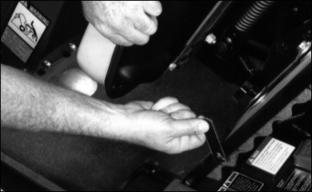
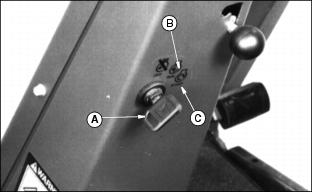
Using Park Brake
· Move knob (A) to the bottom (C) of the slot.
· Push park brake pedal down. Pedal will stay down.
· Move knob (A) to the top (B) of the slot.
Stopping Front Mower

For normal stopping, release foot from speed control pedal.
If unit creeps, push down on service-park brake. If unit continues to creep, see you John Deere dealer.
Disengage PTO and LOCK park brake.
Emergency Stopping

Push hard on service-park brake pedal:
· PTO will automatically DISENGAGE.
Engine Warm-Up
IMPORTANT: Avoid damage! In cold weather, run engine a few minutes to allow engine oil and transmission hydraulic oil to warm-up. |
It is normal that the engine noise level is louder during the warm-up period.
It is also normal that whitish-blue smoke will be seen coming from exhaust after starting and during warm-up. The amount of smoke depends on the outside temperature.

Put throttle lever (A) at half throttle and run engine for 5 minutes without putting Front Mower under a full load.
Cold Weather Starting
For extremely cold weather, an engine block heater and fuel heater are available. (See your John Deere dealer.)
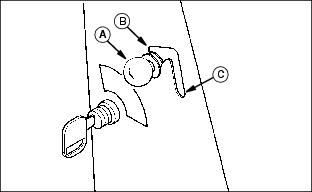
Starting The Engine
3. Move throttle lever to 1/2 throttle position.
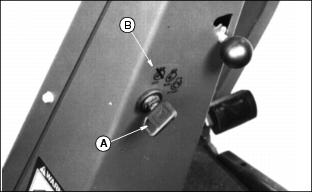
4. Turn key switch (A) to First (RUN) position (B), but DO NOT turn key to Start position (C):
· Oil pressure indicator (D) will be on.
· Battery discharge indicator (E) will be on.
· The engine preheat indicator (F) will come on for approximately 8 seconds.
NOTE: If engine has been run and then cooled, the time may be less. If engine has been run and is hot, the lights will not come on.
5. As soon as engine preheat light goes out, turn key switch to START position.
6. As soon as engine starts, release key. The key will return to RUN position.
· Oil pressure indicator should go out within 5 seconds.
· Battery discharge indicator should go out within 10 seconds.
NOTE: If indicator does not go out after 10 seconds, move throttle to 3/4 position. If indicators stay on longer than the given time intervals, STOP engine, find cause, and correct problem. (See your John Deere dealer.)
Idling Engine
Allowing engine to idle for long periods of time will:
Put throttle lever (A) in the SLOW position when idling engine.
Stopping Engine
NOTE: PTO will automatically DISENGAGE when ever service-park brake is depressed.
1. Depress service-park brake pedal and lower park brake knob (A) into long slot.
2. Pedal will stay down when park brake is LOCKED.
3. Lower attachment to ground.
4. Move throttle lever to SLOW position.
IMPORTANT: Avoid damage! To prevent heat build-up: · Do not STOP engine immediately after hard or extended operation. |
5. Let engine idle for 2 minutes.
6. Turn key switch (A) to OFF position (B).
Driving Front Mower
· Drive the Front Mower very slowly when an attachment is not installed. |
1. Start engine. (See Starting Engine in Operating Engine section.)

2. Push hydraulic lift lever all the way forward to lower attachment to the surface.
3. Push service-brake pedal all the way down.
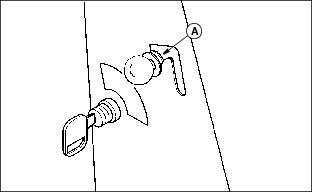
4. Put park brake knob (A) in top of slot (UNLOCKED position).
6. Move throttle lever all the way forward to FAST position.
· Slowly push speed control pedal down:
- The farther you push the pedal down the faster the Front Mower will travel.
· Forward travel speed is 0-17 Km/h (0-10.6 mph).
· Let Front Mower slow down from forward travel.
· Carefully check area behind Front Mower.
· Slowly push speed control pedal down:
- The farther you push the pedal down, the faster the Front Mower will travel.
· Reverse travel speed is 0-8.5 Km/h (0-5.3 mph).
Engaging PTO
· (Serial number 150,001 - 160,000)
NOTE: Front mowers with serial numbers of 150,001 - 160,000 have a three-position rocker switch to engage the PTO.
1. Push throttle lever (A) to midpostion.
2. Push front of PTO switch (B) down to engage PTO.
3. Push throttle lever (A) all the way forward to operate engine at maximum speed.
NOTE: Front mowers with serial number 160,001 and up have a three-position toggle switch to engage the PTO.
1. Push throttle lever (A) to midpostion.
2. Pull up on toggle switch (B).
3. Hold switch up and push completely forward to engage PTO.
5. Push throttle lever (A) all the way forward to operate engine at maximum speed.
Disengaging PTO
· (Serial number 150,001 - 160,000)
NOTE: Front mowers with serial numbers of 150,001 - 160,000 have a three-position rocker switch to engage the PTO.

Push rear of PTO switch (A) down or depress service park brake pedal to DISENGAGE PTO.
NOTE: Front mowers with serial number 160,001 and up have a three-position toggle switch to engage the PTO.
Push toggle switch (A) to the rear or depress service park brake pedal to disengage PTO.
Using Cruise Control (F935) (Optional F925)
NOTE: The Cruise control operates only in forward travel.
· Hold cruise control lever (A) up.
· Push forward speed control pedal at least 1/3 of the way down.
· Remove foot from forward speed control pedal.
· Remove hand from cruise control lever.
· Tap forward speed control pedal.
· Pull down on cruise control lever (A) OR
· Depress service-park brake pedal.
Operate Front Mower in a large, open area to learn how the controls work.
Operating Differential Lock
LOCK the differential for better traction on slopes and in slippery places.
· Differential will stay LOCKED as long as you hold pedal down or as long as wheel slip is unequal.
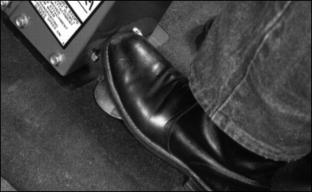
Stopping the Front Mower
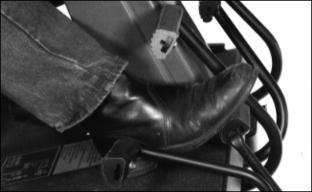
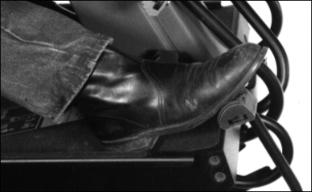
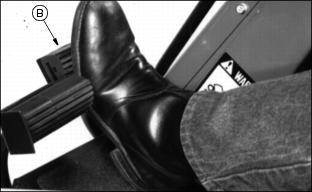
· Use step (A) to dismount safely.
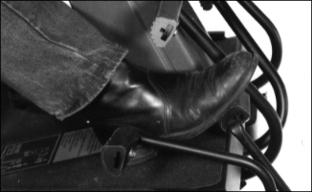
Using Turn Brake Pedals
· Do not apply turn brake pedals at high speeds when making a turn. |
Turn brake pedals can be used for tighter turns.
Using the turn brake pedals may also avoid unnecessary backing of Front Mower.
· Push down on turn brake pedal (A).
· Push down on turn brake pedal (B).
Using Tool Box
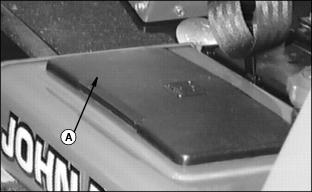
Store operator's manual and necessary hand tools in tool box.
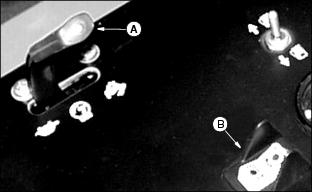
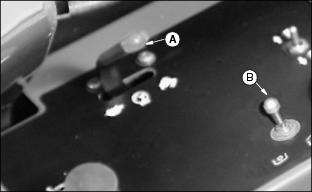
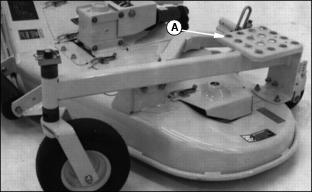
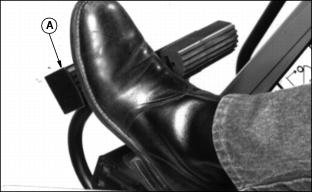
Using Weight Transfer Valve (F935) (Optional F925)
1. With engine running, push hydraulic lift lever completely forward to FLOAT position.
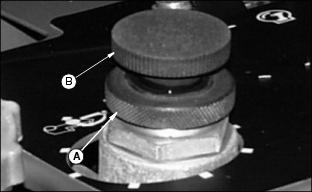
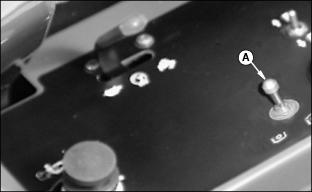
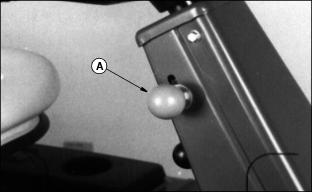
2. Turn valve lock knob (A) counterclockwise to unlock adjusting knob (B).
3. Turn adjusting knob (B) clockwise until mower or other attachment lifts off the ground. (This may require an assistant as it is hard to notice from the operator's seat.)
4. Turn adjusting knob (B) counterclockwise slowly until mower front wheels or other attachment just touches the ground; then turn knob slightly counterclockwise.
5. Turn lock knob (A) clockwise to lock adjusting knob.
6. Operate mower or other attachment over uneven terrain at desired travel speed and observe mower front wheels or front of other attachment. If wheels or attachment do not follow ground contour, operation will be affected. To correct this condition, do Step 7 and 8.
7. Turn valve lock knob (A) counterclockwise to UNLOCK valve.
8. Turn adjusting knob (B) clockwise slightly until mower front wheels or attachment follow ground contour.
9. Turn valve lock knob clockwise to LOCK position after final adjustment.
Using Reserve Fuel System (F935)
The F935 Front Mower is equipped with two fuel tanks.
Before each use, check level in fuel tanks:
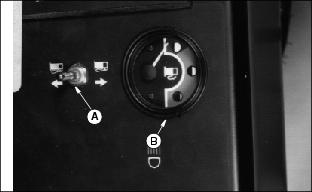
· Move switch (A) to the left.
· Check fuel gauge (B) for proper fuel level in left tank.
· Move switch to the right to check right tank.

If engine starts to stall, move fuel supply lever (C) to other fuel tank position:
· Move lever to the "L" position. This will let you use fuel from the left tank.
· Move lever to the "R" position. This will let you use fuel from the right tank.
Use most of the fuel from one tank before switching to the other tank.
When one tank is near empty, get it filled as soon as possible.
To STOP fuel from getting into the engine:
· Move fuel supply lever between "R" and "L" position.
If engine quits running because fuel tanks are empty:
· Bleed injection pump and lines. (See Bleeding Injection Pump And Lines in Service Engine section.)
DAILY OPERATING CHECKLIST
4 Remove grass and debris from machine.
TESTING SAFETY SYSTEMS
Use the following checkout procedure to check for normal operation of tractor.
If there is a malfunction during one of these procedures, DO NOT operate machine. (See your John Deere dealer for service.)
Perform these tests in a clear open area. Keep bystanders away.
Test 1
Check operation of indicator lights:
· LOOK: Indicator light (A) will come on and go out within approximately 8 seconds. If the engine has been run and then cooled, the time may be less. If the engine has been run and is hot, the light will not come on.
· LOOK: Indicator lights (B) and (C) must light.
· If one indicator does not light, see Replacing Indicator Light Bulb in SERVICE-ELECTRICAL section.
· If new indicator bulb does not light or no indicators work, see your John Deere dealer.
Test 2
1. Unlock park brake and release brake pedal.
2. Raise up off of seat and hold there with weight off of seat cushion.
3. Turn key to START position.
Test 3
· Start engine. Run engine at MAXIMUM engine speed.
· Unlock park brake and release brake pedal.
· Put PTO switch in ON position.

· Raise up off seat. DO NOT get off tractor.
· Engine should begin to die. PTO should immediately SHUT OFF and mower blades should STOP.

· Raise up off seat. DO NOT get off tractor.
· Raise up off seat. DO NOT get off tractor.
· Engine should continue to run.
Test 4
NOTE: Operator must be on the seat. Engine is not running and park brake and PTO are disengaged.
1. Sit on operator's seat with engine off.
4. Depress park brake pedal and start engine.
7. Push down on park brake pedal. PTO must stop.
8. Release park brake. PTO must not restart automatically after releasing park brake. PTO may be restarted only by using the PTO switch.
Using Front Wheel Weights (Optional)
Install front wheel weights when operating on slopes or slippery surfaces to increase traction, stability, braking and steering control.
One 23 kg (50 lb) weight can be attached to each wheel on the F935 Front Mower.
Installation instructions are included with weights.
Using Rear Frame Weights (Optional)
Rear frame weights are recommended for use with attachments listed below.
Installation instructions are included with weights.
Using Liquid Weight
Liquid weight may be used along with front and rear cast iron weights.
Add the same amount of liquid weight to each front or each rear tire.
A tire with liquid weight needs an inner tube.
Use the correct amount of calcium chloride (shown on chart) to prevent water from freezing.
Avoid Damage To Plastic And Painted Surfaces
· Insect repellent spray may damage plastic and painted surfaces. Do not spray insect repellent near machine.
· Be careful not to spill fuel on machine. Fuel may damage surface. Wipe up spilled fuel immediately.
Transporting Front Mower On A Trailer
IMPORTANT: Avoid damage! To prevent damage to transmission: · DO NOT pull or push the Front Mower a long distance. · Transport Front Mower on a trailer. |
Use a heavy-duty trailer to transport your machine.
1. Drive machine forward onto the trailer. Lower any attachments to trailer deck.
3. Fasten machine to trailer with heavy-duty straps, chains, or cables. Both front and rear straps must be directed down and outward from machine.
4. Trailer must have signs and lights required by law.
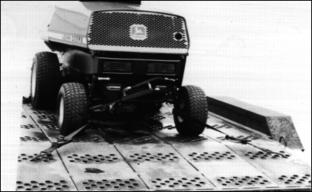
5. Make sure Front Mower hood is latched securely.
6. Fasten hood with hood strap.
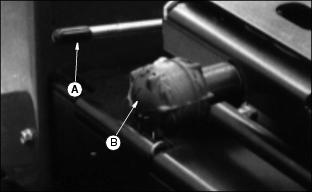
Pushing Front Mower
To move Front Mower when engine is not running:

· Push down and hold two buttons (A) to disconnect transmission.
· Push Front Mower to desired location.
· Two buttons will come back up when you start engine.
Using Drawbar Hitch (Optional)
· Using the appropriate adapter parts, attach the chain to the Front Mower drawbar support or other specified anchor location.
· Provide only enough slack in the chain to permit turning.
· See your John Deere dealer for a chain with a strength rating equal to or greater than the gross weight of the towed machine.
· Use the drawbar hitch to pull only light trailers or other attachments.
· The maximum towed weight that can be used with the drawbar hitch is 409 kg (900 lbs).
· The maximum tongue weight must not exceed 45 kg (100 lbs).