![]()
Introduction
Safety Signs
Controls
Operating Machine
Replacement Parts
Service Machine Safely
Service Interval Chart
Service Engine
Service Transmission
Cleaning & Lubricating Drive Clutch
Checking Driven Clutch Wear Pad
Service Electrical
Service Miscellaneous
Troubleshooting
Storing Machine
Assembly
Specifications
Warranty
John Deere Service Literature
QUALITY DOESN'T END WHEN YOU INVEST IN A DEERE
Copyright© Deere & Company

Service Transmission
Transaxle Oil
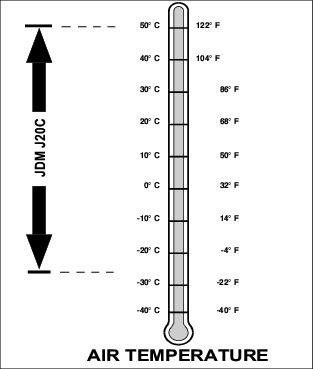
Use oil viscosity based on the expected air temperature range during the period between oil changes.
The following John Deere transmission and hydraulic oil is preferred:
Other oils may be used if recommended John Deere oil is not available, provided they meet one of the following specifications:
· John Deere Standard JDM J20C
IMPORTANT: Avoid damage! DO NOT use engine oil, "Type F" (Red) Automatic Transmission Fluid, or |
NOTE: For temperatures below -13° C (0° F), John Deere J20D HY-GARD® Low Viscosity oil may be used. If J20D is used at temperatures above
-13° C (0° F), some brake squeal may be heard due to lower viscosity of the oil at higher air temperature.
Checking Transaxle Oil
1. Park utility vehicle on a level surface and stop engine.
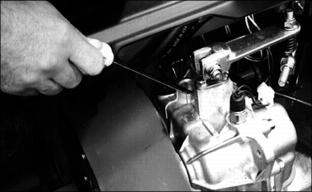
4. Remove dipstick and wipe dipstick clean.
5. Oil should be between hash marks (A) on dipstick.
6. Check oil level by screwing dipstick fully into transaxle case, then unscrewing and checking oil level.
7. If oil level is low, add oil as needed through the fill hole. (See Transmission Oil in this section for correct application.)
8. Install and tighten dipstick.
Changing Transaxle Oil
NOTE: Normal interval for transaxle oil change is 500 hours, but it may be shortened if brakes start to chatter or are noisy when applied.
1. Park utility vehicle on a level surface and stop engine.
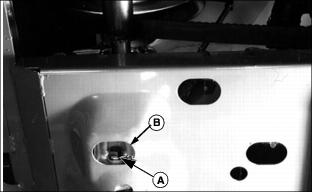
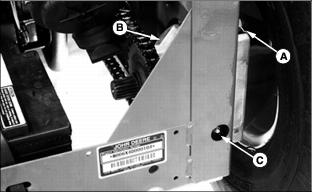
4. Remove drain plug (A). Access drain plug from underside of machine through slot (B).

5. After all oil is drained, install and tighten drain plug.
IMPORTANT: Avoid damage! Before changing the transaxle oil, clean area around the fill plug before removing. |
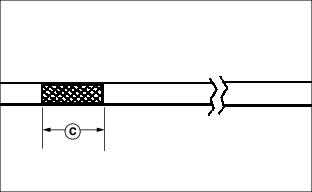
6. Remove dipstick and wipe clean. Oil should be between hash marks (C) on dipstick.

7. Add approximately 4.5 L (4.75 qt.) of oil. (See Transaxle Oil section for oil recommendations.)
8. Check oil level by screwing dipstick fully into transaxle case, then removing to check level.
9. Wait for two minutes then check oil level. Add oil if necessary.
10. Install dipstick and tighten.
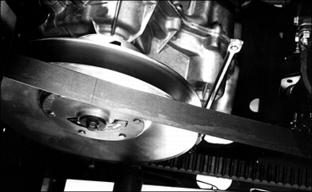
Checking Belt Condition
1. Stop engine and apply parking brake.
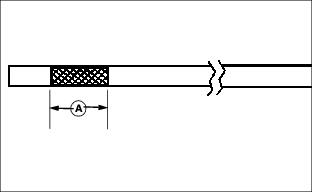
2. Check belt for wear and damage.
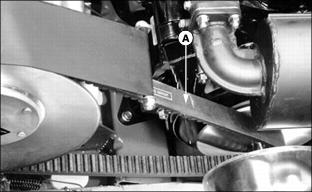
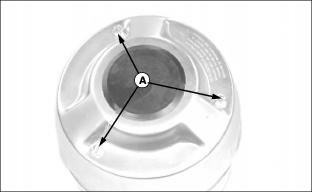
3. Width of belt (A) on top surface should be minimum of 27 mm (1.06 in.).
4. If belt width is less than 27 mm (1.06 in.) replace drive belt.
Replacing Drive Belt
1. Stop engine and engage park brake.
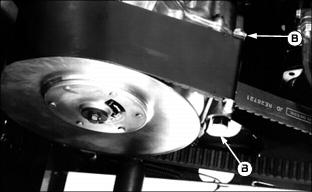
3. Remove lock nut and cap screw (B) to remove belt shield.
4. Lift belt over outer pulley of driven clutch.
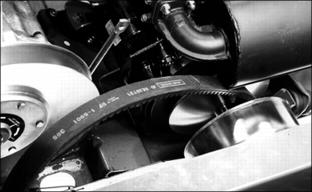
5. Remove belt from drive pulley.
6. To install new belt, reverse above procedure.
7. Install belt shield, cap screw and locknut.
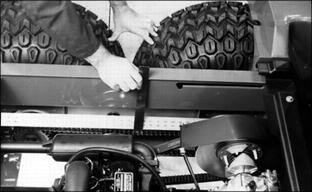
Checking Drive Chain Tension
1. Park utility vehicle on level surface. Stop engine, do not engage parking brake.
2. Differential Lock OFF, transaxle in neutral.
3. Raise all four rear wheels off of ground. Place jack stands under utility vehicle.

5. Rotate rear wheels toward each other so that chain slack is at top chain.
6. With straight edge across top of sprockets, measure distance (sag) to top of chain.
7. Slack should be 12 to 38 mm (0.5 to 1.5 in.).
8. See Drive Chain Tension Adjustment) for adjustment procedure.
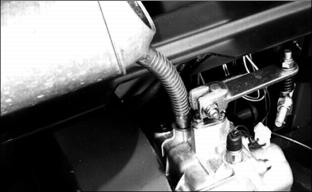
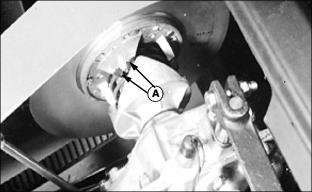
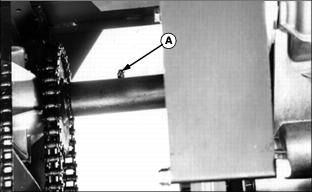
Lubricating Drive Chain
NOTE: If operating conditions are dusty, use of a dry lubricant is suggested.

1. Spray John Deere TY6240 Chain Lubricant or an equivalent on external surface of chain (A).
Adjusting Drive Chain Tension
NOTE: Check tire circumference; largest circumference tires should be mounted on rear most axle.
1. Park utility vehicle on level surface. Stop engine, do not engage parking brake.
2. Differential Lock OFF, transaxle in neutral.
3. Raise all four rear wheels off the surface. Place safety stands under the utility vehicle.
4. Raise box and be sure support rod is latched.
5. Rotate rear wheels toward each other so that chain slack is at top.
6. With straight edge across top of sprockets measure distance to top of chain.
7. Slack should be 12 - 38 mm (0.5 - 1.5 in.).
IMPORTANT: Avoid damage! To avoid stripping threads from adjustment bolt (C), housing bolts (A) must be loosened before turning adjustment bolt. |
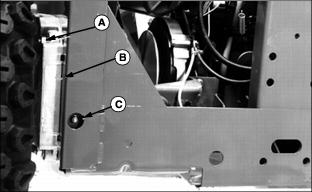
8. Loosen four bolts (A) just enough so that the axle housing (B) can slide easily back and forth.
9. Turn adjustment bolt (C) clockwise to remove chain slack.
IMPORTANT: Avoid damage! If chain is too tight, chain can be damaged. All slack should be removed from chain without chain being tight. Check chain slack again after you tighten axle housing bolts. |
10. Tighten axle housing bolts to 90 N·m (67 lb-ft.). Then back off bolt (C) one half turn to relieve force on bolt.
NOTE: Chain slack must be the same on both sides of vehicle.
12. Check and adjust chain slack on the opposite side.
13. Lower utility vehicle to the ground.
Cleaning & Lubricating Drive Clutch
Picture Note: Clutch is shown removed from utility vehicle for clarity only. Removal is not necessary for cleaning.
1. Remove screws (A) and remove cover from clutch.
2. Blow out clutch and cover using compressed air.
NOTE: Lubricate in area shown and only lubricate sparingly.
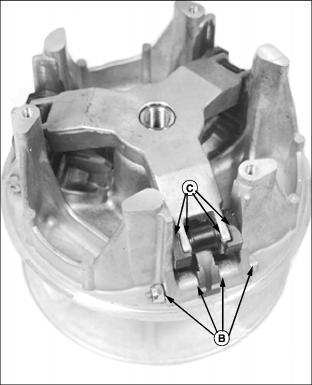
3. Lubricate cam weight pivots (B) and roller pivots (C) using John Deere SUPERLUBE® with TEFLON® spray lubricant or an equivalent. (SUPERLUBE® is a registered trademark of Synco Chemical Corporation. TEFLON® is a registered trademark of DuPont Chemical Corporation.®)
Checking Driven Clutch Wear Pad
1. Check for missing or worn wear pads (A).
2. There should not be any excessive wear, or metal-to-metal contact.
3. If replacement is necessary, see your John Deere dealer, or consult the technical manual.
Lubricating Axle Couplers
IMPORTANT: Avoid damage! Wipe excess grease from coupler at transmission end. Excess grease can contaminate belt and cause belt to slip. |
NOTE: In extreme operating conditions, lubrication should be done every 25 hours. Under normal conditions, it should be done every 50 hours.
Lubricate one fitting on each side of transaxle every 50 hours (See Grease Specifications section).