![]()
Introduction
Safety Signs
Controls
Operating Machine
Protect Children and Prevent Accidents
Driving On Rough Or Hilly Terrain
Using Steering Wheel Lock Cable
Operating Brake and Accelerator Pedals
Raising and Lowering Cargo Box Using Power Lift
Lowering Cargo Box Side Panels
Using Cargo Box Tie-down Rings
Using Sling Load Portal® Rings
Checking the Safety Start System
Carrying and Distributing a Load
Replacement Parts
Service Machine Safely
Service Interval Chart
Service Engine
Service Transmission
Service Electrical
Service Miscellaneous
Troubleshooting
Storing Machine
Assembly
Specifications
Warranty
John Deere Service Literature
QUALITY DOESN'T END WHEN YOU INVEST IN A DEERE
Copyright© Deere & Company

Operating Machine
Operate Safely
· View the videotape provided with the vehicle for safe operating practices.
· DO NOT misuse the M-GATOR, it is a utility vehicle NOT a recreation vehicle.
· Sit on the center of the seat and keep both feet within the foot platform perimeter. Clean foot platform if dirty, and remove any debris from around foot controls.
· Check for debris in engine compartment, especially around brake linkage on each side of the transaxle.
· Always use both hands for steering.
· Know location of controls and how and what they operate.
· Never operate utility vehicle while standing.
· Never operate utility vehicle with the cargo box raised.
· Check brake action before beginning vehicle operation. Adjust or service the brakes as necessary.
· To provide adequate braking ability and traction, DO NOT tow any attachment or loaded trailer unless the utility vehicle cargo box is loaded.
· Inspect vehicle before operating. Be sure hardware is tight. Repair or replace damaged, badly worn, or missing parts. Be sure guards and shields are in good condition and fastened in place. Make any necessary adjustments before operating.
· Keep people and pets out of the work area. Stop the vehicle if anyone enters the area. If an object is hit, stop and inspect the vehicle for damage. Make repairs before operating.
· Keep headlight lenses clean.
· DO NOT leave vehicle unattended when it is running.
· Only operate during daylight or with good artificial light.
· Be careful of traffic when operating near or crossing roadways.
· This vehicle is NOT intended for use on highways or public roadways. It is to be used for off-road use only.
· Avoid sudden starts, stops, or turns.
· Always use a level turnaround area.
· DO NOT wear headphones while operating.
Before Driving
1. Clean foot platform if dirty, and remove any debris from around foot controls. Sit on the center of seat and keep both feet inside foot platform perimeter.
2. Know location of controls and how and what they operate.
3. Inspect utility vehicle for signs of wear or damage.
4. All safety equipment must be in good condition and fastened in place:
5. Before moving, check around utility vehicle, be sure no one is near it.
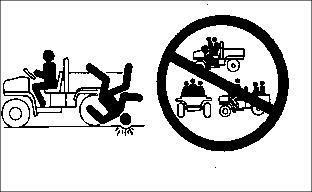
Protect Children and Prevent Accidents
· Never assume that children will remain where you last saw them. Stay alert to the presence of children.
· Never carry children in the cargo box area. DO NOT let children ride in the cargo box of the utility vehicle or any attachment. DO NOT tow children in a cart or trailer.
· Use extra care when coming to blind corners, shrubs, trees, or other objects that may block vision.
· DO NOT let children or an untrained person operate the vehicle.
· Before backing or turning, look behind and around the utility vehicle for children.
HELP PREVENT SERIOUS OR FATAL ACCIDENTS:
· Be alert at all times, drive forward and in reverse carefully. People, especially children, can move quickly into an area of operation.
· Back carefully. Look behind the vehicle, especially for children, before backing up.
· DO NOT operate vehicle if under the influence of alcohol or other drugs.
· Misuse and recreational riding can lead to accidents, severe bodily injury or death.
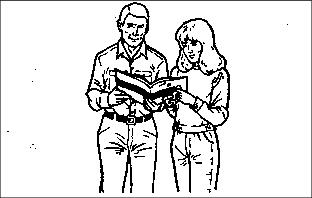
Operator Training Required
Study operation section of this manual before operating the vehicle.
· Operate vehicle in an open, unobstructed area under the direction of an experienced operator.
· Learn the use of all controls.
· Operator experience is required to learn the moving, stopping, turning and other operating characteristics of the vehicle.
· Young drivers may not have the strength or experience to control the utility vehicle. This increases the chances of rolling the vehicle over resulting in severe bodily injury or death.
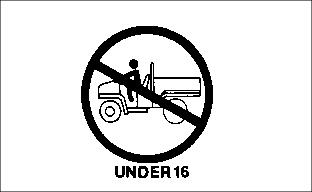
· The utility vehicle should NOT be operated by anyone under the age of 16 years.
Park Safely
1. Stop the vehicle on a level surface, not on a slope.
4. Turn off ignition switch to stop position.
5. Before you leave the operator's seat, wait for engine and all moving parts to STOP.
Use Hand Holds
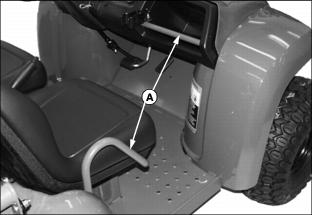
Hand holds (A) are provided for passenger balance when driving over rough terrain. Use dash bar and side rails on seats for stability.
No Driving On Public Roads
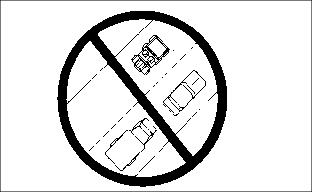
Before you drive utility vehicle, be sure:
· Headlight, taillight, brake light lenses are clean and operate.
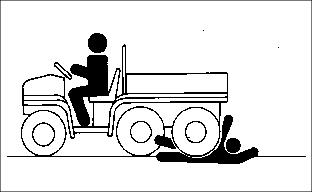
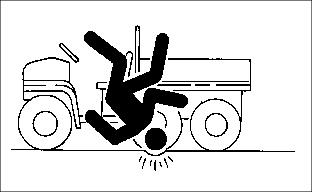
Keep Riders Off Vehicle
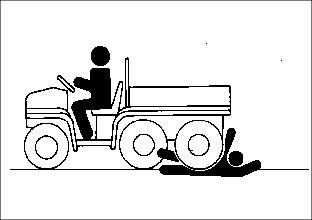
· Seating is provided for operator and one passenger. No riders are allowed in cargo box or anywhere else on vehicle.
· Riders on vehicle are subject to injury such as being struck by foreign objects or being thrown off of the vehicle and severely injured or killed.
· Riders affect the operator's ability to control the vehicle as well as its center of gravity. Also, riders could obstruct the operator's view resulting in the vehicle being operated in an unsafe manner.
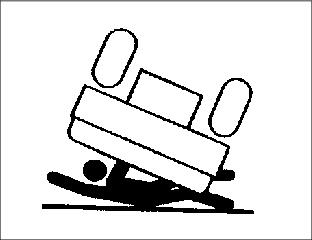
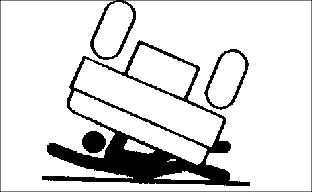
Avoid Tipping
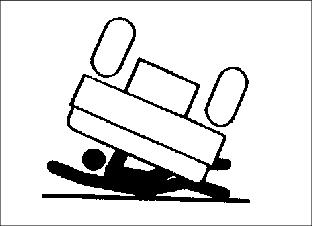
Accidents resulting in serious injury or death can occur from tipping the Utility Vehicle. Observe the following practices to help prevent accidents:
· DO NOT misuse the Utility Vehicle. The Utility Vehicle is not designed for recreational riding.
· Never allow riders in the cargo box or other areas where seats are not provided.
· Drive very slowly when turning. Sharp turns could cause the utility vehicle to tip over.
· Reduce speed and exercise extreme caution on slopes or on rough ground.
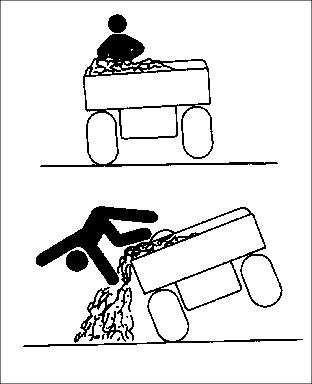
· DO NOT overload vehicle and avoid shifting loads. Reduce load when operating over rough or hilly terrain.
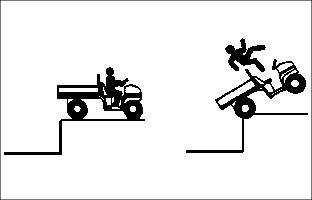
· DO NOT stop or start suddenly when going uphill or downhill. Be especially cautious when changing direction on slopes.
· Stay alert for holes, rocks, and other hidden hazards in the terrain.
· Keep front wheels straight at crest of hill or going over bumps.
· When descending a hill, remove foot from accelerator and apply brakes to reduce speed and maintain control.
· DO NOT make changes or modifications to the Utility Vehicle.
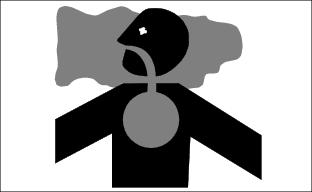
· Use of a helmet and/or protective gear is recommended for certain operating conditions.
Wear Appropriate Clothing
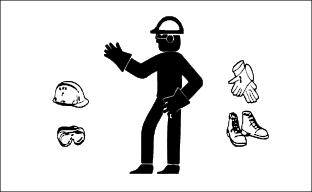
· Wear close fitting clothing and safety equipment appropriate for the job.
· Loud noise can cause impairment or loss of hearing, wear a suitable protective device such as earplugs.
Driving On Rough Or Hilly Terrain
· Horseplay or recreational riding can lead to accidents, severe bodily injury or death.
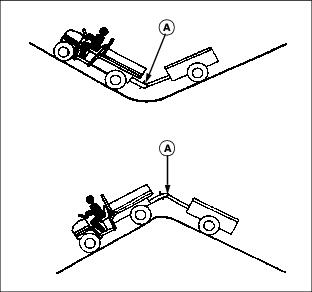
· Always use the brakes when going down slopes. The utility vehicle can speedup (freewheel) going down a slope. When carrying a load, be sure the load is evenly distributed and secured. Braking could shift the load and affect vehicle stability. Due to belt drive, engine and/or clutch, braking effect can be minimal.
· Use existing trails. Avoid terrain such as dangerous slopes and impassable swamps. Watch carefully for sharp bumps, holes, ruts, or obstacles.
· Look ahead at terrain. Know what is coming and be prepared to react. Be alert for hazards.
· Keep front wheels straight at crest of hill or going over bumps.
· Adjust speed according to trail, terrain, and visibility conditions.
· Use of a helmet and or protective gear is recommended for certain operating conditions.
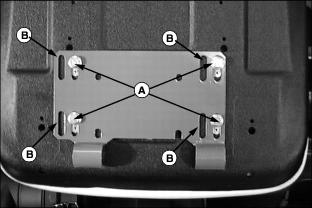
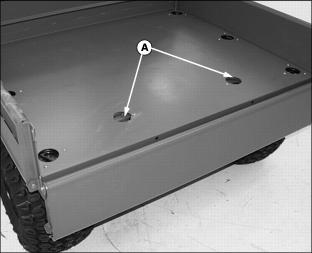
Check Wheel Bolts
IMPORTANT: Avoid damage! Overtightening of front wheel hub mounting bolts may result in bearing damage. |
· A serious accident could occur causing serious injury if wheel bolts are not tight.
· Check wheel bolt tightness after first 10 hours of vehicle operation and every 200 hours thereafter.
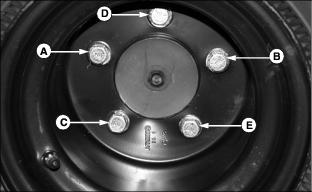
Picture Note: Tighten in order of letters on photo.
· Tighten front wheel bolts to 90 N·m (65 lb-ft.).
· Tighten bolts on the drive wheels to 90 N·m
(65 lb-ft.)
Climbing Or Descending A Hill
· Always use the brakes when going down slopes. The utility vehicle can speedup (freewheel) going down a slope. When carrying a load, be sure they are loaded evenly and secured. Braking could shift the load and affect vehicle stability. Due to belt drive, engine and/or clutch braking effect is minimal.
· Sit on center of seat and keep both feet within foot platform.

· Never drive past the limit of visibility. Slow down near crest of hill until getting a clear view of the other side.
· Keep front wheels straight at crest of hill or going over bumps.
· DO NOT stop or start suddenly when going uphill or downhill. Be especially cautious when changing direction on slopes.
· If vehicle stops or loses power going up a hill, apply park brake to hold vehicle on slope. Maintain direction of travel and release brake slowly. Back straight down hill slowly while maintaining control. DO NOT turn vehicle sideways. Vehicle is more stable in a straight forward or rearward position.
· When descending a hill, remove foot from accelerator and apply brakes to reduce speed and maintain control.
· Use of a helmet and/or protective gear is recommended for certain operating conditions.
Driving Across Slopes
· Sit on center of seat and keep both feet within foot platform perimeter.
· Stay alert for holes, rocks and other hidden hazards in the terrain.

· When riding on soft terrain, turn front wheels slightly uphill to keep utility vehicle on a straight line across the hill.
· If utility vehicle begins to tip, turn front wheel downhill to gain control before proceeding.
· Use of a helmet or protective gear is recommended for certain operating conditions.
Riding Through Water
· Avoid water whenever possible. If drive belt becomes wet, slippage will occur and vehicle will lose power
· Sit on center of seat and keep both feet within foot platform perimeter.
· Reduce speed while driving through water.
Never cross any body of water where depth may be unknown to the operator. As an operational guideline, deep water is considered anything in excess of 152 mm (6 in.) in depth. Tires may float, making it difficult to maintain control.
· Choose a course within the waterway where both banks have a gradual incline. Cross at a point known to be safe.
· Proceed at a slow steady speed to avoid submerged obstacles and slippery rocks.
· Avoid water crossings where the operation of a utility vehicle may cause damage to waterway beds or erode waterway shoreline.
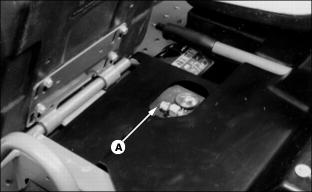
Using Fuel Shut-Off Valve
1. Lift and tip operator seat forward.
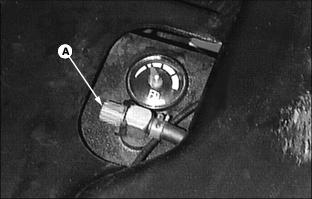
2. Turn knob (A) to shut OFF or turn ON fuel flow. Arrow on knob should face upward for fuel flow to be ON.
NOTE: The fuel shut-off valve should be closed if the vehicle is to be transported or placed in extended storage.
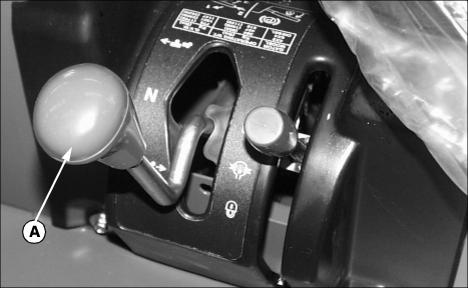
Using Steering Wheel Lock Cable
NOTE: This steering wheel lock cable helps prevent vehicle theft.
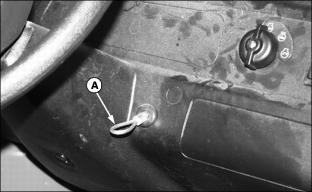
1. Pull cable (A) out of its storage hole.
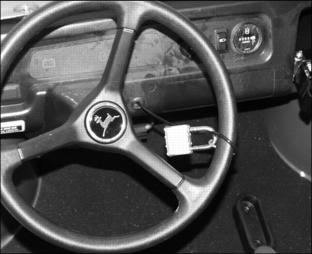
2. Loop cable around steering wheel.
3. Padlock cable to steering wheel.
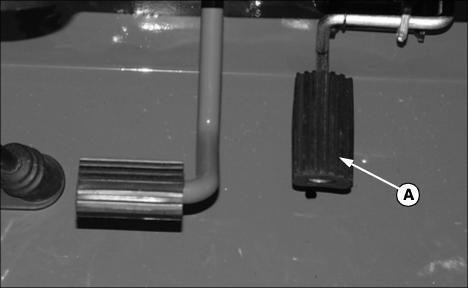
Operating Brake and Accelerator Pedals
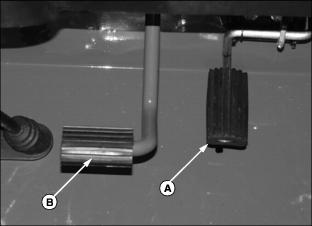
Release accelerator (A) and apply brake pedal (B) evenly and firmly to slow down or stop.
Avoid hard braking applications.
Push down accelerator slowly and smoothly.
Before braking remove foot from the accelerator pedal.
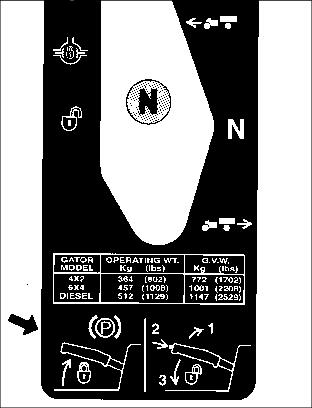
Using Park Brake
NOTE: Applying foot brake pedal while engaging and disengaging park brake decreases effort required to pull or push park brake lever.
To ENGAGE park brake:

· Pull up lever (A) and latch into position.
To DISENGAGE park brake:
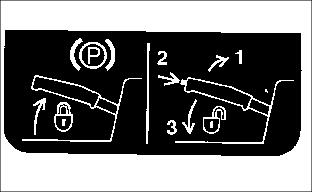
Picture Note: Decal located on console below park brake lever.
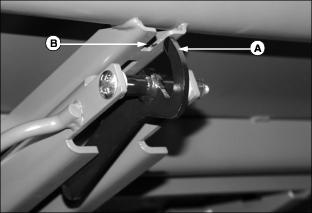
Operating Differential Lock
The differential lock is used for better traction when rear wheels start to slip. Engaging the differential lock will cause all rear wheels to turn together at equal speed.
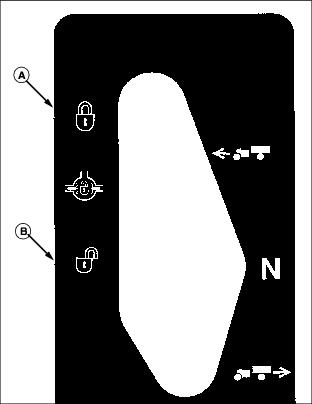
Lever positions are, DISENGAGED (B) and ENGAGED (A).
IMPORTANT: Avoid damage! For differential lock to engage, the opposing wheel(s) must be turning slightly faster than opposite wheel(s). |
· Stop or slow utility vehicle engine speed to 1/3 throttle or less.
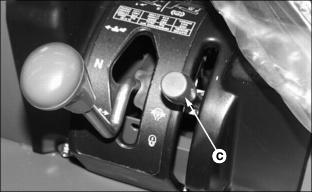
· Push down on lever (C), differential lock will remain engaged as long as lever is down. Function indicator panel light on dash will come "ON".
NOTE: Panel light only tells you when lever is in "ON" or "OFF" position. To actually disengage the differential lock, equalize torque on both axles. Drive vehicle straight ahead at constant speed or stop and reverse machine. This information is described in the video tape supplied with machine.
· To disengage differential lock raise lever (C). Function indicator panel light on dash will go "OFF".
Using Transaxle Shift Lever
· Wait until the engine comes to low idle speed before shifting.
· Always come to a complete stop before shifting.
· DO NOT race engine in neutral and then shift vehicle into gear.
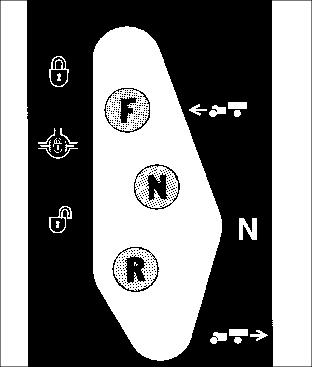
Shift lever (A) is located on a console to the right and below the operator seat. There are three positions:
FORWARD: Push shift lever forward.
NEUTRAL: Move lever to middle position.
REVERSE: Pull shift lever to right, then pull rearward.
Adjusting Seats
1. Lift and tip vehicle seat forward.
NOTE: The back of the seat will hit the front of the fender. Use care when adjusting.
NOTE: Lateral seat movement can be accomplished by removing seat hardware and moving seat to the other slotted seat position (B).
3. Slide seat forward or backward to desired position.
NOTE: Left rear bolt position on passenger seat is intentionally left open, no bolt.
Starting the Engine
1. Sit on vehicle operator's seat. DO NOT start engine at this time.
2. Push down on accelerator pedal (A) to check for free movement of pedal assembly. Release pedal.
3. Engage park brake if vehicle is parked on an incline.
NOTE: Your utility vehicle has a neutral start safety switch. Engine will not start unless transaxle shift lever is in N (Neutral) position.
4. Move gear shift lever to N (Neutral) position.

5. Engage parking brake by pulling UP on handle (B).
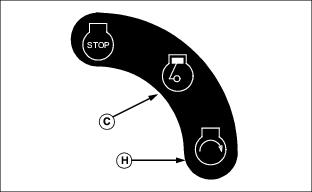
6. Turn ignition switch to the RUN position (C).
The following indicator lights will be ON:
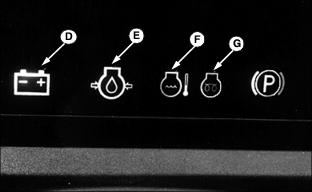
· Battery discharge indicator (D).
· Coolant temperature indicator (F).
· Engine preheat indicator (G); will come ON for up to 8 seconds. Length of time ON varies with air temperature.
7. As soon as coolant temperature and preheat indicators go out, turn the ignition switch to START position (H).
· If engine starts, release switch to the RUN position.
· If engine does not start within 5 seconds, turn the ignition switch to OFF and wait 10 seconds before trying to start again.
· In very cold conditions, attempt starting only three times and then wait 5 minutes before trying to start again. This will allow time for starter to cool and prevent damage to starter.
Warming and Idling the Engine
IMPORTANT: Avoid damage! Do not operate the engine at full throttle or under load until engine has warmed up, or engine damage could occur. |
Warming Engine
Run engine at half speed for 2 or 3 minutes.
Idling Engine
1. Avoid unnecessary slow idling. Instead, stop engine.
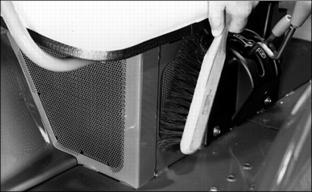
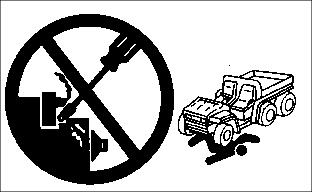
2. Keep engine compartment clean. Be sure radiator screens remain installed and clean. The engine in the utility vehicle needs large volumes of air to keep cool.
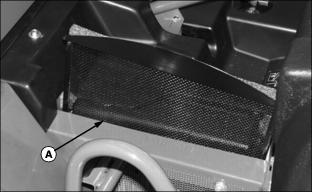
3. Pull up radiator screen (A) for easy cleaning.
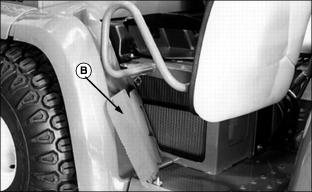
4. Remove outside screens (B) to access front of radiator for complete cleaning.
Stopping Engine
IMPORTANT: Avoid damage! If engine has been running hard and is hot, DO NOT stop engine immediately. Remove load from engine. Run engine at 1/3 to 1/2 throttle for several minutes to cool engine. |
1. Release accelerator pedal and allow engine to slow idle.
2. Move gear shift lever to N (Neutral) position.
4. Turn the ignition switch to the STOP position (A).
Raising and Lowering Cargo Box Using Power Lift
1. Turn the ignition switch to RUN position (A).
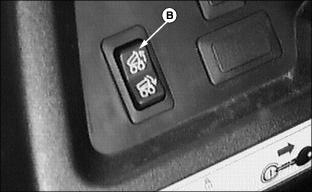
2. Raise cargo box by pushing in on top of rocker switch (B).
NOTE: The noise that is heard when the power lift reaches the end of it's stroke, or when lift capacity is exceeded, is the actuator's clutch slipping. Keep clutch slip to a minimum. Do not overload vehicle capacity.
3. Lower cargo box by pushing in on bottom of rocker switch (B).

4. Turn the ignition switch to STOP position (C).
Operating the Tailgate
Lower Tailgate Using Tailgate Support
NOTE: Use the tailgate support to carry a longer load with tailgate down.
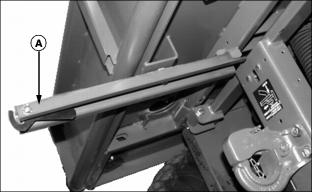
1. Pull tailgate support arm (A) out from under cargo box.
2. Pull latch rod handles (B) up and towards center of tailgate at the same time to release tailgate latches from holes (C) in side panel.
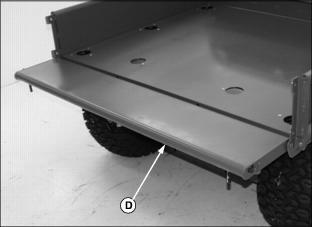
3. Lower tailgate (D) until resting on tailgate support arm. Latch hook/arm into tailgate.
4. Pull up tailgate to close and snap latch rods back into side panel holes at the same time.
5. Push tailgate support arm back under cargo box.
6. Push rod handles down to avoid snagging on clothing.
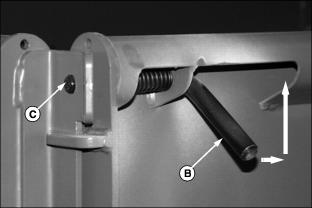
Lower Tailgate Without Tailgate Support
1. Pull latch rod handle (A) up and in to release tailgate latch and remove end of rod (B) from hole in side panel.
2. Pull latch rod handles (A) up and in towards center of tailgate at the same time to release tailgate latches from holes (B) in cargo box.
4. Pull up tailgate to close and snap latch rod handles back into holes at the same time.
5. Push rod handles down to avoid snagging on clothing.
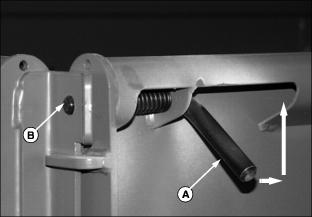
Latching the Tailgate to the Tailgate Support Arm
NOTE: The support arm has a latch handle (A) that will hold the lowered tailgate firmly to the support arm (B).
1. Pull the tailgate support arm out from under the cargo box.
2. Lower tailgate to support arm.
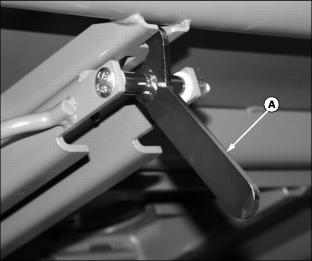
3. Pull up on the latch handle (A) until it connects into slot of support arm.
4. Release tailgate, push in on handle (A) and return support arm to the stored position under the cargo box.
5. Close cargo box and be sure the latch rods snap securely into the holes in the side panels.
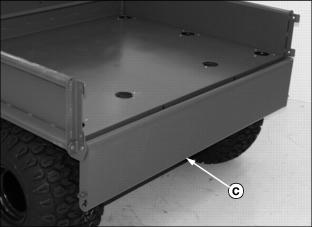
Lowering Cargo Box Side Panels
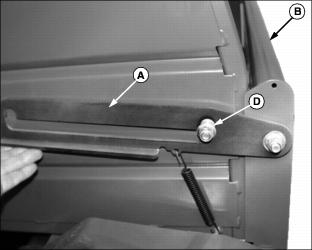
1. Lower the tailgate onto the tailgate support arm.
2. Lift latch (A) at the front of cargo box to disengage latch pin (D) and pull on the side panel (B) to lower.
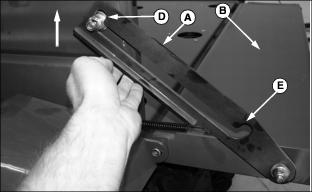
3. Raise side panel, lift latch (A) and raise panel (B) until the lower detent (E) in the latch engages latch pin (D).
4. Pull up tailgate (C) to close and snap latch rods back into holes at the same time.
5. Push rod handles down to avoid snagging on clothing.
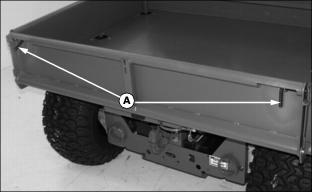
Using Cargo Box Tie-down Rings
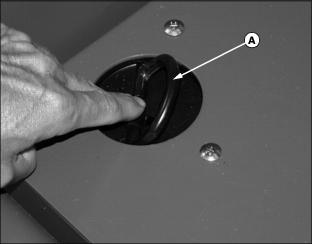
1. Place your finger on the flat of the tie-down ring and push to access the ring loop (A).
IMPORTANT: Avoid damage! To avoid damage to side panels and tailgate, place bulk of load over the main cargo box area (B). Do not overload tailgate or side panels. |
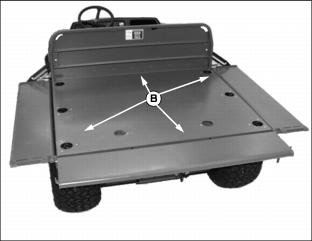
2. Arrange load so that the weight is centered over the main cargo area (B).
3. Secure loads to the tie-down rings in a safe and secure manner.
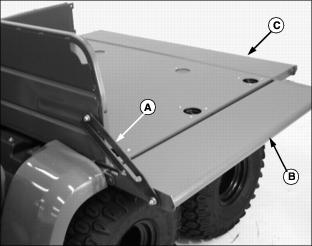
Using Sling Load Portal® Rings
NOTE: The Sling Load Portals (A) located to the rear of the cargo box allow access to the rear lift rings.
NOTE: There is a gap between the tab (B) and the frame stop (C). If necessary pry open the Sling Load Portal in the case of a tight condition.
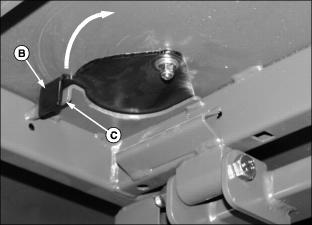
1. Reach under edge of cargo box to the tab (B) of the Sling Load Portal and swing open.

2. Place an approved lifting device through the Sling Load Portal in the cargo box.
NOTE: Rings on the four corners of the vehicle are for lifting or tiedown. Rings (D) must be free to rotate.
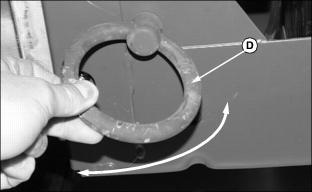
3. If not free to rotate, loosen nut until the rings are free.
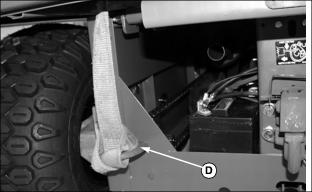
4. Secure the lifting device to the lifting ring (D).
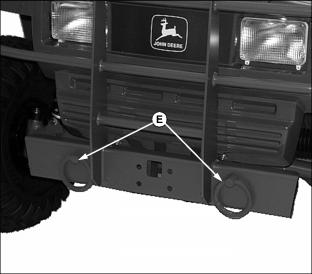
5. There are two lifting rings (E) on the front of the vehicle also.
Daily Operating Checklist
o Check Air Restriction Indicator
o Remove Debris From Vehicle Platform
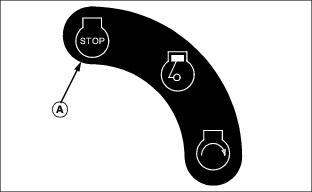
Checking the Safety Start System
Use the following checkout procedure to check for normal operation of utility vehicle.
If there is a malfunction during one of these procedures, DO NOT operate vehicle. (See your John Deere dealer for service.)
Perform these tests in a clear open area. Keep bystanders away.
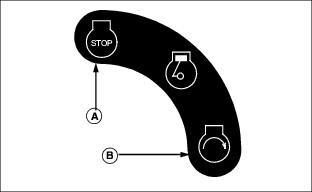
2. Place ignition switch in the STOP position (A).
4. Move transaxle shift lever into the F (Forward) position.
5. Move ignition switch to the START position (B). Engine should NOT crank. Turn ignition switch OFF.
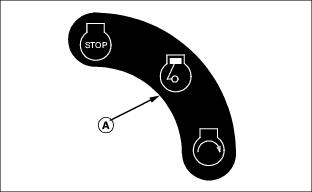
6. Move transaxle shift lever out of F (Forward) into the R (Reverse) position.
7. Move ignition switch to the START position. Engine should NOT crank. Turn ignition switch OFF.
Carrying and Distributing a Load
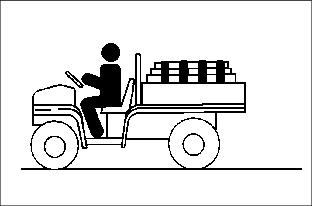
Reduce load and ground speed when operating over rough or hilly terrain.
DO NOT overload utility vehicle. Limit loads to those that can be safely controlled.
· On level terrain, maximum cargo box payload capacity for the M-GATOR is 450 kg (1000 lb.).
· When loading objects into utility vehicle, be sure load is securely anchored and evenly distributed in cargo box. Shifting loads will affect stability.
· Avoid concentrated loads at rear or side of cargo box to prevent vehicle from tipping over.
· DO NOT carry loads above height of load guard.
Avoid Overloading
Payload is more than just pounds carried, load density is more important for judging load. An example of load densities and volumes is listed using sand as a material.
NOTE: Because of the difference in weight between dry and wet sand, the only way of getting true weight of the load you are carrying is by using a weigh scale.
"DRY" sand weighing 450 kg (1000 lb) would be approximately 3/4 of cargo box volume.
For other materials such as those that are bagged, weight is normally printed on bag.
Load carrying capacity of vehicle for example is 450 kg (1000 lb). Ten bags of material weighing 45.0 kg (100 lb) would be a full load.
Dumping a Load
1. Reverse vehicle to area where load is desired.
2. Engage parking brake and release tailgate latches.
NOTE: If you notice a clicking noise or ratcheting while trying to lift load, shut-off power lift immediately. Load is too heavy for power lift, remove some of load by hand.
4. After load is dumped, lower cargo box, and latch tailgate closed. DO NOT drive machine with cargo box in raised position.
Towing Loads
1. To provide adequate braking ability and traction, do not tow a load unless utility vehicle cargo box is loaded.
2. DO NOT tow a load that exceeds the following:
· Do not tow a load that exceeds 635 kg (1400 lb).
· Do not exceed tongue weight of 45 kg (100 lb).
3. Never exceed 16 km/h (10 m.p.h.) when towing a load. Tow load at a speed slow enough to maintain control.
4. Always use hitch point provided on, and hitches approved for the utility vehicle. They are the approved hitch point and hitches. DO NOT modify in any way.
Transporting Utility Vehicle
NOTE: Vehicle is equipped with two shut-off valves.

Turn fuel shut-off valve (A) to "OFF" position (arrow down) during transport.
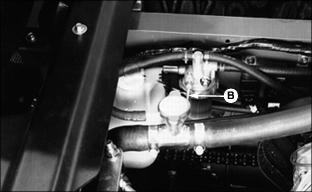
Fuel flow can also be shut off at the fuel filter located under the cargo box. Turn lever (B) to "C" position to stop or close fuel flow. Turn lever to "O" position to allow or open fuel flow.
IMPORTANT: Avoid damage! Never tow the utility vehicle. Transaxle damage will occur if utility vehicle is towed. Haul the utility vehicle on a trailer or on a truck. |
Do not tow utility vehicle behind any other vehicle.
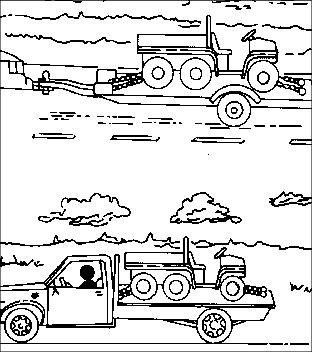
NOTE: Space limitations may vary from one truck manufacturer to another. Short bed trucks do not have the necessary length requirement to accommodate the utility vehicle. Vehicle width to outside of tires is 1545 mm (61 in.).
Use a heavy-duty trailer, full size pickup, or truck to haul your utility vehicle.
Fasten utility vehicle to trailer or truck with straps, chains, or cables.
Be sure trailer or truck has all the necessary lights and signs required by local, state, provincial, or federal laws.
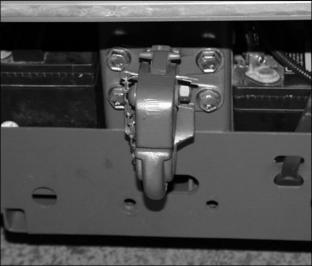
Using Pintle Hitch
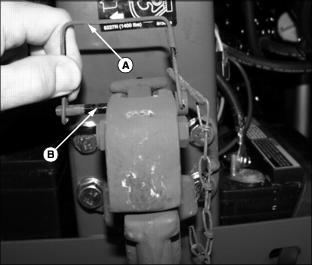
1. Remove wire lock (A) from lock pin (B) and remove lock pin.
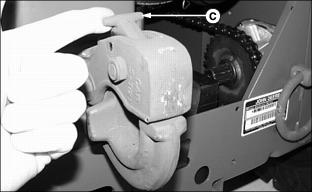
2. Pull the hitch lock (C) forward.

4. To lock hitch, install lock pin and wire lock.
Transport Loads Safely

· Be sure load is evenly distributed.
· Do not load above load guard.
· Securely anchor all loads in cargo box.
· On level ground, do not transport loads that exceed:
· Reduce cargo box payload when operating on rough or hilly terrain.