![]()
Introduction
Product Identification
Safety
Operating
Replacement Parts
Service Intervals
Service Engine
Service Transmission
Checking Transmission Oil Level
Changing Transmission Oil and Filter
Clean Transmission Oil Strainer
Lubricating the Drive Shaft (4WD Models)
Service - Hydraulics
Service Steering & Brakes
Service Electrical
Service Miscellaneous
Troubleshooting
Storage
Assembly
Specifications
Warranty
John Deere Quality Statement
Service Record
Copyright© Deere & Company

Service Transmission
Transmission Oil
Use oil viscosity based on the expected air temperature range during the period between oil changes.
The following John Deere transmission and hydraulic oil is preferred:

Checking Transmission Oil Level
1. Park vehicle safely. (See Parking Safely in the Safety section.)
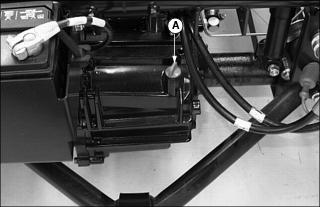
2. Thoroughly clean area around reservoir fill cap/dipstick (A).
3. Remove fill cap/dipstick and wipe with a clean cloth.
NOTE: DO NOT tighten dipstick. Allow threads to rest on top of transmission housing.
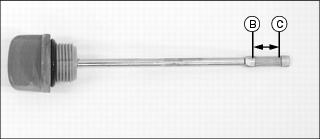
5. Remove fill cap/dipstick. Check oil level on dipstick. Oil level should be between levels (B) and (C) on the dipstick.
· If oil is low, add oil to bring oil level no higher than level (B) on the dipstick.
· If oil is above level (B) on the dipstick, drain to proper level.
Changing Transmission Oil and Filter
1. Raise attachment to service position. (See Using the Lift Cylinder Safety Support in the Safety section.)
2. Park vehicle safely. (See Parking Safely in the Safety section.)
· Allow the engine and transmission to cool.
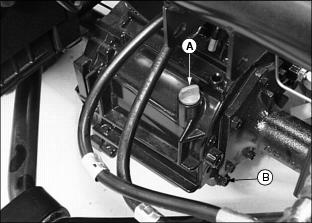
3. Thoroughly clean area around the transmission fill cap/dipstick (A). Remove fill cap/dipstick.
4. Locate drain plug (B) under right side of transmission.
5. Remove drain plug. Allow oil to drain into a drain pan with at least a 10.6 L (2.8 gal) capacity.
NOTE: If the vehicle is equipped with an auxiliary hydraulic kit, the transmission filter (C) is relocated to the right side of the vehicle.

6. Locate transmission oil filter (C) on the right side of vehicle on the transaxle.
NOTE: If vehicle comes without an auxiliary hydraulic kit, the transmission filter (D) is located in the center of vehicle, directly behind control valve.
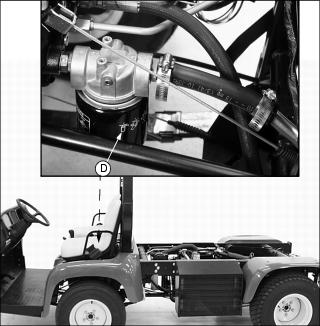
a. Locate transmission oil filter (D) on standard machine in the center behind control valve.
7. Turn filter counterclockwise to remove. Use a drain pan to catch dripping oil.
· Apply a film of clean oil on gasket of new filter.
· Turn filter clockwise until gasket makes contact with the mounting surface. Tighten 1/2 to 3/4 turn after gasket contact.
9. Install and tighten drain plug.
10. Add approximately 10.6 L (2.8 gal) of oil into fill opening.
NOTE: DO NOT tighten dipstick. Allow threads to rest on top of transmission housing.
11. Install fill cap/dipstick.
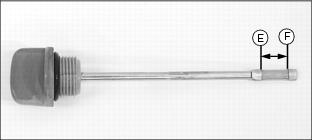
12. Remove fill cap/dipstick. Check oil level on dipstick; oil level should be between levels (E) and (F) on the dipstick.
· If oil is low, add oil to bring oil level no higher than level (E) on the dipstick.
· If oil is above level (E) on the dipstick, drain to proper level.
13. Install fill cap/dipstick.
Clean Transmission Oil Strainer
NOTE: Routinely clean strainer when changing the transmission oil and filter. Strainer should be serviced when the transmission is empty.
1. Change transmission oil and filter.
NOTE: Left rear wheel removed for photo clarity only.
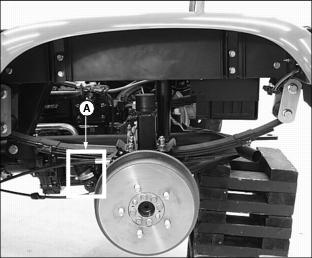
2. Locate strainer housing (A) on the left side of vehicle.
NOTE: Use drain pan to catch dripping oil.
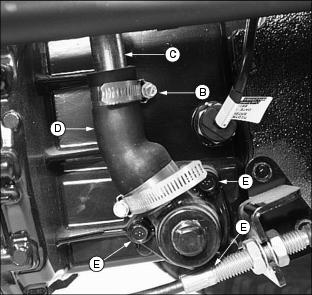
3. Loosen adjustable hose clamp (B).
4. Remove hydraulic line (C) from rubber hose (D).
5. Loosen and remove three hex bolts (E).
6. Remove strainer housing and strainer.
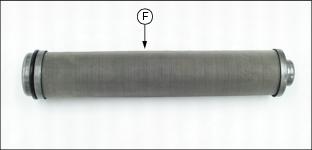
7. Clean strainer (F) with solvent or mineral spirits and allow to dry.
8. Install strainer into the strainer housing.
10. Install and tighten three hex bolts (E).
11. Install rubber hose (D) onto hydraulic line (C).
12. Tighten adjustable hose clamp (B).
Grease
The following greases are preferred:
· John Deere Multi-Purpose SD Polyurea Grease
· John Deere Multi-Purpose HD Lithium Complex Grease
If not using any of the preferred greases, be sure to use a general all-purpose grease with an NLGI grade No.2 rating.
Wet or high speed conditions may require use of a special-use grease. Contact your Servicing dealer for information.
Lubricating the Drive Shaft (4WD Models)
1. Park vehicle safely. (See Parking Safely in the Safety section.)
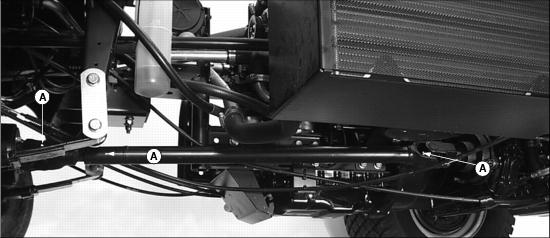
2. Lubricate three grease fittings (A) on the drive shaft with John Deere SD Polyurea grease or an equivalent.