![]()
Introduction
Product Identification
Safety
Operating
Replacement Parts
Service Intervals
Service
Service Transaxle
Service Electrical
Service Miscellaneous
Cleaning and Polishing Plastic Hood and Fenders
Troubleshooting
Storage
Assembly
Specifications
Declaration of Conformity
Declaration of Conformity
Declaration of Conformity
Service Statement
Copyright© Deere & Company

Service Miscellaneous
Checking Tire Pressure
2. Check tire pressure with an accurate gauge.
Tightening Wheel Hardware
Front Wheel Bolts

· Tighten flanged front cap screws (B) to 88 N·m
(65 lb.-ft.).
Rear Wheel Nuts
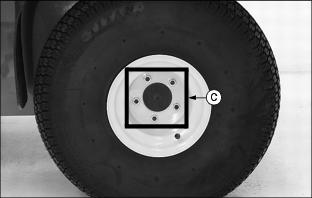
· Tighten rear drive wheel nuts (C) alternately to 88 N·m (65 lb.-ft.).
Grease
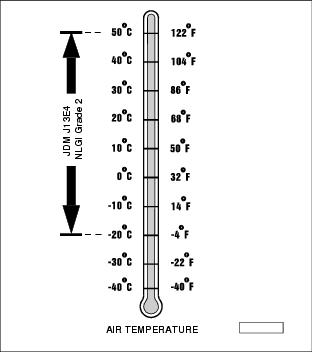
Use the following grease based on the air temperature range. Operating outside of the recommended grease air temperature range may cause premature failures.
ONLY use a quality grease in this application. DO NOT mix any other greases in this application. DO NOT use any BIO-GREASE in this application.
The following John Deere grease is PREFERRED:
NON-CLAY HIGH-TEMPERATURE EP GREASE®-JDM J13E4, NLGI Grade 2.
Other greases may be used if above preferred John Deere grease is not available, provided they meet the following specification:
John Deere Standard JDM J13E4, NLGI Grade 2.
Lubricating Front King Pins
NOTE: In extreme conditions lubrication should be done more frequently.
1. Park vehicle safely. (See Park Safely in the Safety section.)
2. Raise front of utility vehicle with a safe lifting device.

3. Lubricate one grease fitting (A) on each king pin axle arm with the preferred grease or an equivalent.
Adjust Cargo Box Latch
NOTE: The vehicle cargo box should not rattle during transport if the latch is properly adjusted.
1. Park vehicle safely. (See Park Safely in the Safety section.)
2. Move the service/drive switch to the SERVICE position.
4. Lift and secure cargo box in the raised position.
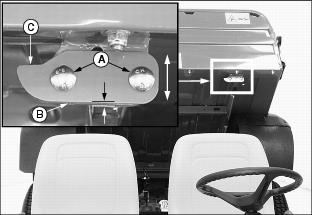
5. Loosen both latch bolts (A).
NOTE: Preliminarily adjust latch plate 2mm 1mm (0.08 in. 0.04 in.) above the lower edge of the cargo box latch backplate (B).
6. Slide latch (C) up or down as desired to secure cargo box more firmly to the vehicle frame.
NOTE: Make sure the cargo box support rod (D) properly rests on the nose of the latch plate.
The cargo box will be difficult to latch and unlatch if the position of the latch plate is adjusted too high.
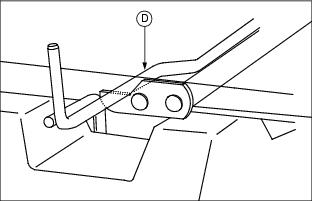
10. Check and adjust latch as necessary.
Cleaning and Polishing Plastic Hood and Fenders
1. Use water to remove excess dust or dirt.
2. When surface is dry, spray on PLEDGE®1 and leave for 30 to 60 seconds.
3. Using a dry soft clean cloth (i.e. cheesecloth) wipe off to bring up lustre.