![]()
Introduction
Product Identification
Safety
Operating Machine
Operating Mower Deck - 1600
Replacement Parts
Service Intervals
Service Lubrication
Service Engine
Service Transmission
Service Steering & Brakes
Service Mower Deck - 1600
Service Electrical
Service Miscellaneous
Cleaning and Repairing Metal Surfaces
Removing and Installing Front Tires
Removing and Installing Rear Tires
Troubleshooting
Storage
Assembly - 1620
Specifications
Warranty
John Deere Quality Statement
Service Record
Copyright© Deere & Company

Service Miscellaneous
Filling Fuel Tank
Add stabilizer to fuel before using it in your machine to prevent engine damage due to stale fuel. Follow directions on stabilizer container.
1. Park machine safely. (See Park Safely in SAFETY section.)
3. Allow engine to cool several minutes.

4. Remove any debris from area around fuel tank cap (A).
6. Fill tank with fresh, stabilized fuel only to bottom of filler neck.
Cleaning and Repairing Metal Surfaces
Cleaning
Follow automotive practices to care for the painted surfaces of your machine. Use a high-quality automotive wax regularly to maintain the factory look of painted surfaces.
Repairing Minor Scratches (Surface Scratches)
1. Clean area to be repaired thoroughly.
2. Use automotive polishing compound to remove surface scratches.
3. Apply wax to entire surface.
Repairing Deep Scratches (Bare Metal or Primer Showing)
1. Clean area to be painted with rubbing alcohol or mineral spirits.
2. Use paint stick with factory-matched colors available from your John Deere dealer to fill scratches. Follow directions included on paint stick for use and for drying.
3. Smooth out surface using an automotive polishing compound. Do not use power buffer.
Tightening ROPS Hardware
1. Park machine safely. (See Park Safely in SAFETY section.)
2. Raise the seat platform and engine cover.
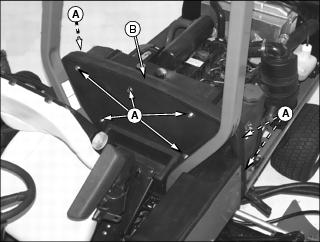
3. Remove hardware (A) securing plastic back panel (B) to machine. Retain all hardware.
4. Carefully lift back panel from machine and set it aside.
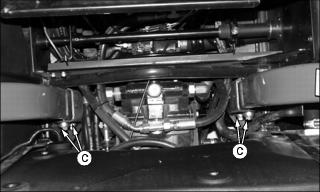
5. Tighten the four ROPS attaching bolts (C) to 136 N·m (100 lb-ft).
6. Install plastic back panel and secure with attaching hardware.
7. Lower seat platform and engine cover.
Removing and Installing Front Tires
Removing Front Tires
1. Raise side deck completely on side of machine requiring front wheel removal. Leave other side deck lowered completely.
2. Engage the side deck transport lock.
3. Raise front mower deck completely.
4. Park machine safely. (See Park Safely in SAFETY section.)
5. Rotate front deck for service to obtain as much clearance as possible between rear of deck and ground surface.
IMPORTANT: Avoid damage! Use caution not to pinch or crush the side deck lift cylinder hydraulic hose with the lifting device. |

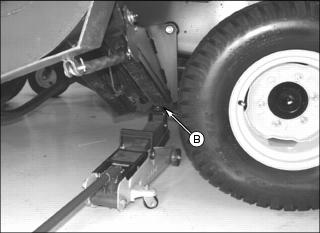
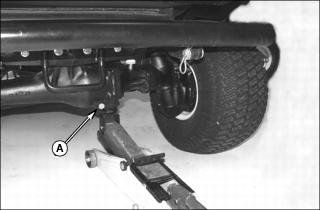
6. Using a safe lifting device, jack up machine at base of lift arm bracket (A) or under the front skid plate if adequate clearance exists.
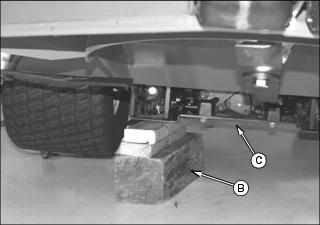
7. Install blocking material (B) under front skid plate (C).
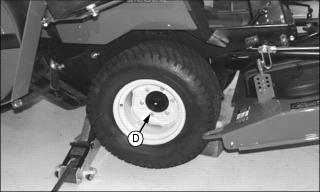
9. Remove wheel bolts (D) and wheel.
Installing Front Tires
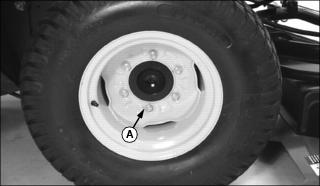
1. Install wheel onto axle hub with valve stem facing outward. Secure with wheel bolts (A).
2. Tighten front wheel bolts to 136 - 163 N·m (100 - 120 lb-ft) using torque wrench.
IMPORTANT: Avoid damage! Use caution not to pinch or crush the side deck lift cylinder hydraulic hose with the lifting device. |
3. Using a safe lifting device, jack up machine at base of lift arm bracket (B) or under the front skid plate if adequate clearance exists.
4. Remove blocking material from under machine.
· After traveling 30 m (100 ft) while changing direction.
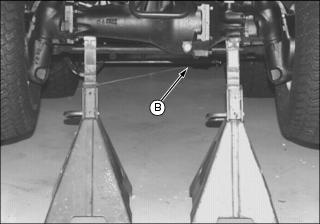
Removing and Installing Rear Tires
· Ensure machine is stable on jack plate before lifting. · Lower machine onto jack stands before loosing wheel bolts. |
Removal
1. Raise side deck completely at side of machine requiring rear wheel removal. Leave other side deck lowered completely.
2. Engage the side deck transport lock.
3. Lower front deck completely.
4. Park machine safely. (See Park Safely in SAFETY section.)
5. Using a safe lifting device, jack up machine under rear axle (A) so both rear wheels are above the ground.
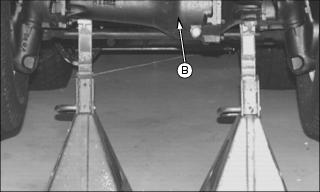
6. Install jack stands under rear axle (B).
7. Lower machine onto jack stands.
8. Remove wheel bolts and wheel from rear axle.
Installation
1. Install wheel onto axle hub with valve stem facing outward. Secure with wheel bolts.
2. Tighten rear wheel bolts to 81 - 95 N·m (60 - 70 lb-ft) using torque wrench.
3. Using a safe lifting device, jack up machine under rear axle (B).
4. Remove jack stands from under machine.