![]()
Introduction
Product Identification
Safety
Operating Machine
Avoid Damage to Plastic and Painted Surfaces
Testing Seat and Park Brake Switch
Using Side Mower Deck Transport Locks (1600)
Using Front Mower Deck Service Latch (1620)
Raising and Lowering Mower Decks
Transporting Machine on Trailer
Operating Mower Deck - 1600
Replacement Parts
Service Intervals
Service Lubrication
Service Engine
Service Transmission
Service Steering & Brakes
Service Mower Deck - 1600
Service Electrical
Service Miscellaneous
Troubleshooting
Storage
Assembly - 1620
Specifications
Warranty
John Deere Quality Statement
Service Record
Copyright© Deere & Company

Operating Machine
Daily Operating Checklist
o Check engine, transmission, and hydraulic oil levels.
o Remove grass and debris from machine.
o Check area below machine for leaks.
o Check air restriction indicator.
Avoid Damage to Plastic and Painted Surfaces
· Do not wipe plastic parts unless rinsed first.
· Insect repellent spray may damage plastic and painted surfaces. Do not spray insect repellent near machine.
· Be careful not to spill fuel on machine. Fuel may damage surface. Wipe up spilled fuel immediately.
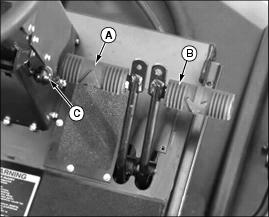
Operator Station Controls

Picture Note: Machines with serial numbers TC1600X010001-020000 or TC1620X010001-020000 shown in top photo. Machines starting with serial number TC1600X020001 or TC1620X020001 shown in bottom photo.
A - Left Mower Deck Lift Lever (1600 Only)
B - Front Mower Deck Lift Lever
C - Right Mower Deck Lift Lever (1600 Only)

C - Seat Spring Adjustment Knob
D - Seat Height Adjustment Knob
B - Seat Platform Release Knob
C - Seat Platform Support Lever
Miscellaneous Controls
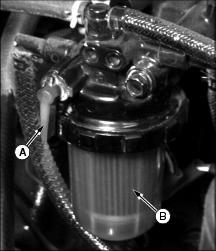
B - Fuel Filter/Water Separator
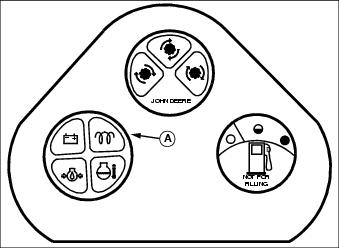
Instrument Panel
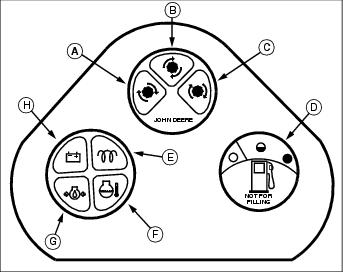
A - Left Mower Deck PTO Lamp (1600 Only)
C - Right Mower Deck PTO Lamp (1600 Only)
E - Engine Manifold Heater Lamp
F - Engine Coolant Temperature Lamp
Testing Safety Systems

Use the following checkout procedure to check for normal operation of machine.
If there is a malfunction during one of these procedures, Do not operate machine. See your John Deere dealer for service.
Perform these tests in a clear open area. Keep bystanders away.
Testing PTO Switch
3. Pull PTO switch up and to the right, to the PTO engageposition.
5. Unlock park brake. Try and start engine.
Testing Seat and Park Brake Switch
5. Raise up off of seat, but do not get off tractor.
Testing Park Brake
1. Stop machine on a 17° slope (30% grade). Stop the engine and lock the park brake.
2. Put transmission in N (neutral).
3. Check to be sure the park brake will hold the machine without rolling.
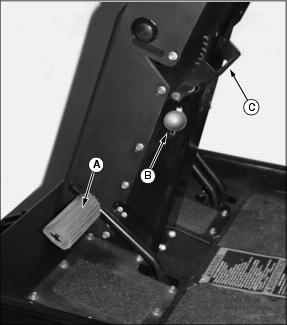
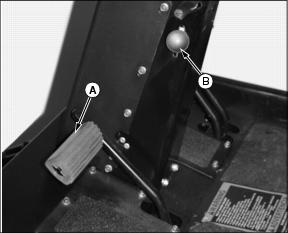
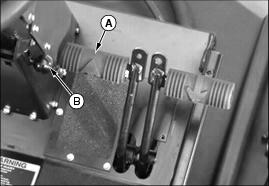
Getting On and Off of Machine
NOTE: Always get on and off from left side of machine to avoid bumping controls and pedals.
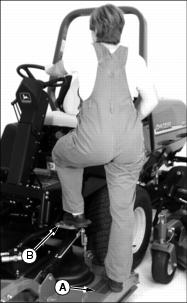
1. Place right foot on mower deck (A) (1600 only) and use steering wheel to balance yourself while stepping up onto machine.
2. Use step on lift arm (B) to get up to operator's platform.
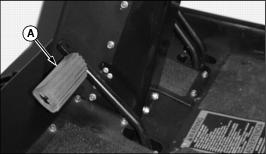
Adjusting Seat
To adjust seat position:
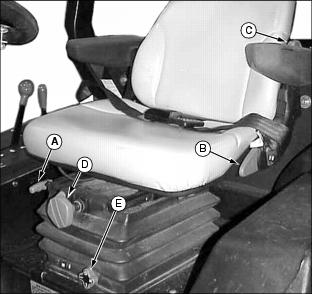
1. Pull seat adjustment lever (A) up, out of locked position.
2. Slide seat forward or rearward to desired position.
To adjust seat backrest:
1. Pull up backrest tilt lever (B), while moving backrest to most comfortable position. Release lever to lock backrest in place.
2. Turn lumbar support knob (C) rearward to increase lumbar support, or forward to decrease support.
To adjust seat spring tension:
1. Turn seat spring adjustment knob (D) to the right to decrease seat spring tension, or to the left to increase tension.
2. Sit on operator's seat and turn seat height adjustment knob (E) to one of the following positions to set limits on how high the seat will travel:
Using Seat Belt
· Use a seat belt when you operate with a Roll-Over Protective Structure (ROPS) to minimize chance of injury from an accident, such as an overturn. |
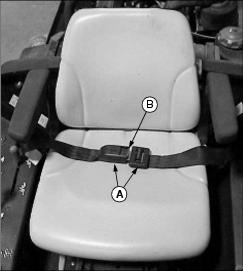
Fasten Belt
· Connect both ends of the seat belt (A) until they "click" together. Loosen or tighten seat belt until operator is firmly held onto the seat.
Release Belt
· Press red button (B) to release seat belt.
Using PTO Switch
NOTE: Starter will not crank if PTO is engaged.
Machines With Serial Numbers TC1600X010001-020000 or TC1620X010001-020000
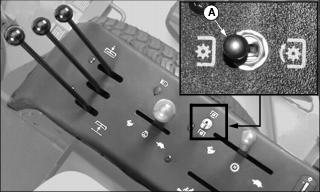
· Pull switch (A) up and move it to the right to engage the PTO.
· Move switch (A) to the left to disengage the PTO.
Machines Starting With Serial Numbers TC1600X020001 or TC1620X020001
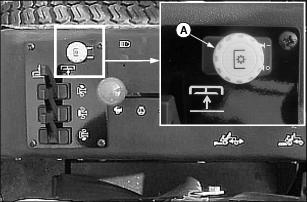
· Pull PTO knob (A) up to engage the PTO.
· Push PTO knob (A) down to disengage the PTO.
Using Key Switch
NOTE: Starter will not crank if any of the following conditions exist:
· Hydrostatic drive pedals are not in centered (neutral) position.
· Park brake is not locked and operator is out of seat.
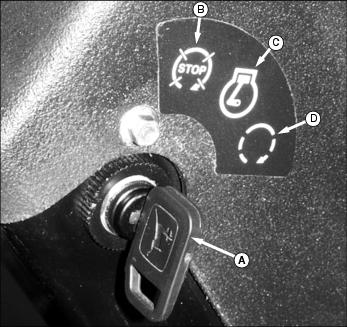
· To turn ignition off, turn the key switch (A) to the stop position (B).
· To turn ignition on, turn key switch to the run position (C). Indicator lights on instrument panel should go on, and beeper will sound.
· To start engine, wait for engine manifold heater light to turn off, turn key switch to the start position (D). Once engine begins to run, release key switch back to the run position.
Using Throttle Lever

· Pull the throttle lever (A) to the rear for slow idle. Use this position to start engine and maneuver the mower in confined spaces.
· Push throttle lever fully forward to the fast idle position for transporting and mowing.
Using Speed Range Lever
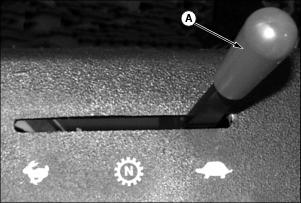
· Place speed range lever (A) in centered neutral position (N) to stop blades and prevent machine from being driven.
· Pull speed range lever to rear for low speed range for mowing and low speed transport. Blade PTO can be engaged in this position.
· Push lever to front position for high speed range used for high speed transport. Blade PTO will not operate in this position.
Hour Meter

The hour meter (A) records the number of hours the engine has run.
Use the hour meter and the periodic service chart (located in the engine compartment) to determine when service procedures need to be performed on the machine and mower deck.
Using Four Wheel Drive Lever
· Pull back on four wheel drive lever (A) (position shown) to use "on-demand" four wheel drive. Rear wheels will engage whenever rear wheel slip is detected, and will disengage automatically.
· Push four wheel drive lever forward to engage full time four wheel drive. Four wheel drive is locked in for forward and reverse travel.
Indicator Lights
IMPORTANT: Avoid damage! If an indicator light turns on while the engine is running, stop the engine to avoid engine damage. Before you restart the engine, find and correct the cause. |

· The battery discharge light (A) indicates the battery is not getting enough charge from the alternator. The light should come on when the key switch is turned from off to run. The light should go off once the engine starts.
Engine Manifold Heater Indicator Light
· The manifold heater light (B) will light to indicate the intake manifold heater is energized and the operator should wait until it goes off before starting the engine.
· The manifold heater is controlled by a temperature sensitive timer, and will turn off sooner in warm weather.
· Starting the engine before indicator turns off will waste fuel, create smoke, and put unnecessary wear on starter.
· The engine manifold heater light will also flash trouble codes if the operator tries to start the engine without the proper conditions. (See Starting the Engine in this section.)
Engine Coolant Temperature Light
· The engine coolant temperature light (C) indicates that the engine is overheating. A warning beeper will sound anytime the light is turned on.
· If the light lights while mowing, perform the following steps:
a. Remove foot from hydrostatic pedal to stop travel.
e. If a major coolant leak is seen coming from the engine compartment, stop the engine immediately.
f. If no coolant or steam can be seen leaking from the engine, open the engine cover and allow engine to idle for five minutes, or until coolant temperature light goes off, then stop engine.
· Check and clean area around radiator and hydraulic oil cooler for buildup of debris and grass.
· Fill coolant overflow tank with a 50/50 mix of coolant and water.
· Allow engine to cool. Inspect cooling system for damage and repair. Fill radiator with 50/50 mix of coolant and water.
IMPORTANT: Avoid damage! If an indicator light turns on while the engine is running, stop the engine to avoid engine damage. Before you restart the engine, find and correct the cause. |
· The engine oil pressure light (D) indicates the engine oil pressure is low. The indicator should light when the key switch is turned to the run position. A warning beeper will sound anytime the light is turned on. The light (and beeper) should go off once the engine starts.
Using Hydrostatic Pedals
Using Forward Travel Pedal:
1. Push the forward travel pedal (A) down to begin driving machine. Push the pedal down more to travel faster.
2. Release the pedal to return to neutral and stop the mower
Using Reverse Travel Pedal:
1. Push the reverse travel pedal (B) down to back the machine. Push the pedal down more to travel faster.
2. Release pedal to return to neutral and stop the machine.
Using Brakes
Using Brake Pedal
1. Push the brake pedal (A) down to hold the machine stationary, or for an emergency stop.
Using Park Brake
1. Lock park brake by depressing brake pedal (A) fully, and sliding park brake lock knob (B) upwards. Hold knob up and release brake pedal. Pedal should stay locked down.
2. Unlock park brake by depressing brake pedal until park brake knob drops, then release pedal.
Using Differential Lock Pedal
The differential lock is used to help improve traction on slopes and in slippery surfaces. The front drive axle will lock so that the front wheels turn together.
IMPORTANT: Avoid damage! Use the pedal only when you need more traction. Do not lock the differential at high speed or make sharp turns when the differential is locked, or turf damage may result. |
1. Push the pedal down with the left foot and hold it.
To unlock the differential:
2. The differential will stay locked as long as wheel slip is unequal. Once the load on the transmission is equalized and reduced, the differential lock will disengage.
Using Cruise Control
Engage Cruise Control
1. Push the forward travel pedal (A) at least 1/3 of the way down to desired travel speed.
2. Pull up and hold the cruise control knob (B).
3. Remove foot pressure from forward travel pedal.
4. Release cruise control knob.
Disengaging Cruise Control
Disengage the cruise control by performing any of the following operations:
· Push down on the cruise control knob (B).
· Tap the forward travel pedal (C).
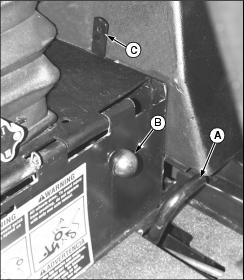
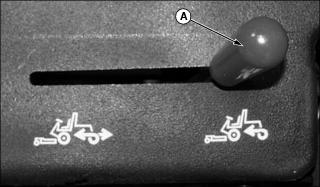
Using Fuel Shutoff Valve
NOTE: Shut off fuel flow when transporting machine on a trailer or storing machine.
1. Lift and open the engine cover.

2. Rotate the fuel shutoff valve to the open or closed position as follows:
· To open, turn the handle so the pointer (A) is facing upwards (as shown).
· To close, turn the handle so the pointer is facing to the rear (B).
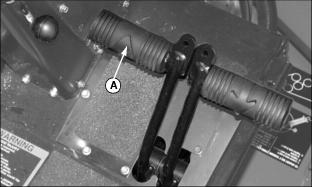
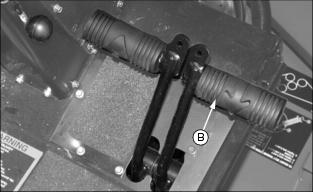
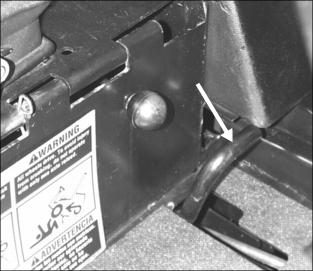
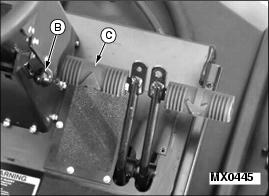
Using Side Mower Deck Transport Locks (1600)
2. Raise side decks to top of travel.
3. Push left and right side transport lock levers (A) down until hooks (B) are over pivot pins (C).
4. Lift transport lock handle to unlock. If mower deck has been lowered while lock is engaged, it will be necessary to raise deck up to unlock transport lock.
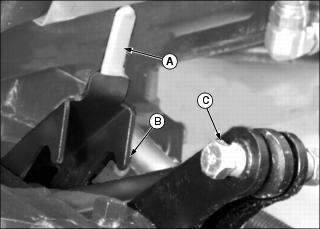
Using Front Mower Deck Service Latch (1620)
1. Bring blades and machine travel to a stop. Set park brake.
2. Raise front deck to top of travel until rubber stops begin to compress.

3. Unlock spring retainer (A) from service latch lock pin (B) on lift arm.
4. Remove service latch lock pin.
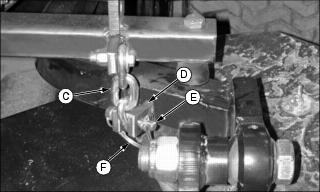
5. Place service latch lock chain (C) into lift arm bracket (D), and install service latch lock pin (E) through bracket and chain.
6. Lock spring retainer (F) over end of service latch lock pin.
7. Repeat for service latch lock on other lift arm.
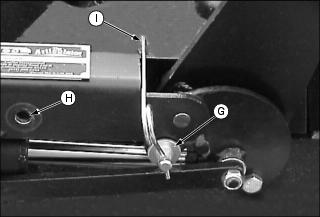
8. Remove lynch pin (G) from storage position (H) and insert into lock position (shown). Lock spring latch (I) to secure lynch pin to mower deck.
Raising and Lowering Mower Decks
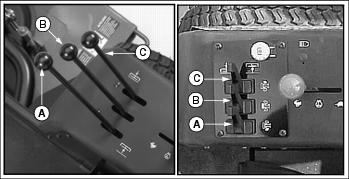
Picture Note: Machines with serial numbers TC1600X010001-020000 or TC1620X010001-020000 shown in left photo. Machines starting with serial number TC1600X020001 or TC1620X020001 shown in right photo.
A - Left deck lever (1600 Only)
C - Right deck lever (1600 Only)
1. To raise mower deck, increase engine speed and pull mower deck lift levers rearward. Mower deck(s) will raise up until levers are released, or attachment reaches top of travel, whichever occurs first.
2. To lower mower deck, momentarily push lever forward. Attachment will drop fully down to ground. If deck needs to be stopped before it lowers completely, momentarily pull lift lever rearward, and then allow it to return to center.
· Raising a side deck will stop the blades for that deck. Lowering the side deck will restart the blades.
· Raising the front deck will stop the blades for all decks. To restart blades, lower front deck and cycle PTO switch from on to off, then on again.
Using Starting Trouble Codes
If starter will not engage when key switch is turned to start position, one of the start conditions has not been met. A trouble code will flash on the instrument panel at the engine manifold heater light (A) when the key switch is held in the start position. The trouble codes are presented as a sequence of flashes and pauses that must be counted and converted to a two digit number:
· One flash, a short pause, and two flashes - Operator attempted to start machine without park brake locked and operator off of seat. (One of these conditions must be met for starter to engage.)
· One flash, a short pause, and three flashes - Operator attempted to start machine with PTO engaged.
· Two flashes, a short pause, and one flash - Hydrostatic pedals are not centered into the neutral position.
Starting Engine
NOTE: Engine will not start unless the PTO is off, and the hydrostatic pedals are in the centered (neutral) position.
1. Open the fuel shutoff valve (if closed).
2. Sit on the operator's seat. Put on seat belt.
4. Push the PTO switch to the off position.
5. Pull the throttle lever back to the slow idle position.
6. Turn the key switch to the run position. Wait for the engine preheat light to turn off.
IMPORTANT: Avoid damage! Do not overheat starter. · Do not operate starter more than ten seconds at a time. Wait two minutes before trying again if engine does not start. |
7. Turn the key switch to the start position for no longer that ten seconds. Release key to run position after engine starts.
· If starter engages, but engine does not start, wait two minutes and try again for no longer than ten seconds.
· If starter does not engage, the engine preheat light may blink starting trouble codes while the key switch is in the start position. See Using Starter Trouble Codes to help determine why the engine will not start.
IMPORTANT: Avoid damage! Do not idle engine for long periods of time. Excessive idling can cause engine overheating, carbon build-up, and poor performance. |
8. Let engine run at half-speed position for two minutes to allow it to warm up before operating machine.
Stopping Engine
1. Stop PTO by moving PTO switch to off position.
2. Move throttle lever (A) to slow idle position. Let engine run at low throttle a few seconds.
4. Lower mower decks to ground.
5. Turn key switch to stop position.
Transporting Machine
1. Turn PTO switch to off position.
3. Lower left and right side mower decks. (If necessary to transport with side decks raised, engage transport locks and keep transport speeds low).
4. Move speed range lever forward to transport position.
Towing Machine
IMPORTANT: Avoid damage! Do not tow machine faster than 15 m.p.h. Steering will be more difficult with engine off. Do not tow machine unnecessarily. |
2. Put range shift lever in neutral (N) position.
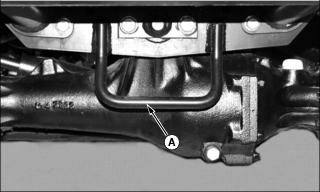
3. Attach heavy chain or tow strap to tow loop (A) of machine at rear axle.
4. Pull machine slowly, using brakes when necessary.
5. Do not use machine to pull or tow any other vehicle or trailer.
Transporting Machine on Trailer
Be sure trailer has all the necessary lights and signs required by law.
1. Raise side decks and engage transport locks.
2. Drive forward onto heavy-duty trailer with front deck raised.
3. Lower front deck down to platform of trailer.
4. Stop engine, remove key, lock park brake.
5. Close the fuel shutoff valve.
6. Fasten machine to trailer with heavy-duty straps, chains, or cables. Fasten rear straps to rear tow loop behind rear axle. Fasten front straps across operator's platform. Both front and rear straps must be directed down and outward from machine.
7. Check that engine cover latches are locked down.
Mowing Tips
Before mowing, be sure deck is leveled and mower deck caster wheels are at the proper height.
Check all machine and deck tires for proper inflation.
When mowing an area for the first time, travel slow and set cutting height high so you can:
· Learn the best mowing pattern.
· Help prevent hitting objects hidden in the grass.
Mow grass only when it is dry; wet grass can plug mower and leave a trail of grass clumps.
Mow grass often; short grass clippings will decay quickly.
Mow at full throttle for best performance.
Use travel speed that fits conditions:
· Travel slow when you mow thick, tall grass.
· Fast travel or sharp turns may produce stripes or an uneven cut: slow down.
· Travel at moderate speed when you mow a thin stand of grass.
Mow often enough so you cut only 1/3 of grass blade in one mowing. Cutting grass too short may kill grass and let weeds grow easily.