![]()
Introduction
Safety Signs
Controls
Operating
Lawn Care
Replacement Parts
Service Machine Safely
Service Intervals
Service Engine
Service Transmisson
Transmission and Hydraulic Oil
Alternative And Synthetic Lubricants
Checking Transmission Oil Level
Changing Transmission Oil Filter
Adjusting Transmission Neutral
Service Steering & Brakes
Service Electrical
Service Miscellaneous
Troubleshooting
Storing Vehicle
Assembly
Specifications
Warranty
John Deere Quality Statement
Copyright© Deere & Company

Service Transmisson
Anti-Chatter Transmission Oil
NOTE: Tractor is filled with John Deere Low Viscosity HY-GARD® (J20D) transmission oil at the factory. DO NOT mix oils.
These tractors are equipped with a hydraulic wet disc clutch transmission. To avoid chatter, use only Low Viscosity HY-GARD® (J20D) transmission oil. DO NOT use type "F" automatic transmission fluid.
John Deere Low Viscosity HY-GARD® (J20D) transmission oil is specially formulated to minimize clutch chatter, and to provide maximum protection against mechanical wear, corrosion, and foaming.
IMPORTANT: Avoid damage! When operating in temperatures below -7°C (20°F), you must use Low Viscosity HY-GARD® or transmission damage will occur. |
Transmission and Hydraulic Oil

Use oil viscosity based on the expected air temperature range during the period between oil changes.
John Deere HY-GARD® is recommended.
Other oils may be used if they meet the following:
Grease
Use grease based on the expected air temperature range during the service interval.
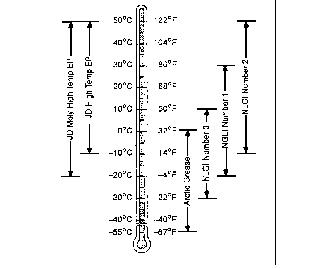
The following greases are preferred:
· John Deere MOLY HIGH TEMPERATURE EP GREASE
· John Deere HIGH TEMPERATURE EP GREASE
Other greases may be used if they meet one of the following:
· SAE Multipurpose EP Grease with a maximum of 5% molybdenum disulfide
Greases meeting Military Specification MIL-G-10924F may be used as arctic grease.
Alternative And Synthetic Lubricants
Conditions in certain geographical areas may require lubricant recommendations different from those printed in this operator's manual. Some John Deere lubricants may not be available in your location. Consult your John Deere dealer to obtain information and recommendations.
Synthetic lubricants may be used if they meet the performance requirements as shown in this operator's manual.
Checking Transmission Oil Level
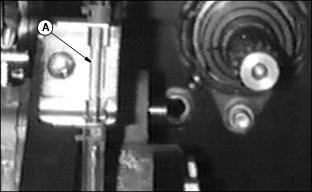
1. Park Front Mower on a level surface.
NOTE: Sight tube is located under left floor panel and viewed from the front of the machine.
2. Oil MUST BE in center of sight tube (A).
3. If oil is low, lift seat. Remove overflow container cap (B).
IMPORTANT: Avoid damage! DO NOT USE Type "F" automatic transmission fluid. DO NOT FILL OVERFLOW CONTAINER COMPLETELY. Add oil only as necessary to sight tube level. |
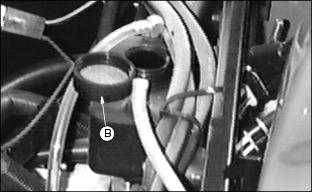
4. Add John Deere Low Viscosity HY-GARD (J20D) transmission oil.
5. Run engine for a few minutes.
6. STOP engine and wait a few minutes before checking transmission oil level. Add oil as necessary.
Changing Transmission Oil

1. Remove drain plug to drain oil.
2. Install and tighten drain plug.
3. Raise seat and locate overflow container.
IMPORTANT: Avoid damage! DO NOT USE Type "F" automatic transmission oil. DO NOT FILL OVERFLOW CONTAINER COMPLETELY. |
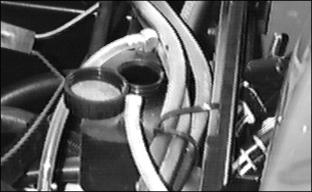
4. Remove overflow container cap. Add approximately 4.4 L (4.6 qt) of John Deere Low Viscosity HY-GARD (J20D) transmission oil.
7. Move hydraulic levers back and forth several times.
8. STOP engine. Wait 3 minutes.

9. Oil MUST BE in center of sight tube (A).
Changing Transmission Oil Filter
· Relieve pressure in system by STOPPING engine and operating all hydraulic control valves. |
NOTE: Change transmission oil filter after first 50 hours of operation.
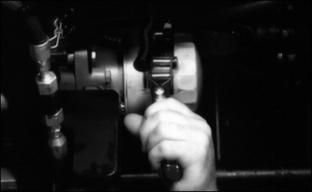
2. Turn transmission filter counterclockwise, using a filter wrench, to remove it.
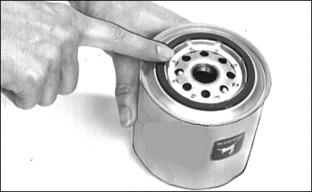
3. Put a film of clean transmission oil on seal of new filter.
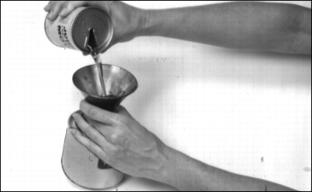
4. Fill the filter 1/3-1/2 full with John Deere Low Viscosity HY-GARD (J20D) transmission oil. DO NOT use Type "F" automatic transmission fluid.
5. Tighten filter QUICKLY until it contacts mounting surface. Tighten filter BY HAND an additional 1/2 turn.
8. Check oil level. Add more oil if necessary.
Adjusting Transmission Neutral
Remove jumper wire, if installed, from seat switch when adjustment is completed. |
Adjust transmission neutral to assure that machine DOES NOT creep when pedals are in the NEUTRAL position.
You will need a hoist and two jackstands.
NOTE: If creep is intermittent, inspect transmission control linkage for wear or damage BEFORE adjusting transmission neutral.

1. Lift machine with a hoist until drive wheels are off the ground.
2. Put jackstands under frame.
3. Loosen pivot arm cap screw (A) and bolt (B).

4. Have someone push down center of seat cushion to activate seat safety switch, or use a jumper wire to bypass the seat switch.
5. Start engine. If engine does not crank, tighten nut (C) so switch plunger (D) contacts striker plate on lever (E).
6. Move throttle lever to full engine speed.
7. With brakes DISENGAGED, and engine running at full throttle, move pivot arm (F) forward and backward until drive wheels stop turning.
9. Tighten cap screw (G) and bolt (H).
10. Start engine. Move throttle lever to full engine speed. Depress each control pedal several times to see if drive wheels STOP when pedals are released. If drive wheels continue to turn, repeat adjustment steps.