M653, M655 and M665 PIN (010001- )
Introduction
Safety Signs
Controls
Operating Machine
Mount and Dismount Machine Safely
Rotating Blades are Dangerous - Protect Children and Prevent Accidents
Operate Mower Safely on Slopes
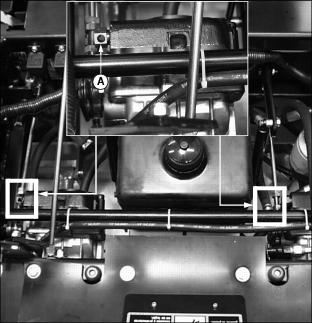
Using the Free-Wheeling Pump Release Valves
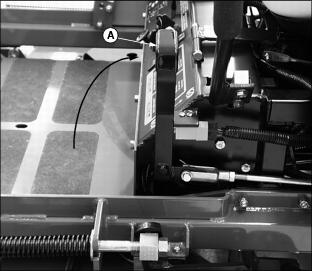
Raising and Lowering Operator Seat
Using the Motion Control Levers
Testing the Safety Interlock System
Adjusting Mower Deck Cutting Height
Adjust Deck Lift Spring Tension
Adjusting Mower Deck Anti-Scalp Wheels
Level Mower Deck (Side-to-Side)
Level Mower Deck (Front-to-Rear)
Avoid Damage to Plastic and Painted Surfaces
Replacement Parts
Service Machine Safely
Service Interval Chart
Service Lubrication
Service Engine
Service Transmission
Service Steering & Brakes
Service Mower
Service Electrical
Service Miscellaneous
Troubleshooting
Storing Machine
Assembly
Specifications
Warranty
John Deere Service Literature
John Deere Quality Statement
CopyrightŠ Deere & Company

Operating Machine
Operate Safely
ˇ Check brake action before you operate. Adjust or service brakes as necessary.
ˇ Inspect machine before you operate. Be sure hardware is tight. Repair or replace damaged, badly worn, or missing parts. Be sure guards and shields are in good condition and fastened in place. Make any necessary adjustments before you operate.
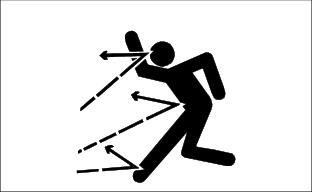
ˇ Clear work area of objects that might be thrown. Keep people and pets out of the work area. Stop machine if anyone enters the area.
ˇ If you hit an object, stop the machine and inspect it. Make repairs before you operate. Keep machine and attachments properly maintained and in good working order.
ˇ DO NOT leave machine unattended when it is running.
ˇ Only operate during daylight or with good artificial light.
ˇ Be careful of traffic when operating near or crossing roadways.
ˇ Do not wear radio or music headphones while operating the machine. Safe operation requires your full attention.
Mount and Dismount Machine Safely
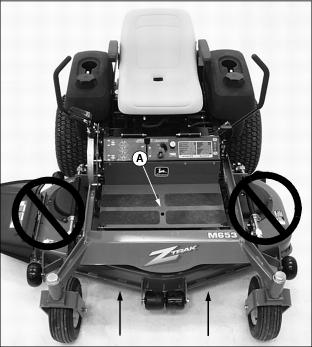
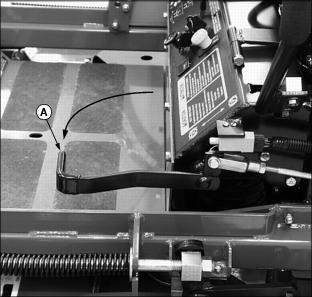
DO NOT step on either side of the mower deck when mounting and dismounting the machine. Mount the machine from the front using foot plate (A).
2. Move the motion control levers to the NEUTRAL LOCK position.
5. Stop engine and remove key.
6. Wait for all moving parts to stop before dismounting.
Rotating Blades are Dangerous - Protect Children and Prevent Accidents
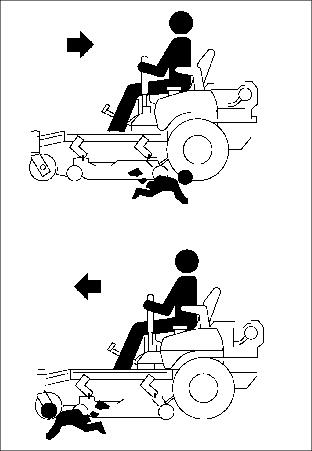
ˇ Never assume that children will remain where you last saw them. Children are attracted to mowing activity, stay alert to the presence of children.
ˇ Keep children in the house when you are operating the machine.
ˇ Turn machine off if a child enters the mowing area.
ˇ Use extra care when you come to blind corners, shrubs, trees, or other objects that may block your vision.
ˇ DO NOT let children or an untrained person operate the machine.
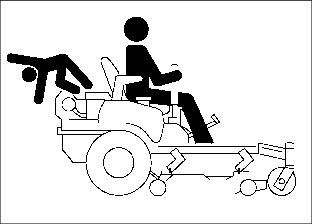
ˇ DO NOT carry or let children ride on machine or any attachment. DO NOT tow children in a cart or trailer.
HELP PREVENT SERIOUS OR FATAL ACCIDENTS:
ˇ Be alert at all times, drive forward carefully. People especially children can move quickly into the mowing area before you know it.
ˇ Back carefully. Shut off PTO and look behind the machine carefully, especially for children, before you back up.
ˇ DO NOT mow in reverse unless it is absolutely necessary.
ˇ Shut off PTO when you are not mowing.
ˇ DO NOT operate machine if you are under the influence of drugs or alcohol.
Wear Appropriate Clothing
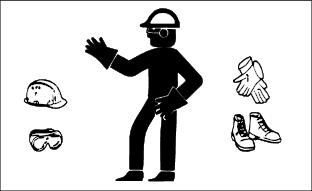
ˇ Wear close fitting clothing and safety equipment appropriate for the job.
ˇ Loud noise can cause impairment or loss of hearing, wear a suitable protective device such as earplugs.
ˇ Do not wear radio or music headphones while operating the machine. Safe operation requires your full attention.
Operator Training Required
ˇ Study operation section of this manual before operating the machine.
ˇ Operate machine in an open, unobstructed area under the direction of an experienced operator.
ˇ Learn the use of all controls.
ˇ Operator experience is required to learn the moving, stopping, turning and other operating characteristics of the machine.
Avoid Tipping
ˇ DO NOT operate machine without the mower deck installed.
ˇ DO NOT drive where machine could slip or tip.
ˇ Stay alert for holes and other hidden hazards in the terrain.
ˇ Slow down before you make a sharp turn or operate on a slope.
ˇ DO NOT stop when going up or down a hill. If machine stops going up hill, STOP PTO and back down slowly.
ˇ DO NOT mow wet grass. Reduced traction could cause sliding.
Operate Mower Safely on Slopes
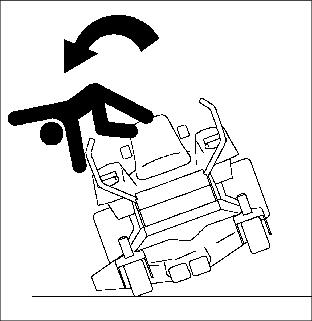
Slopes are a major factor related to loss-of-control and tip-over accidents, which can result in severe injury or death. All slopes require extra caution. If an operator is uneasy mowing on a specific slope, DO NOT mow it.
ˇ Remove obstacles such as rocks, tree limbs, etc.
ˇ Watch for holes, ruts, or bumps. Uneven terrain could overturn this machine. Tall grass can hide obstacles.
ˇ Keep all movement on slopes slow and gradual. DO NOT make sudden changes in speed or direction.
ˇ Avoid starting or stopping on a slope. If tires lose traction, disengage the mower blades and back slowly and gradually down the slope.
ˇ DO NOT turn on slopes unless necessary, and then, turn slowly and gradually downhill, if possible.
ˇ DO NOT mow near drop-offs, ditches, or embankments. The mower could suddenly turn over if a wheel is over the edge of a ditch, or if an edge caves in.
ˇ DO NOT mow on wet grass. Reduced traction could cause sliding.
ˇ DO NOT try to stabilize this machine by putting your foot on the ground.
Keep Riders Off
ˇ Only allow the operator on the machine. Keep riders off the machine.
ˇ Riders on the machine may be struck by foreign objects or thrown off the machine causing serious injury.
ˇ Riders obstruct the operator's view resulting in the machine being operated in an unsafe manner.
Transport Safely
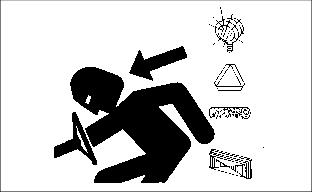
ˇ Use safety lights and devices. Slow moving machines when driven on public roads are hard to see, especially at night. Avoid personal injury or death resulting from a collision with a vehicle.
ˇ Flashing warning lights are recommended whenever driving on public roads to increase visibility. Extra flashing warning lights may need to be installed.
Avoid High Pressure Fluids
ˇ Hydraulic hoses can fail due to physical damage, kinks, age, and exposure. Check hoses regularly. Replace damaged hoses.
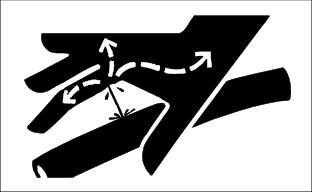
ˇ Escaping fluid under pressure can penetrate the skin causing serious injury. Avoid the hazard by relieving pressure before disconnecting hydraulic or other lines. Tighten all connections before applying pressure.
ˇ Search for leaks with a piece of cardboard. Protect hands and body from high pressure fluids.
ˇ If an accident occurs, see a doctor immediately. Any fluid injected into the skin must be surgically removed within a few hours or gangrene may result. Doctors unfamiliar with this type of injury should reference a knowledgeable medical source. Such information is available from Deere & Company Medical Department in Moline, Illinois, U.S.A. Information may be obtained in the United States and Canada only by calling 1-800-822-8262.
Check Wheel Bolts
ˇ A serious accident could occur causing serious injury if wheel bolts are not tight.
ˇ Check wheel bolt tightness often during the first 100 hours of operation.
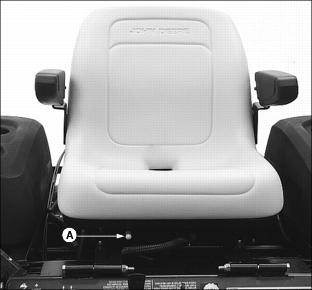
Adjusting Seat
1. Sit on the operator's seat.
2. Push and hold lever (A) to the left.
3. Slide seat forward or backward to desired position.
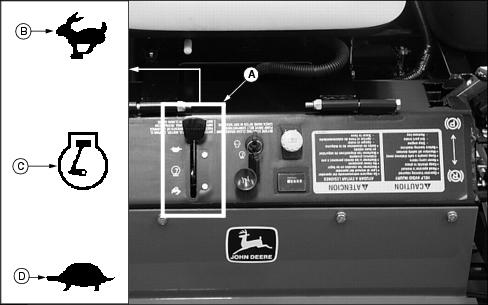
Using the Throttle Lever
ˇ Push lever (A) all the way forward to FAST (r) position (B) when mowing.
ˇ Move lever (A) to the half throttle position (C) when starting and warming the engine.
ˇ Pull lever (A) to rear to SLOW (t) position (D) to idle engine. Do not run engine at SLOW (t) idle any longer than necessary.
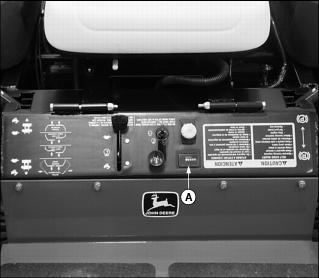
Using the Hour Meter
NOTE: The machine is equipped with an electric start. The hour meter will continue to run with the key switch left in the RUN position.
ˇ The hour meter (A) shows number of hours the machine has run.
ˇ The service interval chart gives necessary service intervals. Use the hour meter and service interval chart to determine when machine will need service.
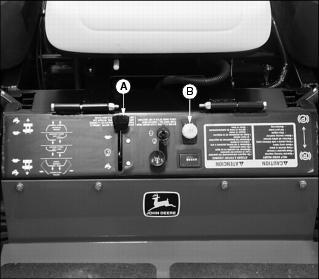
Using the PTO Switch Knob
Engage PTO:
1. Move throttle lever (A) to the 1/2 to 3/4 FAST position.
3. Move throttle lever (A) forward to the FAST (r) position for mowing.
Disengage PTO:
Using the Free-Wheeling Pump Release Valves
IMPORTANT: Avoid damage! Help prevent transmission damage. DO NOT tow the machine, push machine by hand only. |
NOTE: The free-wheeling pump release valves must be fully turned clockwise (closed) during normal vehicle operation.
When the machine needs to be moved WITHOUT starting the engine, use the free-wheeling pump release valves:
2. Lift and secure operator seat in the raised position.
3. Turn both free-wheeling pump release valves (A) counterclockwise approximately 1/4 turn.
6. Push machine to desired location. Due to hydraulic system drag, machine will move slowly.
Raising and Lowering Operator Seat
Raising the Seat
1. Park mower on a hard, level surface.
2. Stop engine and engage park brake.
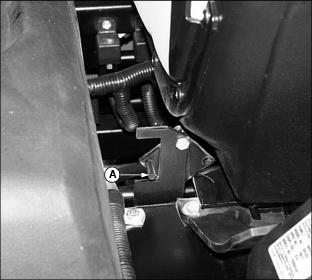
NOTE: Seat latch is located under the left side of the operator seat.
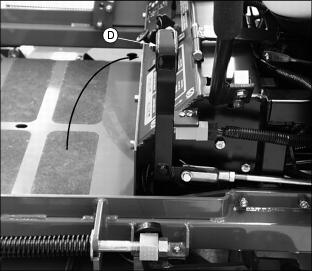
3. Raise latch handle (A) to unlock seat latch.
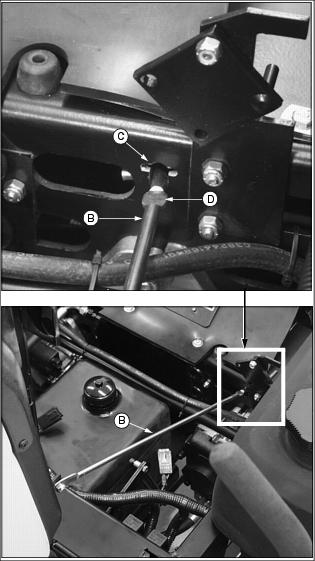
4. Lift seat, stop rod (B) will travel in slotted frame hole (C).
5. When seat is fully raised, make sure stop rod tab (D) securely locks the seat in the raised position.
Lowering the Seat
1. Stand on the left side of the machine.
2. Move operator seat slightly forward and lift stop rod (B).
3. Slowly lower seat, stop rod (B) will travel in slotted frame hole (C).
Using the Park Brake Lever
Setting Park Brake
ˇ Raise park brake lever (A) to ENGAGE (Z) park brake.
Picture Note: Park brake lever shown raised into the ENGAGE PARK "Z" position.
Release Park Brake:
ˇ Lower park brake lever (A) to DISENGAGE (Y) park brake.
Picture Note: Park brake lever shown released and lowered into the DISENGAGE PARK (Y) position.
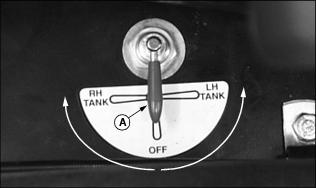
Using Fuel Selector Valve
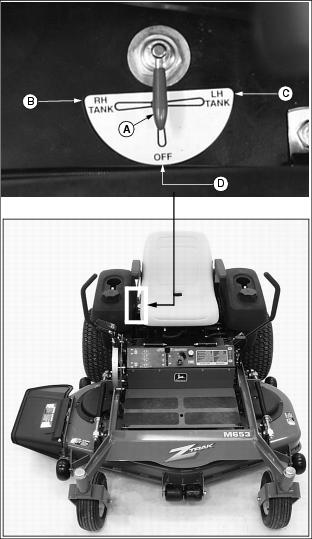
This machine is equipped with two fuel tanks and a three-position fuel selector valve (A).
ˇ The "RH TANK" (OPEN) position (B) uses fuel from the right tank.
ˇ The "LH TANK" (OPEN) position (C) uses fuel from the left tank.
ˇ Fuel selector valve must be in the full "RH TANK" (OPEN) position or the full "LH TANK" (OPEN) position for proper fuel delivery to the engine.
ˇ If the engine should begin to stall, move the fuel supply lever to the other fuel tank position.
ˇ The "OFF" position (D) shuts off fuel supply to the engine.
ˇ Fuel selector valve should be in the "OFF" (CLOSED) position when performing any type of engine service, when transporting and during periods of storage.
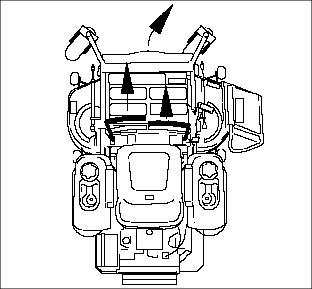
Using the Motion Control Levers
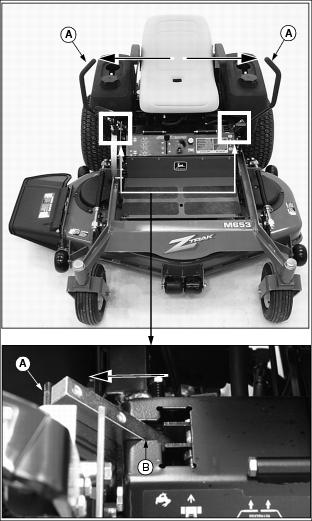
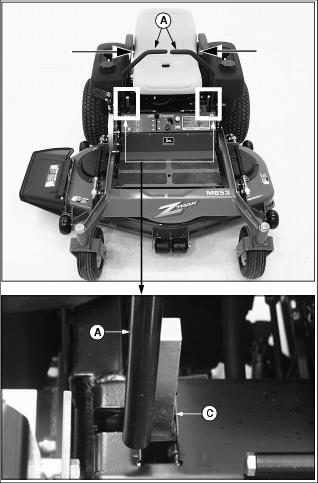
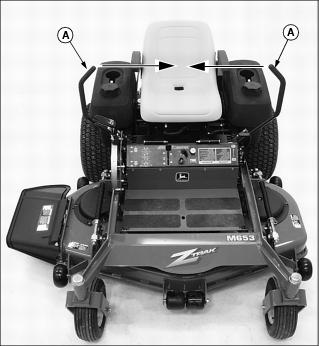
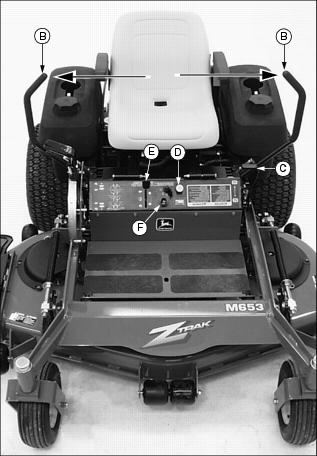
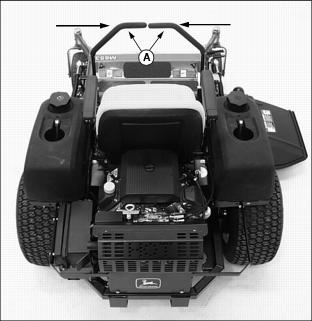
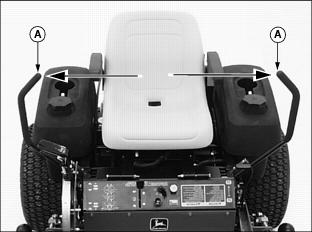
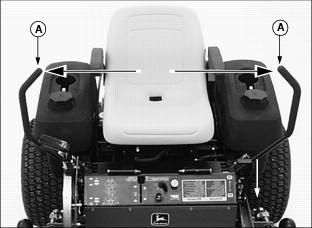
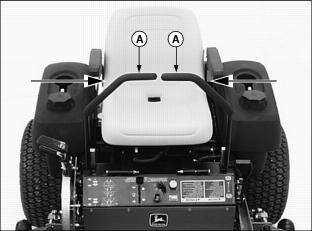
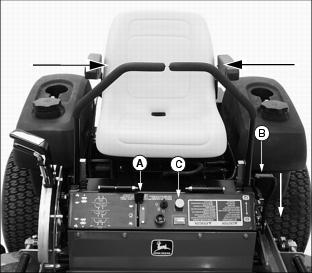
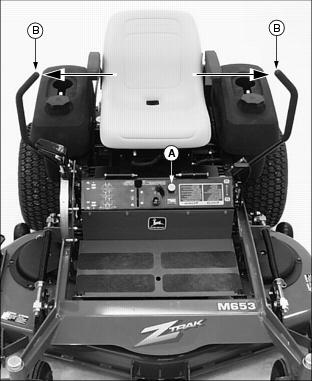
The functions of the Motion Control Levers (A) are:
ˇ Dual function neutral position.
Neutral Lock Position
Picture Note: Motion control levers shown in the NEUTRAL LOCK position.
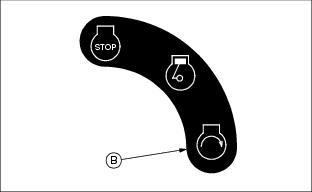
ˇ Motion control levers (A) must be in the NEUTRAL LOCK position (B) and the park brake engaged to start the engine.
ˇ Forward and reverse movement of the motion control levers is prevented when levers are moved to the NEUTRAL LOCK position.
ˇ Operator can exit mower with the engine running when the PTO switch is disengaged, the motion control levers are in the NEUTRAL LOCK position and the park brake is engaged.
ˇ Motion control levers must be in the NEUTRAL LOCK position to safely enter and exit the operator seat.
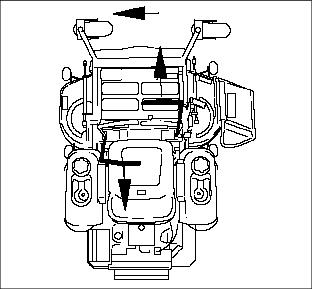
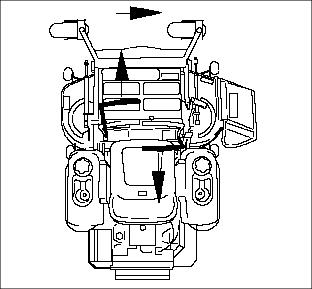
Neutral Position
Picture Note: Motion control levers shown in the NEUTRAL position.
ˇ Machine speed, motion, and direction can be controlled when the engine is running, control levers (A) are in the NEUTRAL position (C), and the park brake is released.
Forward and Reverse Motion:
1. Move throttle lever to the FAST (r) position.
3. Move both motion control levers (A) from the NEUTRAL LOCK position inward to the NEUTRAL position.
4. Push the control levers forward to begin forward motion.
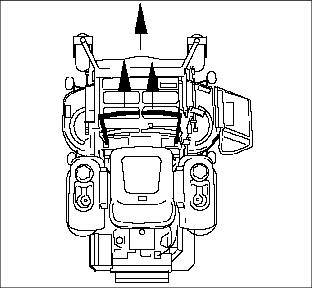
ˇ The further forward the control levers are moved, the faster the machine will travel.
ˇ FORWARD speed range:0-14.4 km/h (0-9.0 mph).
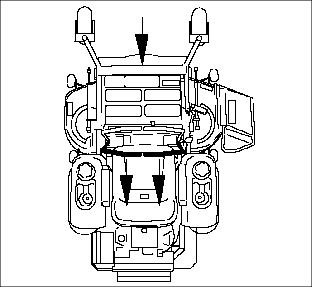
5. Pull both control levers rearward at the same time to begin reverse motion.
ˇ REVERSE speed range: 0-6.4 km/h (0-4 mph).
6. To stop motion, move both motion control levers forward or rearward until the machine comes to a stop.
NOTE: The motion control linkages are adjustable. If adjustment is required see Check and Adjust Reverse Spring Detent and Checking and Adjusting Motion Control Linkages in the Service-Transmission section.
ˇ Push both motion control levers forward at the same time.
ˇ Pull both control levers past center rearward at the same time.
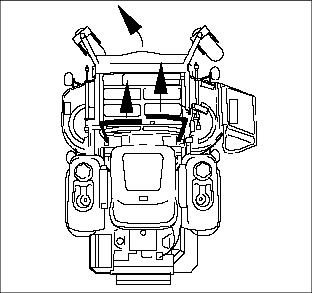
ˇ Push right control lever further forward than the left control lever.
ˇ Push left control lever further forward than the right control lever.
ˇ Push right control lever forward and pull left control lever rearward at the same time.
ˇ Push left control lever forward and pull right control lever rearward at the same time.
Starting the Engine
1. Open the fuel selector valve:
ˇ Turn fuel supply lever (A) to the "RH TANK" (OPEN) position or the "LH TANK" (OPEN) position.
2. Move both motion control levers (B) to the NEUTRAL LOCK position.
3. Sit on the operator's seat.
ˇ Raise lever (C) to the "Z" position.
5. Push the PTO switch knob (D) down to the OFF position to start engine.
6. Move throttle lever (E) to set engine speed:
ˇ Cold engine: Pull knob up to the CHOKE position.
ˇ Warm/Hot engine: If necessary, pull up knob to CHOKE position.
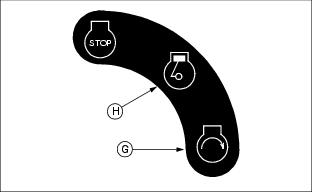
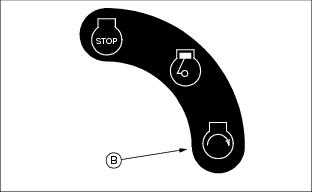
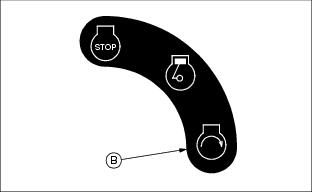
8. Turn key switch to the START position (G).
9. Release key to the RUN position (H) when the engine starts.
ˇ Push choke knob to the OFF position.
ˇ Move throttle lever to the desired engine speed.
Stopping the Engine
1. Move the motion control levers (A) to the NEUTRAL position.
2. Move throttle lever to a 1/2 - FAST (r) position.
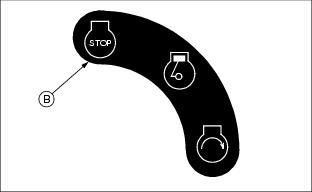
3. Turn key switch to "STOP" position (B).
6. Move the motion control levers to the NEUTRAL LOCK position to exit machine.
Transporting Machine
Use a heavy-duty trailer to transport your machine. Trailer must have signs and lights required by law.
1. Raise deck lift lever (A) to the transport position (B). (Also the 127mm (5 in.) cutting height position).
2. BACK machine onto a trailer.
3. Stop engine and engage park brake.
4. Turn the fuel selector valve to the "OFF" position.
6. Fasten machine to trailer with heavy-duty straps, chains, or cables. Both front and rear straps must be directed down and outward from machine.
Testing the Safety Interlock System
NOTE: This unit is equipped with a Electronic Safety Interlock. Engine will not start unless the PTO switch is in the disengaged position, the control levers are in the NEUTRAL LOCK position and the park brake lever is in the "Z" position.
Use the following checkout procedures to check for normal operation.
If there is a malfunction during one of these procedures, DO NOT operate machine. (See your John Deere dealer)
Perform these tests in a clear open area. Keep bystanders away.
TEST 1
1. Sit on the operator's seat with the motion control levers (A) in the NEUTRAL LOCK position.
2. Raise park brake lever to the "Z" position.
3. Pull PTO switch up to the ENGAGED position.
4. Turn key switch to the START position (B).
Test 2
1. Sit on the operator's seat with the motion control levers (A) in the NEUTRAL LOCK position.
2. Push PTO switch down to the DISENGAGED position.
3. Lower the park brake lever to the (Y) position.
4. Turn key switch to the START position (B).
Test 3
1. Move both motion control levers (A) inward to the NEUTRAL position.
2. Raise park brake lever to the "Z" position.
3. Push PTO switch down to the DISENGAGED position.
4. Turn key switch to the START position (B).
Test 4
2. Lower the park brake lever to the (Y) position.
3. Pull PTO switch up to ENGAGED position.
4. Raise slightly off the seat.
Adjusting Mower Deck Cutting Height
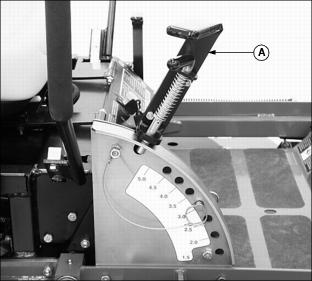
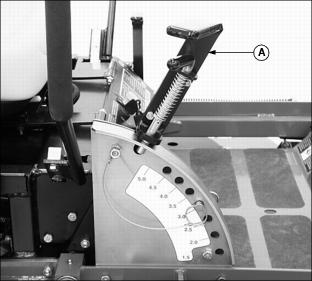
ˇ The mower deck height adjustment consists of eight different cutting heights. The eight cutting heights range from 38-127 mm (1-1/2-5 in.) in 13 mm (1/2 in.) increments.
ˇ Cutting height levels can be adjusted without leaving the operator seat.
Cutting Height Adjustment Procedure
1. Park machine on a hard, level surface.
3. Stop engine and engage park brake.
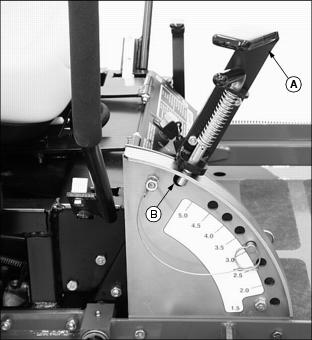
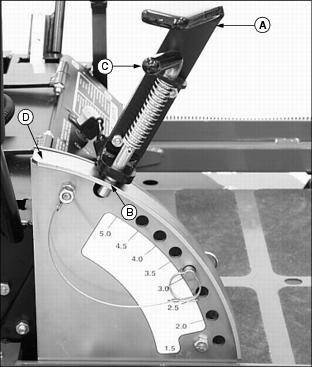
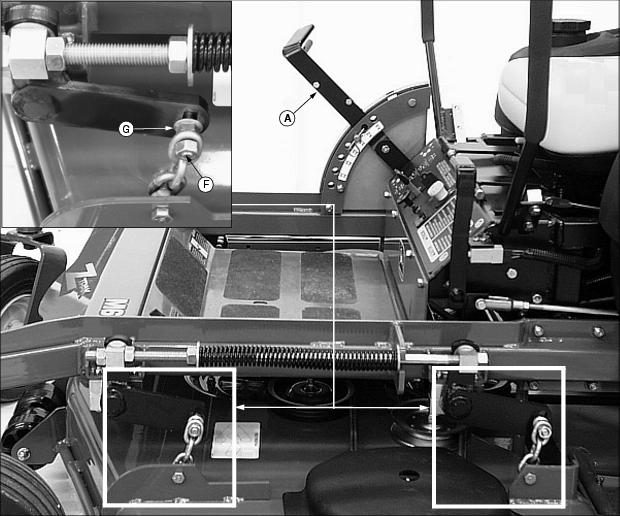
4. Raise the deck lift lever (A) to the transport position (B). (Also the 127mm (5 in.) cutting height position).
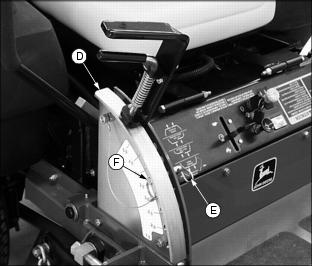
ˇ Make sure spring loaded locking pin (C) fully engages hole in height-of-cut assembly bracket (D) and securely locks the mower deck in the transport position.
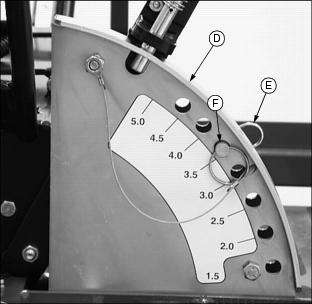
5. Remove spring locking pin (E) and clevis pin (F) from the height-of-cut assembly bracket (D).
6. Select hole in height-of-cut assembly bracket (D) corresponding to the height-of-cut desired.
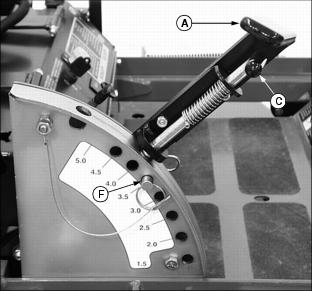
7. Install clevis pin (F) and spring locking pin (E).
8. Move deck lift handle (A) slightly rearward while raising the spring loaded locking pin (C).
9. Lower deck lift handle slowly until contact is made with clevis pin (F).
Adjust Deck Lift Spring Tension
NOTE: Deck lift spring tension is adjusted at the factory. If the effort required to raise or lower the mower deck is not satisfactory, an adjustment may be necessary.
Check Spring Tension
1. Park machine on a hard, level surface.
2. Stop engine and engage park brake.
3. Raise the deck lift lever to the transport position. (Also the 127mm (5 in.) cutting height position).
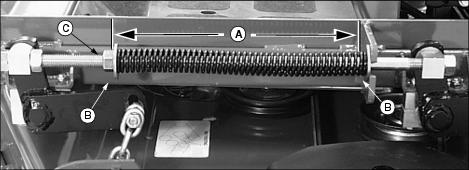
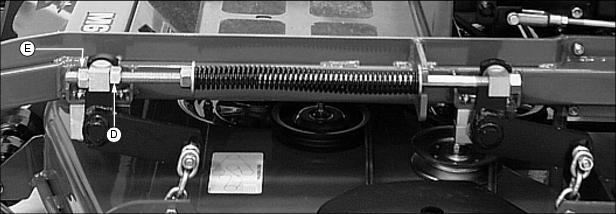
4. Measure distance (A) between the washers (B) on each deck lift spring assembly.
ˇ The recommended factory setting is 30 cm (11-3/4 in.).
Adjust Spring Tension
NOTE: Both deck lift spring assemblies must be adjusted equally.
DO NOT over tension the deck lift springs. If the springs are compressed too tightly, the mower deck will "float" too freely.
Decrease deck lift spring tension if operating in rough terrain.
While positioned in front of the machine:
ˇ Turn hex nut (C) CLOCKWISE to INCREASE deck lift spring tension and reduce the effort to raise and lower the mower deck.
ˇ Turn hex nut (C) COUNTERCLOCKWISE to DECREASE deck lift spring tension and increase the effort to raise and lower the mower deck.
Adjusting Mower Deck Anti-Scalp Wheels
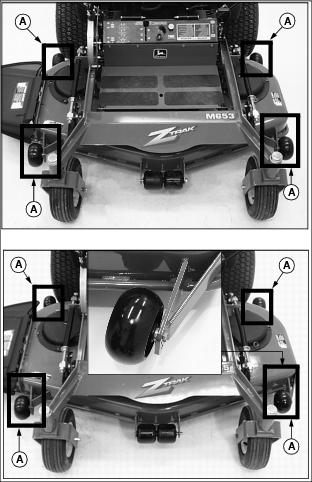
NOTE: The flattest cut can be achieved by having the anti-scalp wheels adjusted off the ground. Check anti-scalp wheel adjustments each time the mower deck cutting height is changed.
It is recommended that all the anti-scalp wheels be kept off the ground to minimize scuffing.
1. Check machine tire pressure. Inflate tires to the correct pressure. (See Checking Tire Pressure in the Service-Miscellaneous section.)
2. Raise the deck lift lever to the transport position. (Also the 127mm (5 in.) cutting height position).
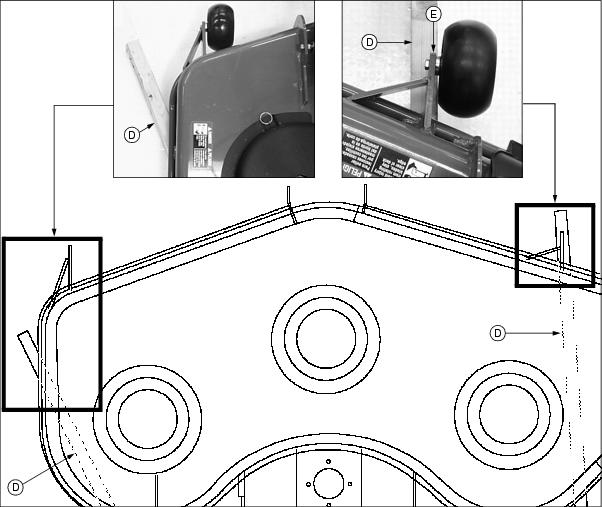
Picture Note: 54-inch mower deck shown in the top photo. 60-inch mower deck shown in center photo. Be aware that the left front anti-scalp wheel on the 60-inch mower deck is installed inside the mounting bracket as shown.
3. Adjust mower deck to desired cutting height.
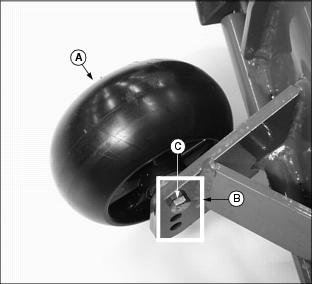
4. Adjust anti-scalp wheel (A) to one of three positions (B).
ˇ Remove hex bolt (C), nylock nut and washer.
ˇ Adjust wheel up or down so it is approximately 6-13 mm (1/4-1/2 in.) above the mowing surface.
5. Install wheel with attaching hardware.
6. Adjust all wheels to the same height.
Level Mower Deck (Side-to-Side)
Mower blades have sharp edges. Wear heavy gloves or use a rag to protect hands. |
1. Park machine on a hard, level surface.
2. Stop engine and engage park brake.
3. Check machine tire pressure.
4. Raise the deck lift lever (A) to the transport position. (Also the 127mm (5 in.) cutting height position).
Checking Level (Side-to-Side)
NOTE: Mower deck anti-scalp wheels should not contact the ground.
1. Move the deck lift handle to the 89 mm (3-1/2 in.) cutting height position.
NOTE: Mower discharge chute raised to illustrate photo clarity.
2. Position right mower blade (B) in the side-to-side position shown.
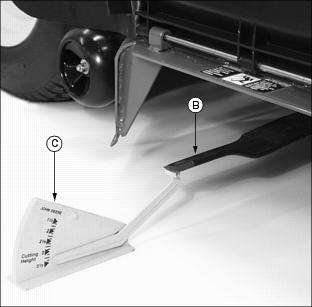
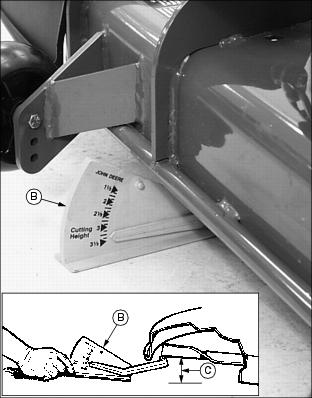
NOTE: Use a short ruler or leveling gauge (C). The leveling gauge, part number TY15272 is available at your John Deere dealer.
3. Measure from outside blade tip to the level surface.
4. Position left mower blade in the side-to-side position.
5. Measure from outside blade tip to the level surface.
ˇ The difference between both measurements should be no greater than 3 mm (1/8 in.).
6. If the SIDE-TO-SIDE adjustment is not within the given tolerance, an adjustment is necessary.
Adjusting Level (Side-to-Side)
1. Raise the deck lift lever to the transport position. (Also the 127mm (5 in.) cutting height position).
2. Place 102 mm (4 in.) wood blocks (D) under each side of the mower deck.
ˇ The wood block placed under the LEFT side of the mower deck must be positioned to the rear of the raised portion of the deck wall.
NOTE: The right front anti-scalp wheel must not rest on the wood block.
ˇ The wood block placed under the RIGHT side of the mower deck must be positioned under the right front anti-scalp wheel bracket (E).
3. Lower mower deck down onto the wood blocks.
4. Move the deck lift handle (A) to the 89 mm (3-1/2 in.) cutting height position.
5. Adjust two upper chain bolts (F) on each side of the machine.
ˇ Loosen flanged hex nuts (G).
ˇ Adjust upper chain bolts in slots to remove any slack.
6. Raise the deck lift lever to the transport position. (Also the 127mm (5 in.) cutting height position).
7. Remove wood blocks from under both sides of the mower deck.
8. Move the deck lift handle to the 89 mm (3-1/2 in.) cutting height position.
9. Check side-to-side mower level.
Level Mower Deck (Front-to-Rear)
Mower blades have sharp edges. Wear heavy gloves or use a rag to protect hands. |
1. Park machine on a hard, level surface.
2. Stop engine and engage park brake.
3. Check machine tire pressure.
4. Raise the deck lift lever (A) to the transport position. (Also the 127mm (5 in.) cutting height position).
Checking Level (Front-to-Rear)
1. Move the deck lift handle to the 89 mm (3-1/2 in.) cutting height position.
2. Position right mower blade in the front-to-rear position.
NOTE: Use a short ruler or leveling gauge (B). The leveling gauge, part number TY15272 is available at your John Deere dealer.
3. Measure from the right front blade tip to the level surface. Turn blade 180° and measure from right rear blade tip to the level surface.
4. Position left mower blade in the front-to-rear position.
5. Measure from the left front blade tip to the level surface. Turn blade 180° and measure from left rear blade tip to the level surface.
6. Distance (C) at the rear of the blade tip should be 6 mm (1/4 in.) higher than distance (C) at front of the blade tip.
7. If the FRONT-TO-REAR adjustment is not within the given tolerance, an adjustment is necessary.
Adjusting Level (Front-to-Rear)
NOTE: Adjust side-to-side mower level before adjusting front-to-rear level.
Adjust both sides of the mower deck equally.
1. Loosen jam nut (D) on each deck lift rod assembly.
2. While positioned in front of the machine, adjust mower level:
ˇ Turn hex nut (E) CLOCKWISE to lower front of mower deck.
ˇ Turn hex nut (E) COUNTERCLOCKWISE to raise front of mower deck.
4. Check front-to-rear mower level.
Mowing Travel Speeds
ˇ Normal mowing on level ground.
Engaging Mower
2. Move throttle lever (A) to the 1/2-3/4 FAST (r) position.
4. Move both motion control levers to the NEUTRAL position.
5. Pull PTO knob (C) up to engage mower deck.
6. Move throttle lever to the FAST (r) position.
7. Push motion control levers forward slowly. Mow at a safe travel speed.
Dismounting to Inspect Mower
1. Park machine on a hard, level surface.
2. Push down knob (A) to disengage PTO.
3. Move the motion control levers (B) to the NEUTRAL LOCK position.
5. Stop engine and remove key. Wait for mower blades to stop turning.
Mowing Tips
ˇ Mow grass with throttle lever in the full FAST (r) position.
ˇ Keep mower deck and discharge chute clean.
ˇ Make sure mower deck is leveled properly for a smooth cut.
ˇ Use a travel speed that fits the conditions:
ˇ Mow tall or wet grass twice. Cut grass at half desired height - then cut at desired height.
ˇ Travel slow when mowing tall, thick or wet grass.
ˇ Avoid damaging grass by slipping or skidding machine drive wheels. Practice smooth control lever movements.
ˇ When performing sharp turns, DO NOT allow inside machine drive wheel to stop and twist on grass.
Daily Operating Checklist
Maintain desirable operational standards and help ensure the safety of the operator by routinely checking the following on a daily basis:
ˇ Make sure all necessary guards and shields are safely and securely attached.
ˇ Test Safety Interlock Systems.
ˇ Check hydrostatic transmission oil level.
ˇ Check for hydraulic oil leaks.
ˇ Check pump drive belt for damage or cracking.
ˇ Check tires for damage or cracking.
ˇ Check mower deck belt for damage or cracking.
ˇ Adjust cutting height if necessary.
ˇ Check mule drive belt for damage or cracking.
ˇ Check operation of park brake.
ˇ Remove grass and debris from machine.
Avoid Damage to Plastic and Painted Surfaces
ˇ Insect repellent spray may damage plastic and painted surfaces. DO NOT spray insect repellent near the machine.
ˇ Be careful not to spill fuel on the machine. Fuel may damage surface. Wipe up spilled fuel immediately.

