![]()
1200A Bunker and Field Vehicle
Introduction
Safety
Controls
Operating
Using Correct Tires And Inflation
Using Headlight Switch If Equipped (OPTIONAL)
Operating The Cultivator(Optional)
Operating Front Blade (Optional)
Avoid Damage To Plastic And Painted Surfaces
Replacement Parts
Service Machine Safely
Service Intervals
Service Engine
Service Transmission
Service Steering & Brakes
Service Electrical
Service Miscellaneous
Troubleshooting
Assembly
Specifications
Warranty
John Deere Quality Statement

Operating
Operate Safely

· Check brake action before you operate. Adjust or service brakes as necessary.
· Clear work area of objects that might be thrown. Keep people and pets out of the work area. Stop machine if anyone enters the area.
· If you hit an object, stop the machine and inspect it. Make repairs before you operate. Keep machine and attachments properly maintained and in good working order. Keep all shields and guards in place.
· DO NOT leave machine unattended when it is running.
· Only operate during daylight or with good artificial light.
· Be careful of traffic when operating near or crossing roadways.
· Do not wear radio or music headphones while operating the machine. Safe operation requires your full attention.
Park Safely
· Stop machine on a level surface, not on a slope.
· Before you leave the operator's seat, wait for engine and all moving parts to STOP.
Protect Bystanders

· Never assume that children will remain where you last saw them. Children are attracted to machine activity, stay alert to the presence of children.
· Turn machine off if anyone enters the raking area.
· Use extra care when you come to blind corners, shrubs, trees, or other objects that may block your vision.
· DO NOT let children or an untrained person operate the machine.
· DO NOT carry or let people ride on machine or any attachment. DO NOT tow people in a cart or trailer.
HELP PREVENT SERIOUS OR FATAL ACCIDENTS:
· Be alert at all times, drive forward carefully. People ESPECIALLY CHILDREN can move quickly into the bunker area before you know it.
· Back carefully. Lift rake and look behind the machine carefully, especially for bystanders, before you back up.
· Shut off engine when you are not operating.
· DO NOT operate machine if you are under the influence of drugs or alcohol.
Avoid Tipping

· Be alert. Machine can accelerate downhill. Engine braking may not be adequate-use service brake.
· DO NOT drive where machine could slip or tip.

· Keep front wheel straight at crest of hill, and when going over bumps.
· Stay alert for holes and other hidden hazards in the terrain.
· Slow down before you make a sharp turn or operate on a slope.
· Do not stop or start suddenly when going uphill or downhill. Be careful when you change direction on a slope.
· DO NOT stop when going up hill or down hill. If machine stops going up hill, back down slowly.
· Reduced traction could cause sliding.
· DO NOT try to stabilize the machine by putting your foot on the ground.
Operator Training Required
· Study operation section of this manual before operating the machine.
· Operate machine in an open, unobstructed area under the direction of an experienced operator.
· Learn the use of all controls.
· Operator experience is required to learn the moving, stopping, turning and other operating characteristics of the machine.
Keep Riders Off

· Only allow the operator on the machine. Keep riders off.
· Riders on the machine or attachment may be struck by foreign objects or thrown off the machine causing serious injury.
· Riders obstruct the operator's view resulting in the machine being operated in an unsafe manner.
Wear Appropriate Clothing

· Wear close fitting clothing and safety equipment appropriate for the job.
· Loud noise can cause impairment or loss of hearing, use suitable protective devices such as earplugs, if appropriate.
Stay Clear Of Moving Parts

Entanglement in rotating sheave or belt can cause serious injury or death:
· Wear close fitting clothing.
· STOP the engine and be sure moving parts are stopped before getting near it.
Check Wheel Bolts
· A serious accident could occur causing serious injury if wheel bolts are not tight.
· Check wheel bolt tightness often during the first 100 hours of operation.
Keep Off Roadways

This machine is intended for off roadway use only.
Do not operate machine on a roadway.
Inspect Machine For Safety
Inspect mechanical condition of machine before each use to minimize chance of injury or being stranded.
Shields and guards must be in place and in good condition before starting.
Keep nuts, bolts and all connections tight. Replace worn parts.
Check condition of tires and wheels. Maintain correct tire pressure. Use a low pressure tire gauge available from your John Deere Distributor.
Before Driving
Footrests should be clean. Sit on center of seat and keep both feet on footrest at all times.
Know location of controls and how they work.
Inspect machine. Use the checklist in Prestarting Checks section.
All safety equipment must be in good condition and fastened in place:
Check around machine, be sure no one is near.
Using Correct Tires And Inflation
DO NOT change brands, styles, or sizes of tires. Replacement tires must be same as original equipment. Order from your John Deere distributor.
Keep tires inflated to 34-41 kPa (4-6 psi) (0.34-0.41 bar). Over inflation may damage tires. Under inflation could cause wheel damage when riding over rough terrain. Could also cause unlevel attachment use.
Use a low pressure gauge, available from your John Deere Distributor. Automotive tire gauges will not work.
Do Not Drive On Roads

Make sure reflective tape is clean.
If so equipped make sure headlight lenses (A) are clean.
Make sure lights are working properly.
Checking Terrain

Sit on center of seat and keep both feet on foot platform at all times.

Avoid terrain where you do not belong, like dangerous slopes and impassible swamps. Watch carefully for sharp bumps, holes, ruts, or obstacles.
Never drive past your limit of visibility. Slow down near crest of hill until you get a clear view of the other side.
Keep front wheel straight at crest of hill and when going over bumps.
Do not stop or start suddenly when going uphill or downhill. Be especially cautious when changing direction on slopes.
When riding on soft terrain slopes, turn front wheel slightly uphill to keep machine on straight line across hill.
If machine begins to tip, turn front wheel downhill to gain control before proceeding.
Checking Terrain (Continued)

If machine stops or loses power going uphill, apply parking brake to hold vehicle on slope. Maintain direction of travel and release brake slowly to back straight downhill slowly while maintaining control, DO NOT turn vehicle sideways. Vehicle is more stable in a straight forward or rearward position.
When descending a hill, remove foot from accelerator and apply brakes to reduce speed and maintain control.
Adjust your speed to terrain conditions and visibility.
Operating Tips
Sit on center of seat and keep both feet on foot platform at all times.
Never operate machine while standing.
Always use both hands for steering.
Avoid sudden starts, stops, or turns.
Be sure load is evenly distributed and secured in basket.
Always use a level turn-around area.
Go slowly when climbing or descending a hill. Be especially cautious when changing direction on a slope.
Always perform the following when parking the machine:
· Stop the vehicle and engage the parking brake lock.
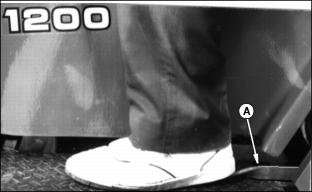
Using Brake Pedal

Release throttle pedal and apply brake (A) evenly and firmly to slow down or stop. Avoid hard braking applications.
Using Parking Brake Lock

To lock parking brake: Depress brake pedal completely and engage lever (A). Brake pedal should remain down when foot is removed.
To unlock parking brake: Depress brake pedal and disengage lever. Brake pedal should release when foot is removed.
Using Differential Lock Pedal
The differential lock is used to provide better traction when rear wheels start to slip. Engaging the differential lock will cause rear wheels to turn equally.
To engage differential lock (A):
NOTE: For differential lock to engage, the opposing wheel must be turning slightly faster than opposite wheel.
Stop or slow machine engine speed to 1/3 throttle or less.
Push down on pedal. Lock will remain engaged as long as pedal is depressed.
To disengage differential lock: Remove foot from pedal. Machine must travel forward for differential to disengage.
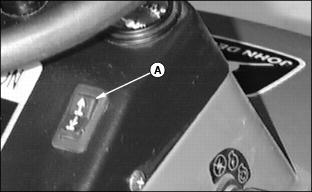
Using Gearshift Pedals
IMPORTANT: Avoid damage! Do not shift gears when machine is slipping or with engine running above idle speed; damage to transmission will occur. |

The shift pedal is located on the floorboard to left side of seat. There are three positions:
Forward: Push inside (forward arrow) pedal (A) down.

Neutral: Push forward or reverse pedal until both pedals are not engaged (C).
· If forward pedal (A) is engaged reverse pedal (B) must be pushed.
· If reverse pedal (B) is engaged, forward pedal (A) must be pushed.

Reverse: Push outside (reverse arrow) pedal (B) down.
Using Accelerator

Push pedal (A) down slowly and smoothly.
Before braking, release accelerator pedal and allow engine to assist slowing down vehicle.
Using Headlight Switch If Equipped (OPTIONAL)

Turn key switch (A) to "RUN" position.

Push switch (B) to turn headlights on.
· Push switch (B) down to turn headlights off.
Before Starting Engine

The engine is air-cooled and needs a large volume of air to keep cool.
Keep engine compartment clean.
Be sure fan-flywheel screen remains installed and clean.
Cylinder and head fins should be free from dirt and chaff.
Starting The Engine

2. Check out the smooth opertion by pushing down on accelerator pedal..
3. Move forward pedal (A) or reverse pedal (B) to (neutral ) and engage parking brake lock.
NOTE: This machine has a neutral start safety switch. Engine will not start unless transmission shift pedals are in (neutral) position.

4. Pull choke knob (C) out if engine is cold.
Pull choke knob halfway out if engine is warm.

5. Turn key (D) to START position.
6. After engine starts, release key to RUN position.
7. Push down accelerator to half-speed position and gradually push choke knob in.
Warming And Idling Engine
IMPORTANT: Avoid damage! Do not operate engine at full throttle or under load until engine has warmed up, or engine damage could occur. |

Run engine at half speed for 2 or 3 minutes.
Avoid unnecessary slow idling. Instead, stop engine.
Stopping Engine
IMPORTANT: Avoid damage! If engine has been running hard and is hot, do not stop engine immediately. Remove load from engine. Run engine at 1/3 to 1/2 throttle for several minutes to cool engine. |

1. Move shift pedals to neutral position

2. Remove foot from accelerator to allow slow idle.

Operating The Rake (Optional)
1. Push rake switch (A) arrow pointing up, to raise rake.
2. Push rake switch (A) arrow pointing down to lower the rake.
Operating The Cultivator(Optional)

1. Lift cultivator handle (A) up and pull in to lower cultivator. Place handle in one of five slots available for depth of cultivation desired.
2. To disengage cultivator from ground contact, pull handle in and up, and push out to lock in transport position.
Operating Front Blade (Optional)

1. Remove locking pin (A) and place in front hole.

2. Lift red plastic cover (C) with right foot. Push front blade handle (B) forward to lower blade.

3. To lock blade in upward position, pull back handle (B) until locking pin (A) can be installed in rear hole.
Avoid Damage To Plastic And Painted Surfaces
· Insect repellent spray may damage plastic and painted surfaces. Do not spray insect repellent near machine.
· Be careful not to spill fuel on machine. Fuel may damage surface. Wipe up spilled fuel immediately.
Transporting Machine

Do not tow machine behind any other vehicle. Use a heavy-duty trailer or truck to transport your machine.

Drive machine forward onto a trailer. Lower any attachments to trailer deck.
Fasten machine to trailer with heavy-duty straps, chains, or cables. Both front and rear straps must be directed down and outward from machine.
Trailer must have signs and lights required by law.
Transport Loads Safely

Use only hitch point provided.