![]()
3215B TURF SYSTEM I PIN (030001-)
3225B TURF SYSTEM II PIN (020001-)
3235B TURF SYSTEM II PIN (030001-)
Introduction
Product Identification
Safety
Operating Machine
Operating Cutting Units
Replacement Parts
Service Intervals
Service Lubrication
Service Engine
Engine Warranty Maintenance Statement
Changing Engine Oil and Filter
Checking Air Restriction Indicator
Checking Fuel Filter & Sediment Bowl
Service Transmission
Service Cutting Units
Service Electrical
Service Miscellaneous
Troubleshooting
Storage
Assembly
Specifications
Warranty
John Deere Quality Statement
Service Record
Copyright© Deere & Company

Service Engine
Engine Warranty Maintenance Statement
Maintenance, repair, or replacement of the emission control devices and systems on this engine, which are being done at the customers expense, may be performed by any non-road engine repair establishment or individual. Warranty repairs must be performed by an authorized John Deere dealer.
Engine Oil

Use oil viscosity based on the expected air temperature range during the period between oil changes.
The following oil is preferred:
The following oil are also recommended:
· John Deere TORQ-GARD SUPREME®
Other oils may be used if they meet one of the following:
· API Service Classification CE
· API Service Classification CD
Viscosity grade SAE 15W-40 is preferred.
If John Deere PLUS-50 engine oil and a John Deere oil filter are used, the oil and filter service interval may be extended by 50 hours.
If diesel fuel exceeding 0.5% sulfur content is used, reduce the service interval for engine oil and filter by 50%.
Avoid Fumes
Raising Hood
2. Turn button (B) clockwise to unlock cowling.
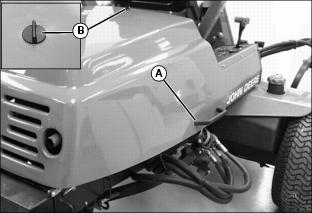
3. Use handle (A) to raise and lower rear engine cowling.
4. Turn button counterclockwise to lock cowling in the lowered position.
Raising and Lowering Seat
1. Pull latch (A) back and raise seat forward until seat locks into the desired position.
2. Hold back of seat and pull lever (B) forward. Hold lever forward and lower seat carefully, to lower seat.
Checking Engine Oil Level
IMPORTANT: Avoid damage! Failure to check the oil level regularly could lead to serious engine problems if oil level is low. |
2. Allow engine to cool for a few minutes.
3. Remove dipstick. Wipe with a clean rag. Install dipstick.
· Oil must be between ADD and FULL marks.
6. Remove oil filler cap (A), if oil level is low. Add oil to bring oil level no higher than FULL mark on dipstick.
Changing Engine Oil and Filter
IMPORTANT: Avoid damage! Do not use a funnel that seals off the opening when adding oil. Damage to engine can result. Allow space between funnel and engine opening to prevent pressure buildup. |
1. Run engine a few minutes to warm oil.
3. Place a container at oil drain location under machine.


5. Wipe dirt from around oil filter (B).
6. Turn filter counterclockwise to remove.
7. Put a film of clean oil on new filter gasket.
8. Install filter. Turn filter until gasket contacts mounting surface. Turn filter by hand 1/2 turn more.
9. Install and tighten drain plug.
10. Remove lower filler cap (C).
11. Add required amount of oil per the engine model. Capacities are:
12. Install cap. Run engine. Check for leaks around filter and drain plug. Stop engine. Check oil level.
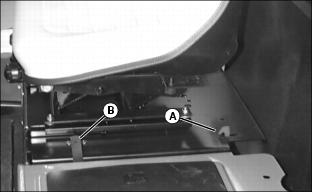
Checking Air Restriction Indicator
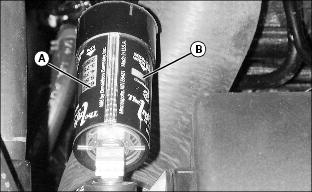
Check air restriction indicator:
· Push reset button on bottom of indicator.
· Start engine. Run at full throttle.
· Change primary element only when red plunger (A) is up to the window (B).
Changing Air Cleaner Elements
When plunger in air restriction indicator is up to the red line, change the primary element.
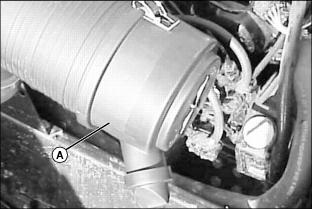
1. Stop engine. Remove cover (A).
2. Remove and discard element (B).
3. Install new element and tighten wing nut.
IMPORTANT: Avoid damage! If wing nuts are not tight enough, engine damage will occur. Be sure sealing washer is in place on all wing nuts. |
5. Tighten wing nut until you can no longer turn the element. Then tighten nut 1/8 to 1/4 turn more. DO NOT use other hardware in place of wing nuts.
6. Start engine. Check air restriction indicator. If indicator shows 500 mm (20-in.) vacuum or more, change secondary element.
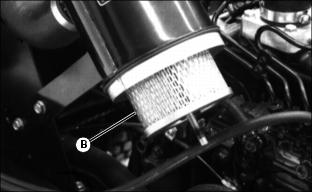
Changing Secondary Element
NOTE: Check air restriction indicator. If indicator shows 500 mm (20 in.) vacuum or more, change secondary element.
1. Remove cover and primary element.
2. Remove and discard element (A).
IMPORTANT: Avoid damage! If wing nuts are not tight enough, engine damage will occur. Be sure sealing washer is in place on all wing nuts. |
4. Tighten wing nut until you can no longer turn the element. Then tighten nut 1/8 to 1/4 turn more. Do not use other hardware in place of wing nuts.
5. Install primary element and cover. Tighten wing nuts.
Cleaning Under Hood And Seat
IMPORTANT: Avoid damage! Do not use water to wash under hood. Use compressed air and blow debris away. Water in electrical connections may create electrical problems. |
Cleaning Radiator
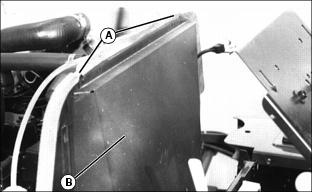
1. Loosen wing nuts (A) and pull up on protective screen (B).

2. Unfasten cap screws (C) and lower cooler and bracket away from radiator, if optional oil cooler is installed.
4. Clean radiator fins using low-pressure compressed air or a clean brush. Do not bend fins.
5. Install oil cooler and seal area where cooler fittings go through sheet metal.
Service Cooling System Safely
Recommended Engine Coolant
The following John Deere coolant is preferred:
· COOL-GARD PRE-DILUTED SUMMER COOLANT (TY16036).
· COOL-GARD CONCENTRATED SUMMER COOLANT (TY16034)
If neither of the above coolants is available, use an ethylene glycol base coolant that meets the following specification:
Check container label before using to be sure it has the appropriate specifications for your machine. Use coolant with conditioner or add conditioner to coolant before using.
If using concentrate, mix approximately 50 percent antifreeze with 50 percent distilled or deionized water before adding to cooling system. This mixture will provide freeze protection to -37 degrees C (-34 degrees F).
Certain geographical areas may require lower temperature protection. See the label on your antifreeze container or consult your John Deere dealer to obtain the latest information and recommendations.
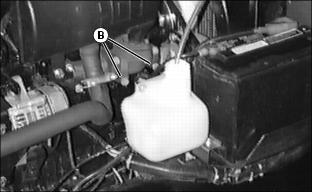
Checking Coolant Level
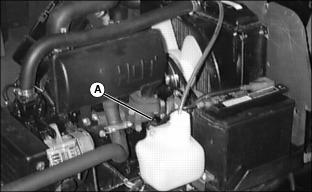
1. Check coolant in coolant expansion tank (A) when engine is at operating temperature.
· Coolant expansion tank should be half full at engine operating temperature.
2. Add correct coolant mixture if level is low.
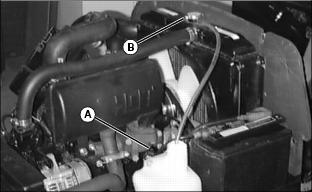
IMPORTANT: Avoid damage! If expansion tank is empty, let engine cool, remove cap (B). Fill radiator full and expansion tank 1/3 full with coolant. Replace cap (B). |
3. Fill coolant expansion tank (A) to half full with engine at operating temperature.
Draining Cooling System
1. Stop engine and lock parking brake.
2. Raise hood. Let engine cool.
4. Open radiator drain cock. Drain coolant into a pan.
5. Remove block drain plug (A). Drain coolant from engine block.
6. Tighten radiator drain cock and install block drain plug, after all coolant is drained.
7. Remove cap from expansion tank.
8. Remove two bolts (B). Remove expansion tank and empty.
9. Install coolant tank and fill cooling system.
Flushing Cooling System
IMPORTANT: Avoid damage! To prevent engine damage, DO NOT pour water into a hot engine. DO NOT operate engine without coolant. |
1. Drain cooling system completely.
2. Fill cooling system with clean water and cooling system cleaner. Follow directions on can.
3. Fill coolant tank 1/3 full.
4. Install and tighten radiator cap and coolant tank cap.
5. Start and run engine until operating temperature is reached.
6. Open radiator drain cock and remove engine block drain plug (A). Drain the cooling system immediately before rust and dirt settles.
7. Close drain cock and install block drain plug.
Filling Cooling System
1. Fill cooling system. For cold weather, use a solution of only ethylene glycol antifreeze (without a stop-leak additive) and clean, deionized or distilled water.
3. Run engine until operating temperature is reached.
4. Stop engine. After engine cools, check coolant level in coolant tank. Add if necessary.
5. Check condition of coolant system hoses. Install new hoses periodically. Tighten hose clamps regularly.
Adjusting Throttle Cable
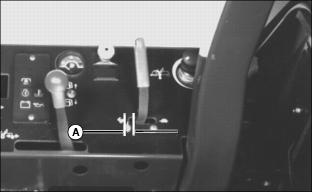
1. Move throttle lever to within 2-3 mm (0.080-0.120 in.) from fast idle end of slot (A).
2. Loosen throttle cable clamp (B).
3. Pull throttle cable to hold governor linkage (C) against the fast idle stop. Tighten cable clamp (B).
4. Verify throttle lever moves governor linkage throughout full range of travel against stops.
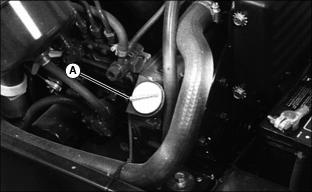
Checking Fuel Filter & Sediment Bowl
To clean the sediment bowl and change the filter:
1. Turn fuel tank pointer (A) to off.
2. Turn collar (B) counterclockwise to remove bowl and filter.
3. Clean bowl. Replace filter.
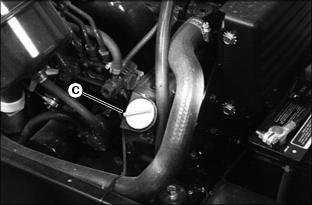
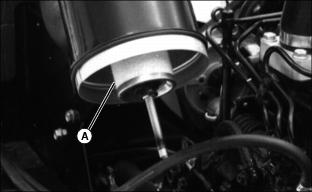
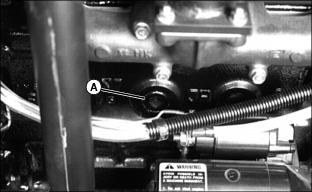
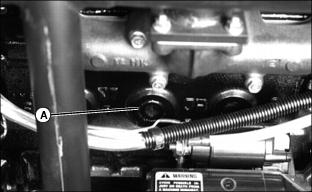
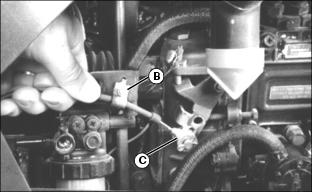
Bleeding Fuel System
NOTE: Bleed the fuel system after you work on it or if the machine runs out of fuel.
1. Stop engine. Loosen screw (A).
2. Pump lever (B) until fuel flows from around screw without air bubbles.
3. Tighten screw. Start engine.
4. If engine will not start or runs rough for more than 30 seconds:
· Loosen each nut (C) on injection nozzle one at a time starting with the nozzle closest to the injection pump.
· Run engine until fuel flows without bubbles from around the nut and tighten.
Adjusting Fuel Injection Pump
NOTE: The fuel injection pump is calibrated by the engine manufacturer and should not require any adjustments.
If engine is hard to start, lacks power, or runs rough, check the TROUBLESHOOTING section of this manual.
After performing the checks in the troubleshooting section and your engine is still not performing correctly, contact your John Deere dealer.
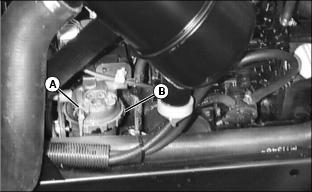
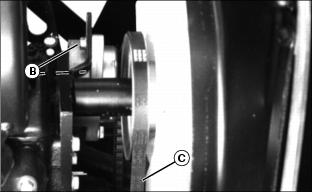
Servicing Alternator Belt

1. To adjust or replace belt, remove four bolts (B) on belt guard and remove guard (A).

2. Push down on belt (C) halfway between pulleys. Belt should deflect approximately 12 mm (1/2 in.) with 98 N (22 lb) force (moderate thumb pressure).
4. Apply pressure to front alternator housing to correct belt tension or replace belt if necessary.
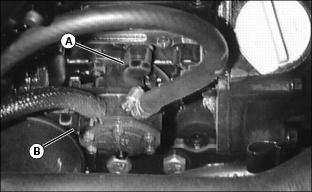
Adjust/Replace Fan Belt
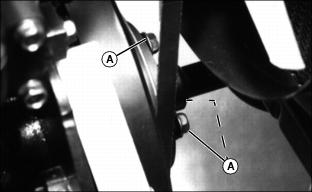
1. Remove three bolts (A) holding drive shaft.
2. Loosen two bolts at front of drive shaft where it clamps to hydrostatic input shaft.
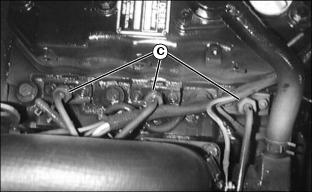
5. Remove belt. Install new belt and drive shaft.
6. Adjust tension. Belt should deflect 6 mm (1/4 in.) with light-to-moderate pressure at (C).