![]()
3215B TURF SYSTEM I PIN (030001-)
3225B TURF SYSTEM II PIN (020001-)
3235B TURF SYSTEM II PIN (030001-)
Introduction
Product Identification
Safety
Operating Machine
Operating Cutting Units
Replacement Parts
Service Intervals
Service Lubrication
Service Engine
Service Transmission
Transmission and Hydraulic Oil
Checking and Adding Transmission/Hydraulic Oil
Changing Transmission Oil And Filter
Adjusting Transmission Neutral (3215B/3225B)
Adjusting Transmission Neutral (3235B)
Service Cutting Units
Service Electrical
Service Miscellaneous
Troubleshooting
Storage
Assembly
Specifications
Warranty
John Deere Quality Statement
Service Record
Copyright© Deere & Company

Service Transmission
Transmission and Hydraulic Oil
NOTE: Tractor is filled with John Deere HY-GARD (J20C) transmission oil at the factory. Do not mix oils. Do not use type "F" automatic transmission fluid or J20D Low Viscosity HY-GARD.
John Deere HY-GARD (J20C) transmission oil is specially formulated to provide maximum protection against mechanical wear, corrosion, and foaming.
Hydraulic Component Location
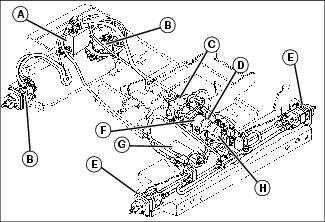
A - Flow Valve, Rear Wheel Motor
H - Charge Pump, Steering and Lift
Service Safely
Checking and Adding Transmission/Hydraulic Oil
NOTE: Hydraulic dipstick/fill cap (A) is black and located on left fender.
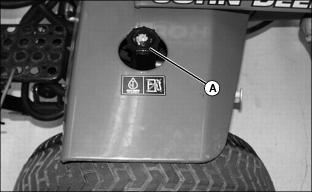
2. Remove and clean dipstick (A).
IMPORTANT: Avoid damage! Use ONLY John Deere HY-GARD (J20C) Transmission and Hydraulic Oil. Do not overfill as oil may expand during operation, and spill on turf. |
3. Install dipstick and tighten. Remove dipstick and check fluid level.
4. If fluid level is low, add to bring to the TOP of the cross hatch marks on the dipstick.

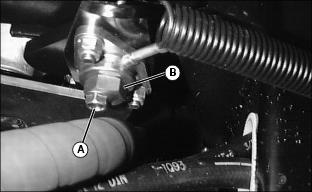
5. To aid in filling to correct level, remove plug (B) and fill until hydraulic fluid just begins to come out of hole. Replace plug. If overfilled accidently, remove plug and drain sufficient fluid.
Changing Transmission Oil And Filter
NOTE: Use ONLY John Deere HY-GARD (J20C) Transmission/Hydraulic Oil.
1. Park Mower on a level surface.
2. Run engine to warm oil. STOP engine.
4. Remove filter (B) while oil is draining.
5. Fill new filter half full of clean transmission/hydraulic oil.
6. Install filter quickly to avoid dripping oil. Turn it until seal contacts base, then turn it by hand1/2 turn more.
· Capacity is approximately 45.4 L (12 gal.).
9. Start engine. Check for leaks around drain plug and filter.
10. Move lift lever back and forth several times.
11. Stop engine. Check oil level and top off as necessary.
Adjusting Transmission Neutral (3215B/3225B)
NOTE: The eccentric mechanism is located under the operator's seat and is accessible from the right side of the hydrostatic transmission.
1. Perform a thorough visual inspection of linkages and return springs for damage, before making any adjustment. Repair as necessary.
2. Stop engine and lower cutting units to floor.
3. Shut off 4WD if installed on machine.
4. Raise either side of machine until front wheel is off the ground. Support wheel with a jackstand.
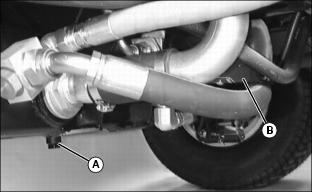
Picture Note: Photo taken from underside of 3215B/3225B.
6. Place a 9 kg (20 lb) weight on the seat to activate the seat safety switch.
7. Start engine and run at low idle.
8. Turn eccentric nut (B) forward and backward until drive wheels stop turning.
9. Hold adjustment and tighten shoulder bolt (A). Make sure adjustment did not change.
10. Put pedals in neutral. Depress both forward and reverse speed pedals, then release.
11. Check neutral adjustment. Repeat adjustment until drive wheels stop turning.
12. Lower machine to the ground and test drive the machine to make sure the machine is not moving while in neutral.
Adjusting Transmission Neutral (3235B)
1. Before making any adjustment, perform a thorough visual inspection of linkages and return springs for damage. Repair as necessary.
2. Stop engine and lower cutting units to floor.
3. Shut off 4WD if installed on machine.
Raise left tire and make needed adjustments from right side of machine. |
4. Raise left side of machine until left front tire is off the ground. Support tire with a jackstand
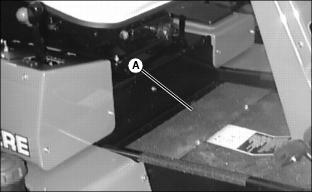
5. Remove access panel (A) on floorboard.

6. Loosen nut (B) to allow 4WD switch (C) to hang freely, if machine is equipped with 4WD option.
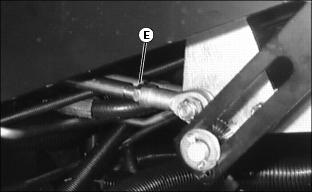
7. For all 3235B models, loosen nut (E) on ball joint located under front right side of floor board.
8. Place a 9 kg (20 lb) weight on the seat to activate the seat safety switch.
9. Start engine and run at low idle.

10. Turn large adjusting nut (D) forward and backward until drive wheels stop turning.
11. Put pedals in neutral. Depress both forward and reverse speed pedals, then release.
12. Check neutral adjustment. Repeat adjustment until drive wheels stop turning.
13. Tighten nut at ball joint end of rod assembly.
14. For 4WD units, tighten nut to hold 4WD switch in the original position.
15. Install access panel. Lower machine to the ground and test drive the machine to make sure the machine is not moving while in neutral.