![]()
Introduction
Safety Signs
Controls
Operating Machine
Operating Cutting Units
Replacement Parts
Service Machine Safely
Service Interval Chart
Service Lubrication
Service Engine Gas Units
Service Engine Diesel Units
Service Hydraulics & Transmission
Transmission and Hydraulic Oil
Check Hydraulic Oil Filter Status Indicator
Clean Hydraulic Oil Reservoir Strainer
Adjusting Transmission Neutral
Checking and Adjusting Park Brake Neutral
Service Cutting Units
Service Electrical
Service Miscellaneous
Troubleshooting
Storing Machine
Assembly
Specifications
Warranty
John Deere Service Literature
John Deere Quality Statement
Copyright© Deere & Company

Service Hydraulics & Transmission
Transmission and Hydraulic Oil
NOTE: Greensmower is filled with John Deere HY-GARD® (J20C) Transmission and Hydraulic Oil at the factory. DO NOT mix oils. DO NOT use type "F" automatic transmission fluid or J20D Low Viscosity HY-GARD®.
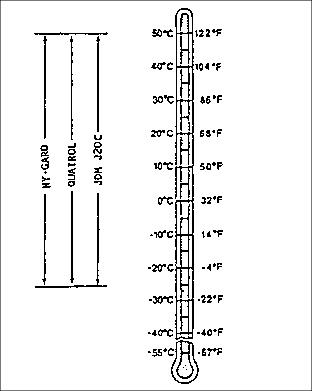
Use oil viscosity based on the expected air temperature range during the period between oil changes.
John Deere HY-GARD® Transmission/Hydraulic Oil is recommended.
Other oils may be used if they are QUATROL® oils or if they meet John Deere Standard JDM J20C.
John Deere HY-GARD® (J20C) oil is specially formulated to provide maximum protection against mechanical wear, corrosion and foaming.
Checking Hydraulic Oil Level
IMPORTANT: Avoid damage! Check oil level in reservoir tank when oil is cold. Engine must not be running. |
1. Park greensmower on a hard, level surface.
2. Lower cutting units to ground.
3. Stop engine and engage park brake.
NOTE: Check hydraulic oil level when oil is cold.
· Check oil level on sight glass (A). Oil should be maintained to a mid-level range (B) on the sight glass.
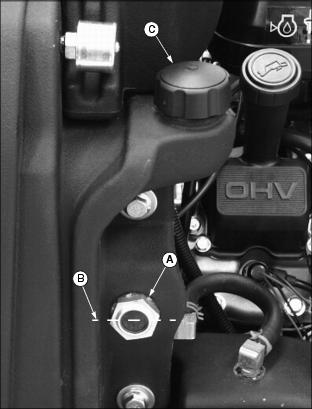
Picture Note: Engine area of liquid cooled gas model greensmower shown.
· Carefully clean area around oil reservoir fill cap (C).
· Remove reservoir cap. Add oil at reservoir fill cap location until oil level reaches mid-level range on the sight glass. (See Transmission and Hydraulic Oil in this section for the proper oil application.)
7. Install and tighten reservoir cap.
Check Hydraulic Oil Filter Status Indicator
IMPORTANT: Avoid damage! Severe or unusual conditions may require a more frequent service interval. (See Service Interval Chart for reference.) |
1. Park greensmower on a hard, level surface.
2. Lower cutting units to the ground.
3. Stop engine and engage park brake.
4. Lift and secure operator seat in the raised position.
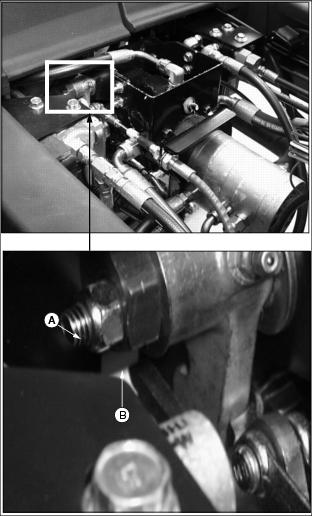
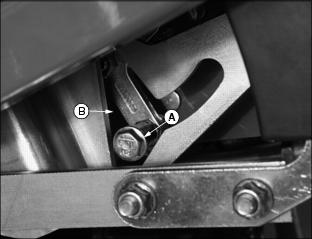
5. Locate and check hydraulic oil filter status indicator (A) just above oil filter.

· When plunger (B) inside indicator moves in direction shown by arrow and is visible inside the indicator red zone, hydraulic oil filter requires immediate service. (See Changing Hydraulic Oil Filter in this section.)
Changing Hydraulic Oil
NOTE: Refer to Service Interval Chart for break-in and routine oil change intervals.
1. Park greensmower on a hard, level surface.
2. Stop engine and engage park brake.
· Allow engine and hydraulic oil reservoirs to cool.
4. Locate drain plug (A) under left side of main oil reservoir. Locate drain plug (B) under left side of auxiliary oil reservoir.
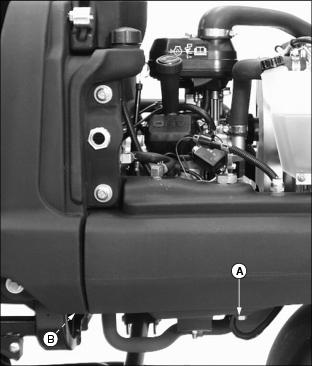
Picture Note: Engine area of liquid cooled gas model greensmower shown.
· Remove main drain plug and auxiliary tank drain plug.
· Allow oil to drain into a drain pan with at least a 20.4 L (5.4 gal) capacity.
NOTE: Apply LOCTITE®1 Thread Sealant to drain plug threads.
5. Install and tighten drain plug (A) and drain plug (B).
NOTE: Total oil capacity of hydrostatic and reel drive system is 28.8 L (7.6 gal). Capacity of hydraulic oil reservoir ONLY is 20.4 L (5.4 gal).

Picture Note: Engine area of liquid cooled gas model greensmower shown.
· Clean area around reservoir fill plug (C).
· Remove fill plug (C). Fill reservoir with oil. DO NOT overfill.
· Apply LOCTITE® Thread Sealant to main fill plug threads.
· Install and tighten fill plug.
7. Fill auxiliary oil reservoir.
· Clean area around auxiliary oil reservoir fill cap (D). Remove cap.
· Add oil at reservoir fill cap location until oil level reaches mid-level range (E) on the sight glass (F).
9. Cycle hydraulic controls for approximately one or two minutes. Check for leaks.
11. Check oil level. Add oil as necessary. (See Checking Hydraulic Oil Level in this section.)
12. Close rear engine cowling.
Changing Hydraulic Oil Filter
NOTE: Refer to Service Interval Chart for break-in and routine oil change intervals.
1. Park greensmower on a hard, level surface.
2. Stop engine and engage park brake.
· Allow engine and hydraulic oil filter to cool.
3. Lift and secure operator seat in the raised position.
4. Locate hydraulic oil filter (A) under right side of greensmower.
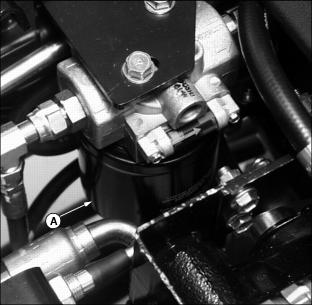
· Turn filter counterclockwise to remove.
· Apply a film of clean oil on gasket of new filter.
· Turn filter clockwise until gasket makes contact with the mounting surface. Tighten 1/2 to 3/4 turn after gasket contact.
8. Cycle hydraulic controls for approximately one or two minutes. Check for leaks.
10. Check oil level. Add oil as necessary. (See Checking Hydraulic Oil Level in this section.)
Clean Hydraulic Oil Reservoir Strainer
NOTE: Routinely clean hydraulic oil reservoir strainer when changing the hydraulic oil and filter. Strainer should be serviced when the hydraulic oil reservoir is EMPTY. Refer to Service Interval Chart for recommended service interval.
1. Change hydraulic oil and filter. (See Changing Hydraulic Oil and Changing Hydraulic Oil Filter in this section.)
2. Locate hydraulic oil reservoir strainer (A) under left side of greensmower.
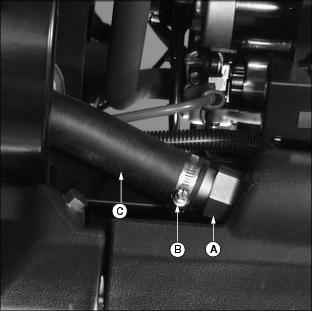
· Loosen adjustable hose clamp (B).
NOTE: Use drain pan to catch dripping oil.
· Remove rubber hose (C) from strainer.
· Loosen and remove strainer from reservoir housing.
3. Clean strainer (A) with solvent or mineral spirits.
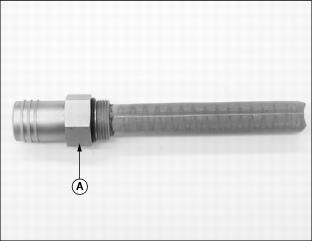
· Apply LOCTITE®2 Thread Sealant to strainer threads.
· Install strainer into reservoir housing and tighten.
· Install rubber hose (C) onto strainer.
· Install and tighten adjustable hose clamp (B).
Adjusting Transmission Neutral
NOTE: The neutral lock adjustment should be done after the transmission neutral adjustment.
Check Transmission Neutral Adjustment
· The greensmower may creep forward or backward while in neutral with engine running.
· After engine has started, release parking brake with directional speed control pedals centered. The greensmower should not move.
· If movement is detected, neutral return mechanism is adjusted incorrectly. Adjust until greensmower does not move when directional speed control pedals are in neutral position.
Transmission Neutral Adjustment
1. Park greensmower on a hard, level surface.
2. Move mow/transport lever to the TRANSPORT ) position.
3. Lower cutting units to the ground.
4. Stop engine and engage park brake.
5. Lift and secure operator seat in the raised position.
6. Lift front of greensmower so drive wheels are off the ground. Support with jack stands or wooden blocks.
8. Adjust throttle level to SLOW ) idle.
10. Loosen eccentric jam nut (A).
11. Slowly turn eccentric cam (B) clockwise or counterclockwise to stop any drive wheel rotation.
12. Hold eccentric cam and tighten eccentric jam nut.
· Depress and release forward and reverse travel pedals.
· Check turning motion of drive wheels.
· Repeat adjustment until the greensmower does not creep.
Adjust Neutral Lock
IMPORTANT: Avoid damage! Transmission neutral adjustment must be completed prior to doing this service adjustment. |
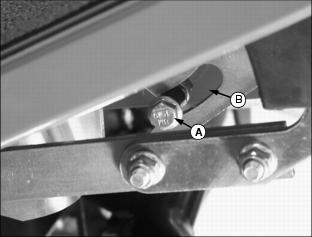
Check Position of Neutral Lock Pin
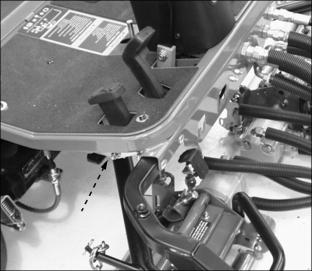
· Locate neutral lock linkage under the right side of the operator platform.
· Depress and lock park brake pedal in the first engaged position.
· The neutral lock pin (A) should be engaged into the NARROW opening of slot (B) in the FORWARD travel pedal linkage.

· When the park brake is disengaged, the neutral lock pin (A) should be in the WIDE opening of slot (B). The FORWARD travel pedal should have full forward and full reverse motion within the pedal linkage opening.
· If both of these conditions are not met, an adjustment is required.
Adjust Position of Neutral Lock Pin
1. Locate neutral lock adjustment mechanism under the right side of the operator platform.
2. Loosen jam nut (C) on the neutral lock rod.

3. Remove cotter pin (D) and flat washer (E) from the neutral lock driver arm.
4. Disconnect rod end (F) off of driver arm.
5. Install rod end (F), flat washer (E) and cotter pin (D) onto driver arm.
7. Recheck neutral lock pin engagement.
Checking and Adjusting Park Brake Neutral
Check Adjustment
1. Depress and lock park brake pedal in the first engaged position.
· The neutral lock pin (A) should be engaged into the NARROW opening of slot (B) in the FORWARD travel pedal linkage.
· The forward travel pedal should not move or should lift up slightly when the brake is engaged.
· If the drive wheels begin to creep when the brake is set, adjustment is required.
Adjust Park Brake Neutral
2. Lift front of greensmower so drive wheels are off the ground. Support with jack stands or wooden blocks.
3. Lift and secure operator seat in the raised position.
NOTE: Park brake pedal should be depressed and locked in the first engaged position.
5. Remove cotter pin (C) and clevis pin (D) connecting the cable linkage yoke (E) to the hydraulic pump lever.

· If the drive wheels begin to creep with the brake pedal locked in the first engaged position, additional adjustment is necessary. Continue adjustment process until creep is gone.