![]()
Introduction
Safety Signs
Controls
Operating Machine
Operating Mower
Replacement Parts
Service Machine Safely
Service Intervals
Service Lubrication
Service Engine
Service Hydraulics/Transmission
Service Cutting Units
Service Electrical
Service Miscellaneous
Troubleshooting
Storing Vehicle
Assembly
Specifications
Warranty
John Deere Quality Statement
Copyright© Deere & Company

Service Miscellaneous
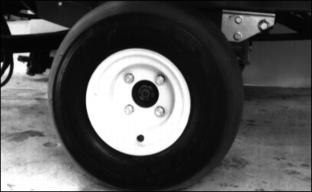
Checking Tire Pressure


2. Check tire pressure with an accurate gauge.
Correct tire pressure is between 69-83 kPa (10-12 psi)
(0.7-0.8 bar).
Refueling Machine

Fuel Specifications
· Use Grade No. 2-D fuel at temperatures above 4°C (40°F).
· Use Grade No. 1-D fuel at temperatures below 4°C (40°F).
· Use Grade No. 1-D fuel for all air temperatures at altitudes above 1500 m (5000 ft.).
· For maximum filter life, sediment and water should not be more than 0.10 per cent.
· The cetane number should be 40 minimum. If you operate your tractor where air temperatures are normally low or where altitudes are high, you may need fuel with a higher cetane number.
· Cloud Point - For cold weather operation, cloud point should be 6°C (10°F) below lowest normal air temperature.
· In winter use special winter fuel or add an anti-gelling compound to fuel to maintain its proper viscosity.
Diesel Fuel Storage
DO NOT use a galvanized container to store diesel fuel.
· Specially coated steel containers made for diesel fuel.
DO NOT use brass-coated containers, brass is an alloy of copper and zinc.
Before Filling Fuel Tank
· Remove any trash from top of fuel tank drain areas.
· Fill both fuel tanks at the end of each day's operation to prevent condensation and freezing during cold weather.
· Fuel tank capacity: 18.9 L (5 gal) per tank, 37.9 L (10 gal) total.
1. STOP engine. If engine is hot let it cool several minutes before you add fuel.

2. Remove fuel tank cap (A) slowly to allow any pressure built up in tank to escape.
3. Fill tank only to maximum fill line (B).
Adjusting Parking Brake
1. Park greensmower on level surface.

3. Adjust rod (B) to minimum length to remove looseness and still be able to replace rod in lever and install cotter pin.

5. When properly adjusted, each wheel hub should hold 250 N·m (185 ft.lb.) of torque with the brake set.
6. Remove pin (C) and lengthen the main brake rod (D) as needed to increase the brake holding torque.
NOTE: Initial setting is approximately 51 mm (2 in.) of thread below connector.

8. Adjust parking brake lock so latch (E) engages pedal (F).
9. Turn lock nut (G) to adjust.
NOTE: Initial setting is 7 mm (1/4 in.) of thread below lock nut.
Tightening Wheel Bolts
NOTE: Tighten bolts after first 10 hours of operation
and every 50 hours thereafter.
Tighten wheel bolts to 81-95 N·m (60-70 lb-ft).
Raising Hood
1. Stop the engine. Lock the parking brake.


2. Raise top of hood by pushing down on back of hood and lifting front center of hood. If this procedure is not followed the hood may fall off the hood bracket.
Raising Seat
Carefully raise and lower the seat to avoid pinching fingers. |

· Lift seat (A) all the way up.

· Be sure push nut (B) is seated in notch (C).