![]()
Introduction
Safety Signs
Controls
Operating Machine
Operating Mower Deck
Lawn Care
Replacement Parts
Service Machine Safely
Service Interval Chart
Service Engine
Engine Warranty Maintenance Statement
Changing Engine Oil And Filter
Checking Air Filter Restriction Indicator
Service Transmission
Service Steering And Brakes
Service 48 & 54 Inch Mower Deck
Service 60 Inch Mower Deck
Service Electrical
Service Miscellaneous
Removing 48 & 54 Inch Mower Deck
Removing 60 Inch Mower Deck
Installing 48 & 54 Inch Mower Deck
Installing 60 Inch Mower Deck
Troubleshooting
Storing Machine
Assembly
Specifications
Warranty
John Deere Service Literature
John Deere Quality Statement
Copyright© Deere & Company

Service Engine
Engine Warranty Maintenance Statement
Maintenance, repair, or replacement of the emission control devices and systems on this engine, which are being done at the customers expense, may be performed by any nonroad engine repair establishment or individual. Warranty repairs must be performed by an authorized John Deere dealer.
Avoid Fumes
· If it is necessary to run an engine in an enclosed area, use an exhaust pipe extension to remove the fumes. |
Engine Oil

Use oil viscosity based on the expected air temperature range during the period between oil changes.
The following John Deere oils are PREFERRED:
· TORQ-GARD SUPREME®-SAE 5W-30.
The following John Deere oils are also recommended, based on their specified temperature range:
Other oils may be used if above John Deere oils are not available, provided they meet one of the following specifications:
· SAE 15W-40-API Service Classification CF-4 or higher;
· SAE 10W-30-API Service Classification CF or higher;
· SAE 30-API Service Classification CF or higher.
If diesel fuel with sulfur content greater than 0.5% is used, reduce the service interval for oil and filter by 50%.
Checking Engine Oil
1. Park Front Mower on a level surface.
3. Lift and open the engine cover.
4. Unscrew dipstick (A) and remove from engine. Wipe off oil from lower end with clean cloth.
5. Insert the dipstick back into engine, but do not tighten it; let the dipstick threads rest on top of the tube.
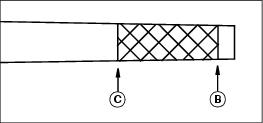
6. Remove the dipstick. Check the oil level. Oil should be between the add mark (B), and full mark (C) on the dipstick. Do not fill above the full mark (C).
IMPORTANT: Avoid damage! If oil is below the add mark (B), do not run the engine until oil can be added. |
7. Add oil if necessary. See "Engine Oil" above.
8. Install and tighten dipstick. Lower hood.
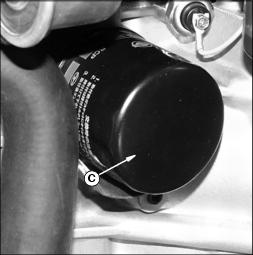
Changing Engine Oil And Filter
1. Park the Front Mower on a hard, level surface.
2. Lock the park brake. Stop the engine.
4. Put an oil pan under the drain tube (A).
5. Loosen the drain fitting (B).
6. Remove the engine oil filter (C) by unscrewing it counterclockwise.
7. Clean oil from engine at oil filter sealing surface.
8. Put a film of oil on the gasket of the new filter.
9. Install the new filter. Turn the filter until the gasket contacts the mounting surface. Then turn the filter by hand 3/4 turn more.
10. Tighten the drain fitting. Do not overtighten the fitting. Remove the drain pan.
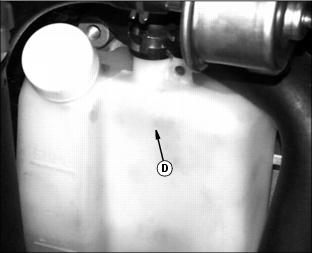
11. Unscrew and remove the dipstick (D).

12. Pour the new engine oil into the dipstick tube. Engine oil capacity (without filter) is 2.27 L (2.4 qt).
13. Run the engine at half speed.
14. Stop the engine. Check for leaks around the filter and drain fitting.
Replacing Fuel Filter
To help prevent fire and/or explosion: |
NOTE: Change filter when fuel is low in fuel tank.
1. Park tractor on a level surface.
2. Stop engine. Remove key. Let engine cool.
4. Turn the fuel shutoff pointer to the rear to the closed position.
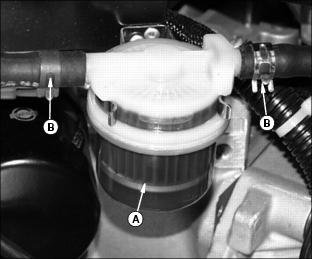
5. To change the fuel filter (A):
· Use pliers to open and slide hose clamps (B) away from the filter. Pull hoses from the filter.
· Install the new filter with the arrow on the filter body pointing toward the fuel injection pump (rear of engine).
6. Turn the fuel shutoff valve (C) straight up to the open position.

7. Start engine and check for leaks.
Checking Air Filter Restriction Indicator
1. Open engine cover and locate air filter restriction indicator on air filter housing.

2. Check the clear band at the center of the indicator (B) for the red indicator band. If red band is beginning to show, air filter(s) are partially clogged. (Primary element begins to clog first.) If red band is completely filling the clear band, both primary and secondary air filter elements may be clogged.
3. Reset indicator by pressing button (C) on top of housing.
Servicing Air Cleaner
IMPORTANT: Avoid damage! If Front Mower is operated in dusty conditions, check the air filter restriction indicator daily. Do not run the engine without the air cleaner elements. |
2. Push wire spring clips (A) outward and unhook from air cleaner housing.
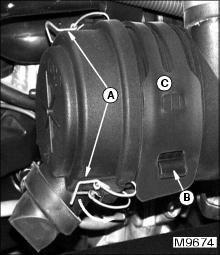
NOTE: It may be necessary to unhook rubber hold-down strap (B) and pull air cleaner housing away from engine to unhook wire spring clips (A).
3. Remove the air cleaner cover (C) from housing.
4. Pull the primary element (D) and the secondary element (E) from the air cleaner housing.

5. Replace the elements making sure the open ends are installed towards the engine.
6. Install the air cleaner cover keeping the arrow stamped on the end facing up.
7. Hook rubber strap back down, if removed.
Service Cooling System Safely
Engine Coolant
Use ethylene glycol base coolant. These coolants usually have labels stating "For Automobile and Light Duty Service." These products are also often labeled for use in aluminum engines. Check container label before using.
IMPORTANT: Avoid damage! To prevent engine damage, do not use pure antifreeze or more than 50% antifreeze in the cooling system. Do not mix or add any other type additives to the cooling system. |
Mix approximately 50 percent antifreeze with 50 percent distilled or deionized water. This mixture will provide freeze protection to -37° C (-34° F).
Certain geographical areas may require lower temperature protection. See the label on your antifreeze container or consult your John Deere dealer to obtain the latest information and recommendations.
The recommended antifreeze provides:
· Corrosion-resistant environment within the cooling system.
· Compatibility with cooling system hose and seal material.
· Protection during cold and hot weather operations.
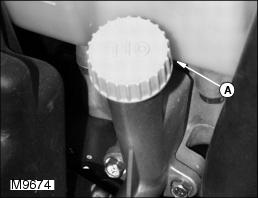
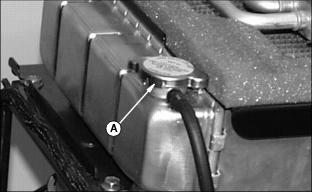
Checking Coolant Level
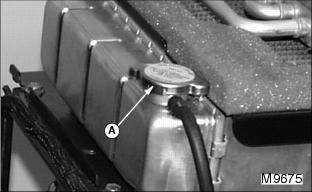

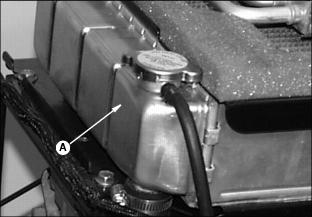
2. Check the coolant level when the engine is cool. Do not remove the radiator cap (A) when the engine is hot.
3. Remove radiator cap. Coolant level should be less that 3/8 in. (10 mm) below bottom of filler cap neck (B). If not, fill to this level. Replace radiator cap.
4. Check coolant level in coolant recovery tank. Level should be between the low (C) and full (D) marks on the side of tank.

5. If coolant is low, remove the recovery tank cap (E).
6. Add a solution of 50% ethylene glycol antifreeze (without stop-leak additive) and 50% water to the correct level.
7. Install and tighten the tank cap.
8. If necessary, clean debris from the air intake screen and radiator.
9. Check the condition of the hoses and clamps. Check for leaks or loose connections. Check overflow hose (F) is not touching the bottom of the recovery tank
10. Recheck coolant level in recovery tank after engine has been run up to operating temperature, then allowed to cool.
Draining Cooling System
1. Stop engine. Let engine and cooling system cool down to room temperature.
3. Cover radiator cap (A) with a rag, then turn cap counterclockwise to first stop. Allow cap to raise up to release all pressure. Press down on cap slightly and continue to turn counterclockwise until second stop is reached.
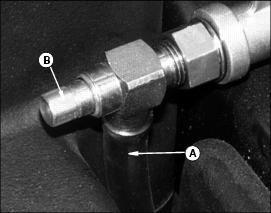
4. Place drain pan under left side of engine.
5. Locate drain screw (B) on water pump housing. Remove screw and drain coolant into pan. Alternatively, loosen lower radiator hose clamp (C) on water pump housing, and pull hose from engine.

6. Drain coolant recovery tank using a suction gun or by removing tank from engine block and pouring out.
7. Replace drain screw (or lower radiator hose) onto thermostat housing.
8. Flush the cooling system. (See "Flushing Cooling System" in this section.)
Flushing Cooling System
IMPORTANT: Avoid damage! To prevent engine damage, do not pour water into a hot engine. Do not operate engine without coolant. |
1. Drain cooling system and fill with clean water and John Deere Cooling System Cleaner, or John Deere Cooling System Quick Flush or equivalent. Follow directions on can.
2. Install and tighten radiator cap (A).
3. Start and run engine until it reaches operating temperature.
4. Drain cooling system immediately before rust and dirt settle.
5. Install and tighten drain plug or lower radiator hose.
6. Fill cooling system. (See "Filling Cooling System" in this section.)
Filling Cooling System
· Use a solution of only ethylene glycol antifreeze (without a stop-leak additive) and clean, soft water.
· A chart on antifreeze container tells how much antifreeze to use for freeze protection needed in your area.
2. When operating engine in extremely cold temperatures:
· See your John Deere dealer for information on arctic operation.
3. For temperatures above freezing:
· Fill cooling system with clean, soft water and John Deere Engine Coolant Conditioner.
4. John Deere Cooling System Sealer or its equivalent may be added to radiator to seal leaks. Do not use any other additives in cooling system.
5. Install and tighten radiator cap.
6. Run engine until it reaches operating temperature.

8. After engine cools, check coolant level in recovery tank (A):
· When engine is hot, coolant level should be to full mark (B) on recovery tank.
· When engine is cold, coolant level should not drop below low mark (C) on recovery tank.
9. Remove cap (D) to add coolant if necessary.
10. Check condition hoses. Install new hoses if rubber becomes cracked or spongy. Check that end of overflow hose (E) is just above bottom of tank.
11. Tighten hose clamps regularly.
Cleaning Radiator
Cleaning Radiator With Engine Running
1. Lower engine speed to slow idle (t) position.
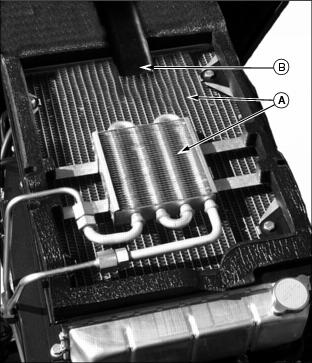
4. Using gloves, clean grass and debris from top of radiator and oil cooler (A), and from air intake on front of engine cover.
5. Lower engine cover and allow engine to run at slow idle for five minutes until cool.
6. Resume mowing or stop engine.
Cleaning Radiator With Engine Off
1. Allow engine to cool before cleaning.
2. Open engine cover and clean grass and debris from top of radiator and oil cooler (A), and from air intake on front of engine cover.
3. Cover opening of air intake tube to air cleaner (B) with a rag or plastic bag.
4. Using low pressure water or compressed air, clean out debris from between fins on radiator and oil cooler, and between oil cooler and radiator.