![]()
Introduction
Safety Signs
Controls
Operating Machine
Operating Mower Deck
Lawn Care
Replacement Parts
Service Machine Safely
Service Interval Chart
Service Engine
Service Transmission
Service Steering And Brakes
Service 48 & 54 Inch Mower Deck
Avoid Injury From Contacting Blades
Checking The Mower Gearbox Oil Level
Checking The PTO Gearbox Oil Level
Changing The Mower Deck Gearbox Oil
Lubricating The Caster Wheel Bearings And Spindles
Lubricating The Mower Deck Spindles
Lubricating The Driveline U-joints And Spline
Removing And Installing The Belt Shields
Balancing And Installing The Blades
Service 60 Inch Mower Deck
Service Electrical
Service Miscellaneous
Removing 48 & 54 Inch Mower Deck
Removing 60 Inch Mower Deck
Installing 48 & 54 Inch Mower Deck
Installing 60 Inch Mower Deck
Troubleshooting
Storing Machine
Assembly
Specifications
Warranty
John Deere Service Literature
John Deere Quality Statement
Copyright© Deere & Company

Service 48 & 54 Inch Mower Deck
Avoid Injury From Contacting Blades

Grease
Use the following grease based on the air temperature range. Operating outside of the recommended grease air temperature range may cause premature failures.
IMPORTANT: Avoid damage! ONLY use a quality grease in this application. DO NOT mix any other greases in this application. DO NOT use any BIO-GREASE in this application. |
The following John Deere grease is preferred:
· TY6341 Multi-Purpose Super Duty High-Temperature EP POLYUREA Grease. NLGI Grade 2.
Other greases may be used if above preferred John Deere grease is not available, provided they meet the following specification:
· John Deere Standard JDM J13E4, NLGI Grade 2.

Mower Deck Gearbox Oil
Use the appropriate oil viscosity based on the air temperature ranges. Operating outside of these recommended oil air temperature ranges may cause premature gear case failure.
IMPORTANT: Avoid damage! ONLY use a quality oil in this gear case. DO NOT mix any other oils in this gear case. DO NOT use BIO-HY-GARD® in this gear case. |
The following John Deere gear case oil is PREFERRED:
· GL-5 GEAR LUBRICANT®-SAE 80W-90.
The following John Deere gear case oil is also recommended if above preferred oil is not available:
· GL-5 GEAR LUBRICANT®-SAE 85W-140.
Other gear case oils may be used if above recommended John Deere gear case oils are not available, provided they meet the following specification:
· API Service Classification GL-5.

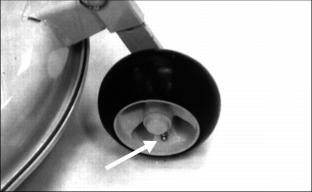
Checking The Mower Gearbox Oil Level
1. Lower deck, stop the engine. Wait until the gearbox is cool.
2. Remove the check plug (A) from either side of the gearbox.
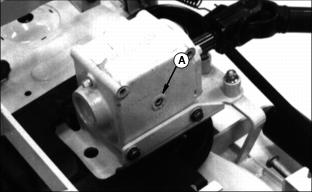
3. Oil should drain from the plug hole.
4. If not, pour or squirt oil through the check plug hole until the oil runs out of the hole.
5. Install plug. Wipe up any spilled oil.
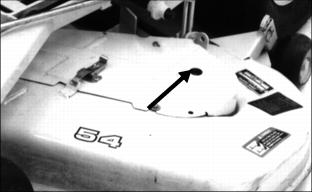
Checking The PTO Gearbox Oil Level
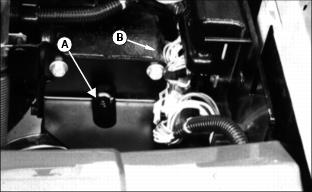
2. Lift the seat to the second position.
3. Remove the check plug (A). Oil should flow from the plug hole.
4. If not squirt oil through the check plug hole, OR remove the fill plug (B) and squirt oil through the fill plug hole.
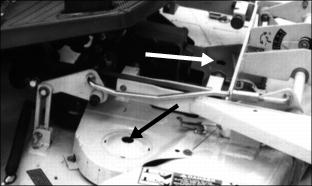
Changing The Mower Deck Gearbox Oil
1. STOP the engine. Wait until the gearbox is cool.
2. Lift the seat platform to the highest position.
3. Remove the driveline coupler from the vehicle's PTO gearbox shaft.
4. Remove the three mower deck belt shields. Use a spring puller to remove the end of the mower belt tension spring from its bracket.
5. Remove the two cap screws (A) from in front of the gearbox.

6. Remove the two bolts (B) and spacers from the rear of the gearbox.
7. Remove the gearbox and driveline from the belt and the mower.
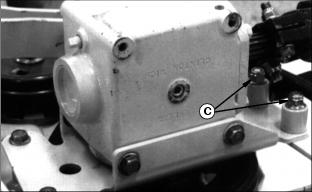
8. Remove a check plug (C) from either side of the gearbox.
9. Turn the gearbox on it's side to drain it. After the oil has drained, turn the gearbox right side up.
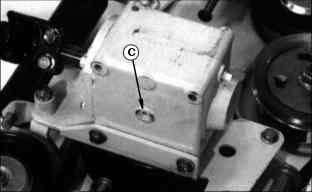
10. Pour or squirt oil through the fill plug hole until the oil runs out of the check plug hole.
11. Install the plugs in the gearbox.
12. Install the gearbox on the mower. Install the belt on the gearbox sheave as you install the gearbox.
13. Tighten the cap screws and bolts to 70 N·m (50 lb-ft).
14. Connect the coupler to the vehicle gearbox shaft.
15. Use a spring puller to install the end of the spring in its bracket.
Lubricating The Caster Wheel Bearings And Spindles
Lubricate the wheel bearings and spindle bushings on each front caster wheel assembly, using recommended John Deere Grease.
Lubricating The Mower Deck Spindles
Lubricate the three mower deck spindles using recommended John Deere Grease.
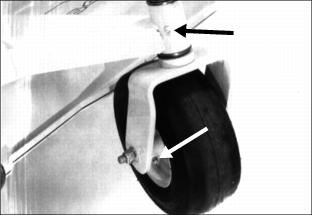
Lubricating The Gauge Wheel
Lubricate the gauge wheel axle using recommended John Deere Grease.
Lubricating The Crank Bushing
Lubricate the crank bushing grease fitting using recommended John Deere Grease.

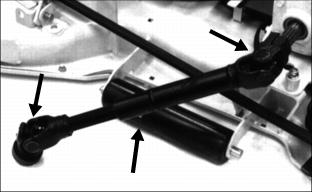
Lubricating The Driveline U-joints And Spline
Lubricate the three grease fittings on the driveline using recommended John Deere Grease.
Removing And Installing The Belt Shields

1. To remove the shields, open the three latches shown.
2. Remove the center shield first, then the other two shields.
3. Install the outer shields first, then the center shield.
Removing The Mower Belt
1. Remove the three belt shields.
2. Lower the mower all the way by turning the crank on the front of the mower.
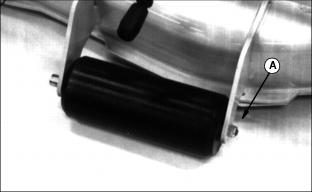
3. Use a spring puller to remove the end of the spring (A) from the mower bracket.

4. Loosen the two cap screws (B) in front of the gearbox several turns.

5. Remove the two bolts (C) and the two spacers from the rear of the gearbox.
6. Use a bar to lift and hold up the rear of the gearbox.
7. Remove the belt from under the gearbox. Lower the gearbox.
8. Remove the belt from the other sheaves and discard it.
Installing Mower Belt
1. Use a bar to lift and hold up the rear of the gearbox.
2. Install the new belt on the sheave that is under the gearbox.
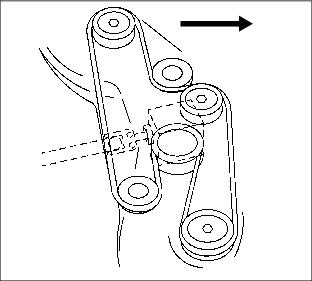
4. Use the picture at the right to help you install the belt on the other sheaves. Do not twist the belt.
5. Install the two bolts and spacers (A) at the rear of the gearbox.
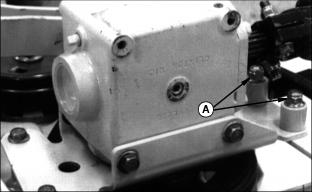
6. Tighten the two bolts to 70 N·m (50 lb-ft).
7. Tighten the two cap screws (B) in front of the gearbox.

8. Use a spring puller to install the end of the spring (C) in the bracket.

9. Install the three belt shields.
Checking The Blades

1. Put blocks in front of the mower.
3. Pull up the attachment lift lever to raise the mower deck as high as it will go.
4. Hold the lift lever up and drive the Front Mower slowly forward until you can lower the deck onto the blocks.
5. Release the Lift Lever to lower the mower onto the blocks.
6. Stop the engine. Lock the park brake.
7. Check the blades for damage and sharpness.
8. Replace blade(s) if damaged.
9. Sharpen dull blade(s). See "Sharpening Blades" in this section.

10. To remove a blade, turn the bolt (A) counterclockwise.
Replacing The Rollers
1. Turn the crank to raise the mower as high as it will go.
3. Pull the shaft out and remove the roller.
4. Install the new roller on the shaft.
5. Install and tighten the lock nut.
Sharpening Blades
1. Sharpen blades with grinder, hand file or electric blade sharpener.
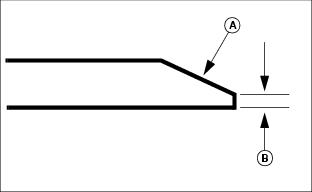
2. Keep original bevel (A) when you grind. Blade should have 0.40 mm (1/64 in.) cutting edge (B).
3. Balance the blade. (See "Balancing And Installing The Blades" in this section.)
Balancing And Installing The Blades
· Put the blade on a nail in a vise or wall. The heavy end of the blade will drop. Grind the bevel of the heavy end. Do not change the bevel.
2. Fasten blades with washers and bolts. The cup-side of the washer must be against the blade. Tighten bolts to 68-75 N·m (45-55 lb-ft).
